
Agentic Teams
Put several specialist agents behind one chat, let a supervisor route each message to the right one, and share the team with colleagues, a password link, or a widget on your website.
An Agentic Team is one chat backed by several specialist agents. You talk to the team the way you talk to a single assistant. For every message, a supervisor reads what you asked and hands it to the member best suited to answer: an account researcher, a pricing expert, a CRM lookup agent. That member works with its own tools, tables and knowledge bases, then replies in the same chat.
Use a team when the work arrives as a conversation that covers several topics, and you want one place to ask instead of picking the right agent yourself. Internal desks (a sales call co-pilot, an ops help desk) and customer-facing chats (a website concierge) are the usual cases. If the job is a fixed list of steps, build a Sequential Agent. If you want a coworker that takes on background tasks and remembers you, hire an AI Employee.
How a team answers a message
Routing happens on every message, not once per conversation. Your next message can go to a different member, and the chat keeps the full thread so each member sees what was said before.
Build a team step by step
Teams live under Build, Agentic Teams in the left navigation. The steps below follow the order you work in: create or import the team, add members, give them knowledge and tools, test it in chat, then share it.
Open the Agentic Teams list
The list shows every team in the selected workspace. Use the All andPaused tabs, the search box (name or agent), Sort, and the grid or list toggle to find a team. Each card shows the visibility, status and model, the member agents, and three numbers: Total runs, P95 runtime andCost · MTD (cost this month, with the average cost per run). The card footer hasEdit pipeline (open the editor), Run team (open the chat) andLogs (open the chat history). Tutorial plays a short walkthrough video.
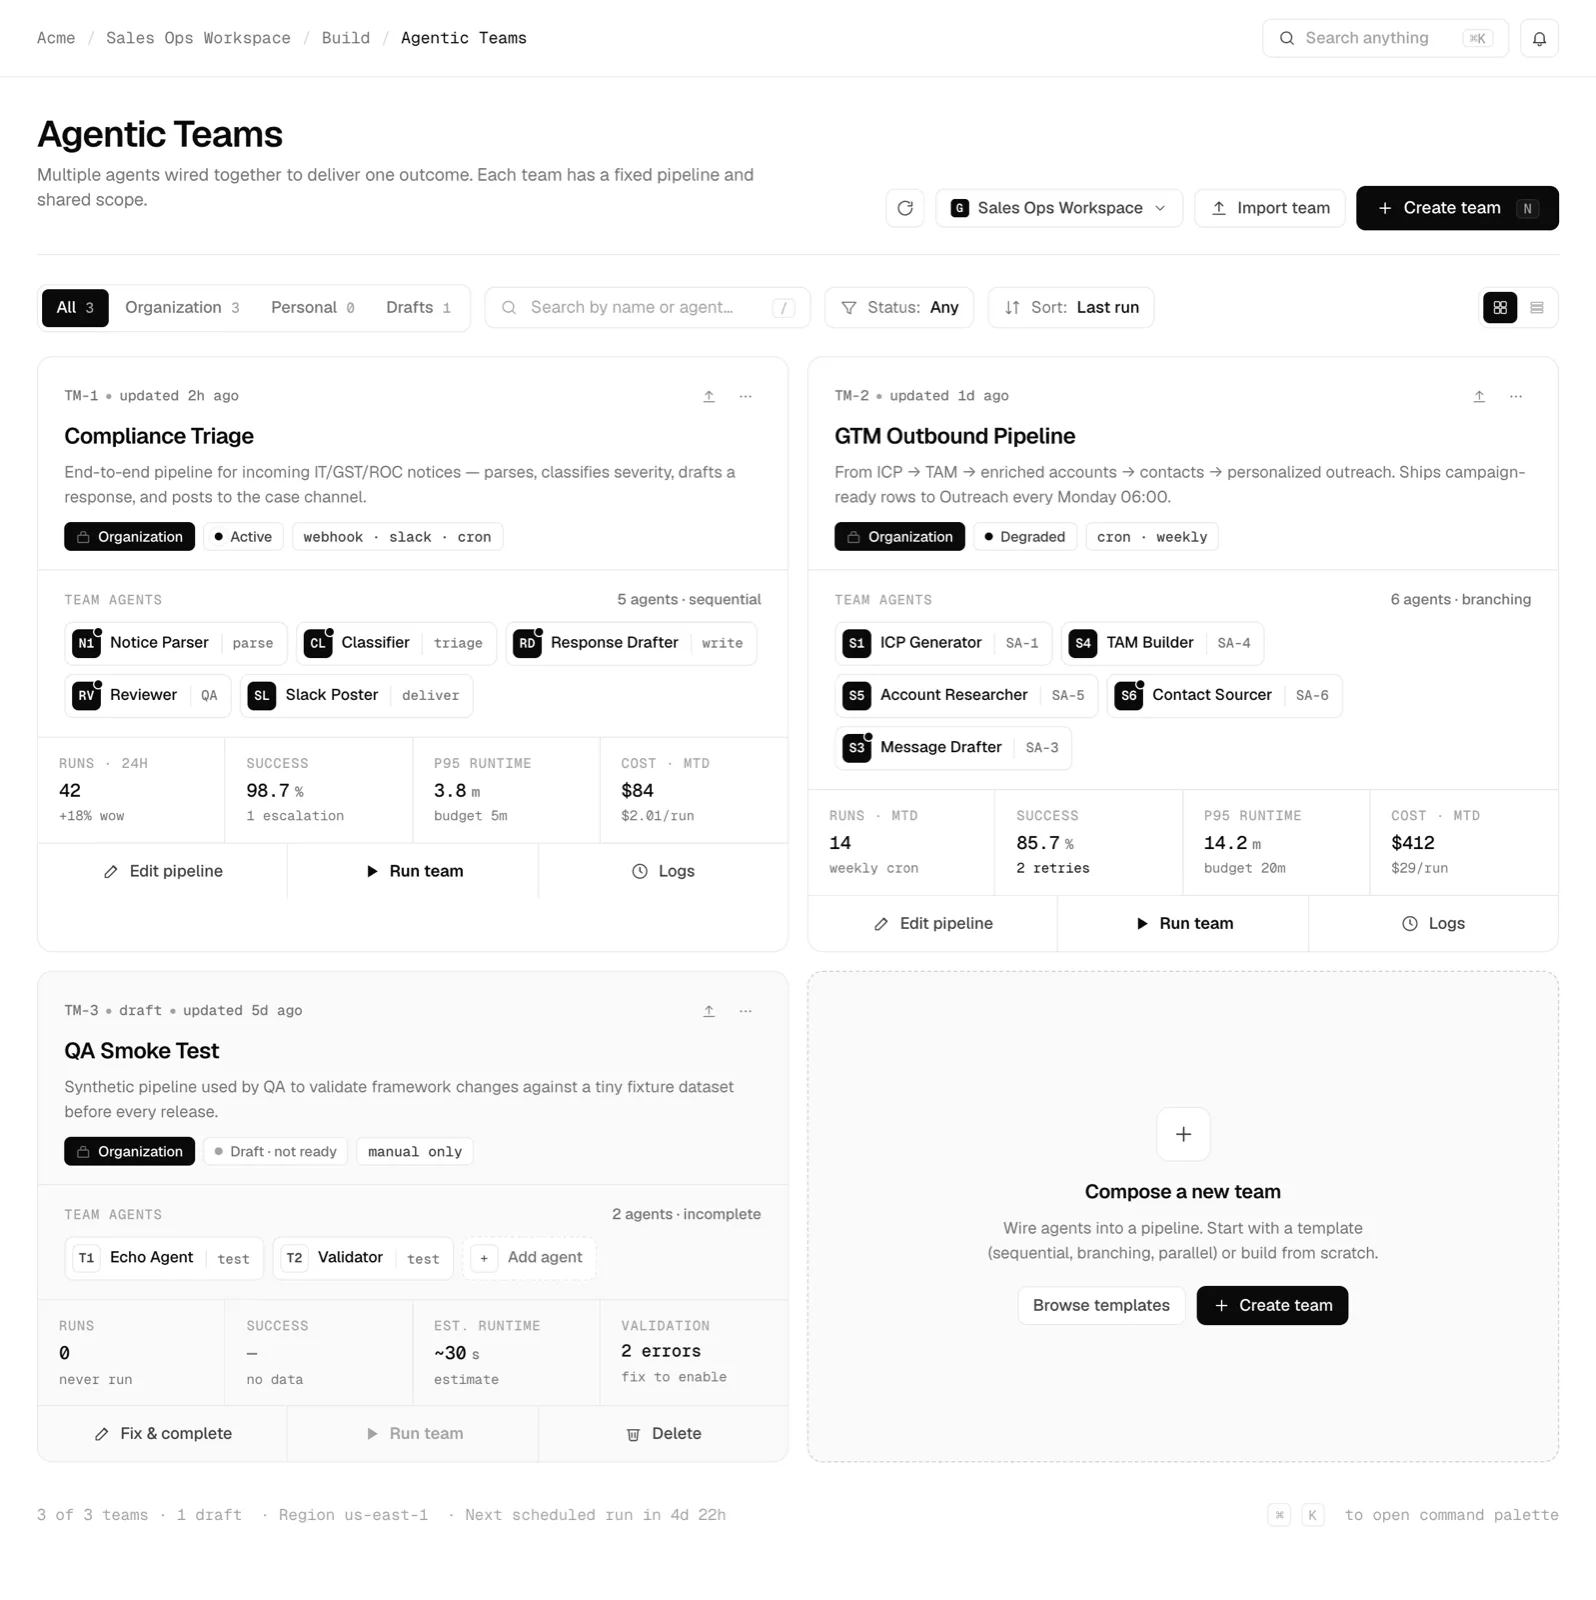
The Agentic Teams list. Each card shows the roster and this month's runs, runtime and cost.click to enlarge Import a ready-made team (optional)
Import team opens Import Team from Library: pre-built teams from official packs, partners and your organization. Filter by Official,Partner or My/Org, or by industry tag, and search by name, vertical or tag. Each card shows the model it was built on and how many agents, tables and knowledge bases come with it.
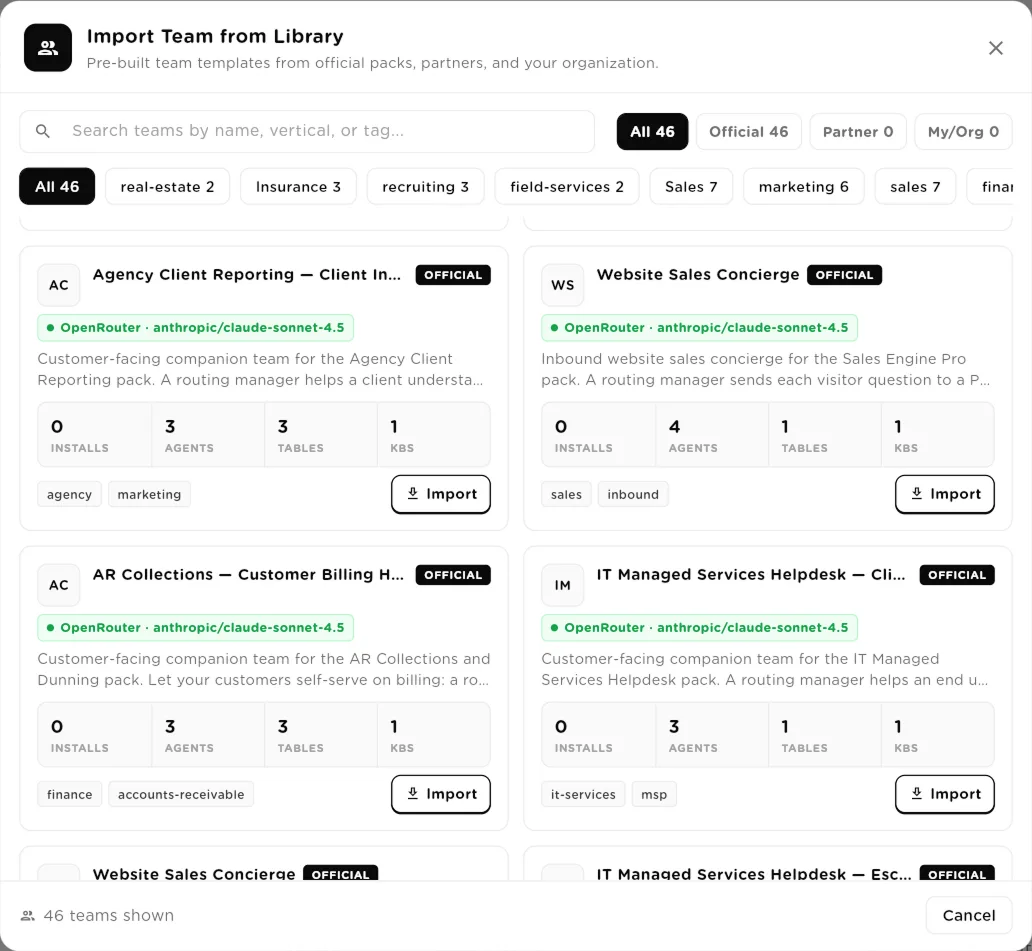
Import Team from Library: filter by source or tag, then open a template to inspect it.click to enlarge Click a template to open its detail panel. It shows an overview, the counts at a glance, whether its model is already available in your workspace, and every agent, table and knowledge base it will add. Click Import N items to install. When it finishes, chooseView team to open it or Done to stay on the list.
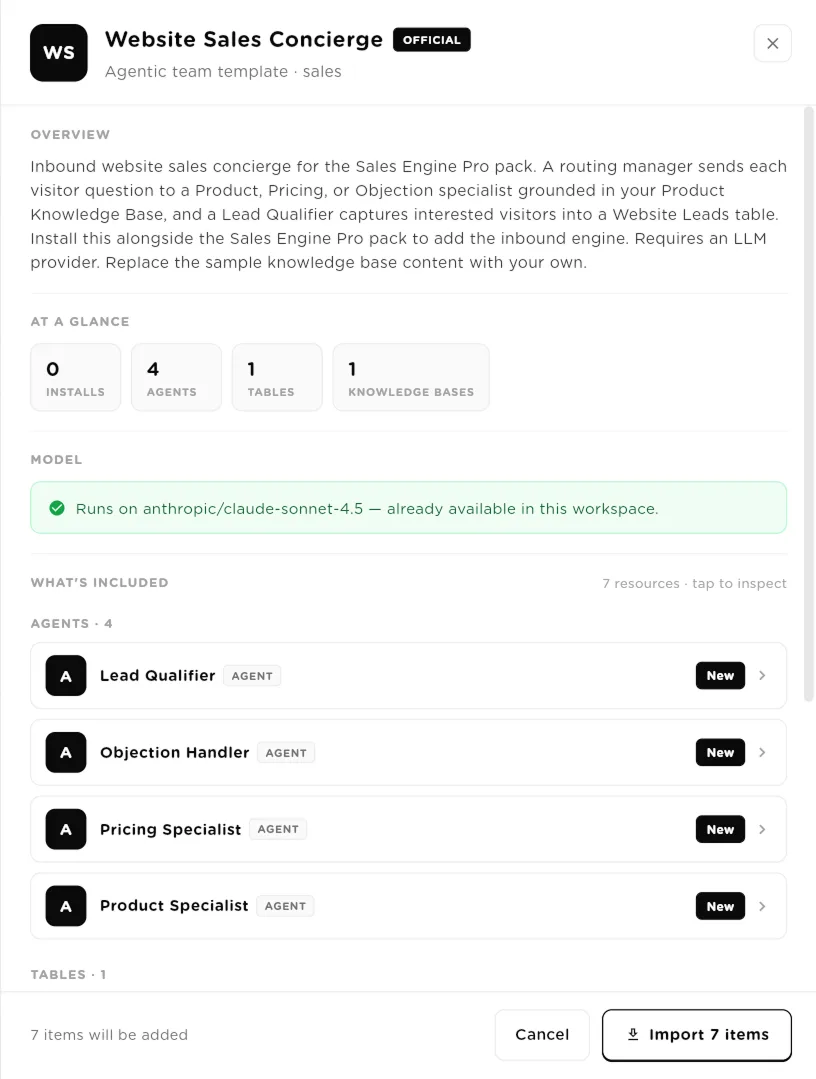
The detail panel lists everything the import will add before you commit.click to enlarge Create a team and fill in Basic Settings
Click Create team. The editor opens on Basic Settings. Enter aTeam name (required, up to 80 characters) and a Description (up to 280 characters). Write the Team Instructions: this is the system prompt the supervisor uses to coordinate the members, so name each member and say which kind of request goes to which one. Use Expand for a larger editor. Pick the LLM Providerand LLM Model the team runs on; only models connected on theModels page appear. Click Create team in the top right to save. You can add members only after the team exists.
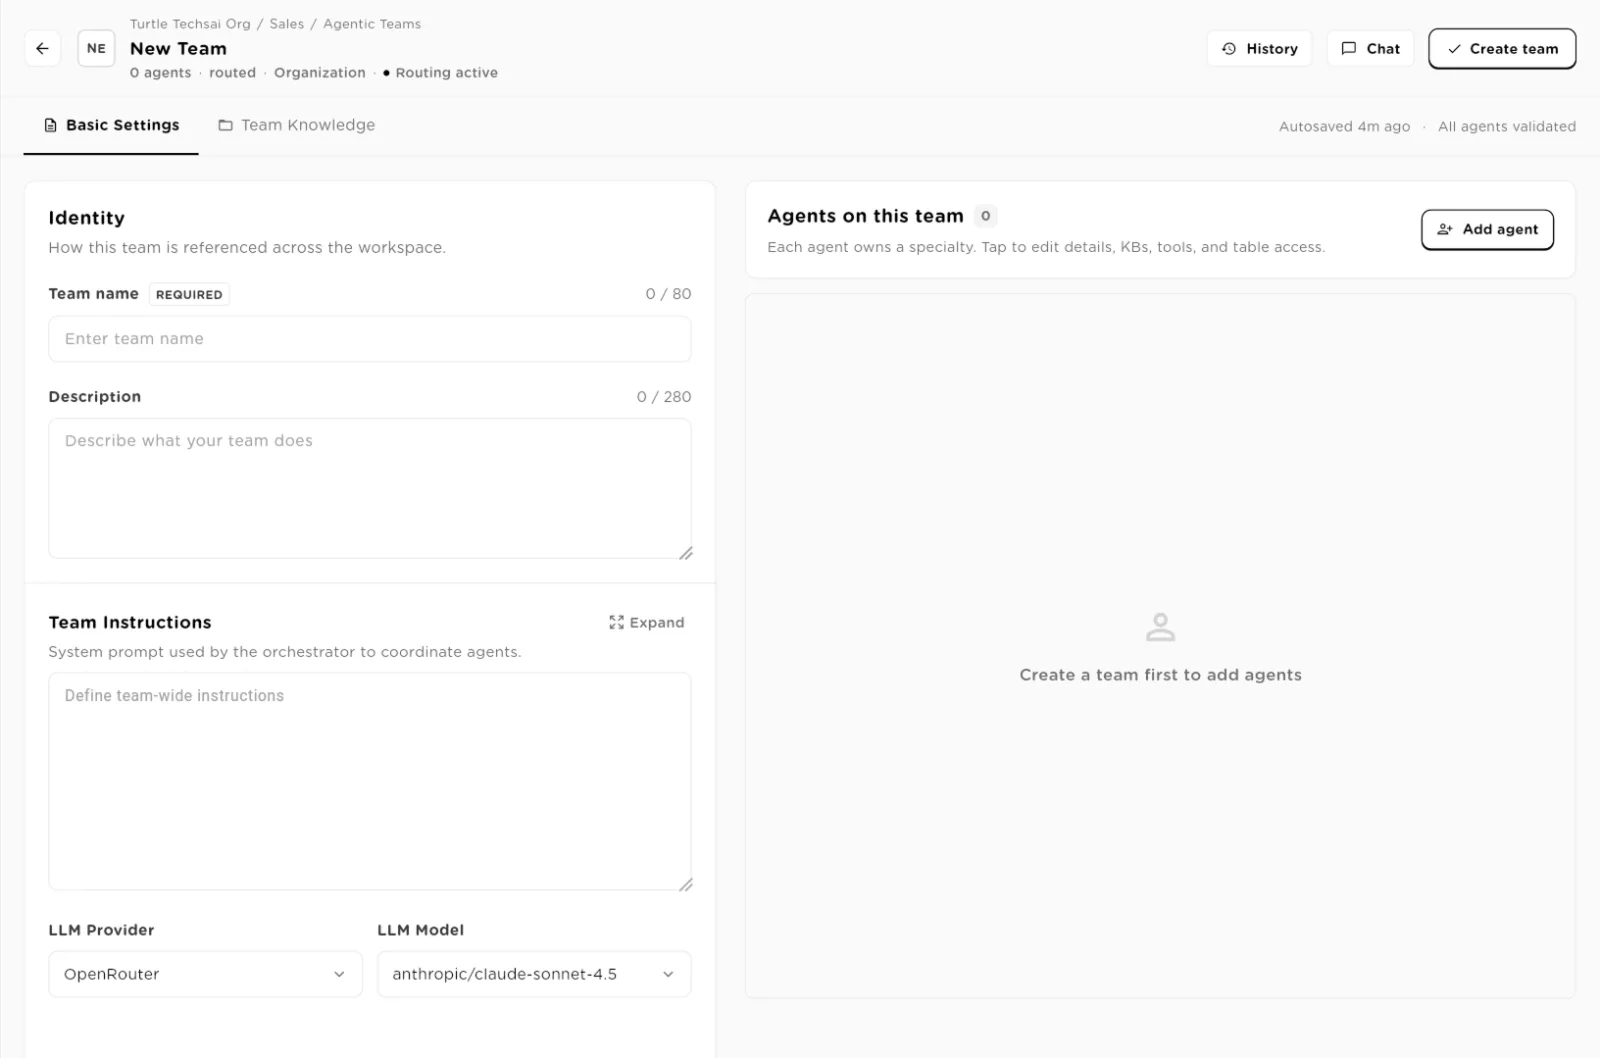
A new team: identity, the supervisor's instructions, and the model. Members come after the first save.click to enlarge Add member agents
In the Agents on this team panel, click Add agent. A four-step panel opens, and each step saves when you click Next:
- Agent details: the member's Name (required), a Description (up to 280 characters) and its Instructions (up to 4000 characters). A clear description helps the supervisor route to the right member.
- Knowledge base: tick the knowledge bases this member can search.
- Tools: three tabs. Integrations lists your connected tools, Custom tools lists your custom API tool collections, and Custom MCP servers attaches your organization's own MCP servers.
- Table access: click Add Table Access, choose tables, and set Read, Create, Update and Delete for each one.
Finish with Update agent (or the create button on a new member). Each member then appears as a numbered card showing its model and the tables, knowledge and tools it holds, with edit and delete icons.
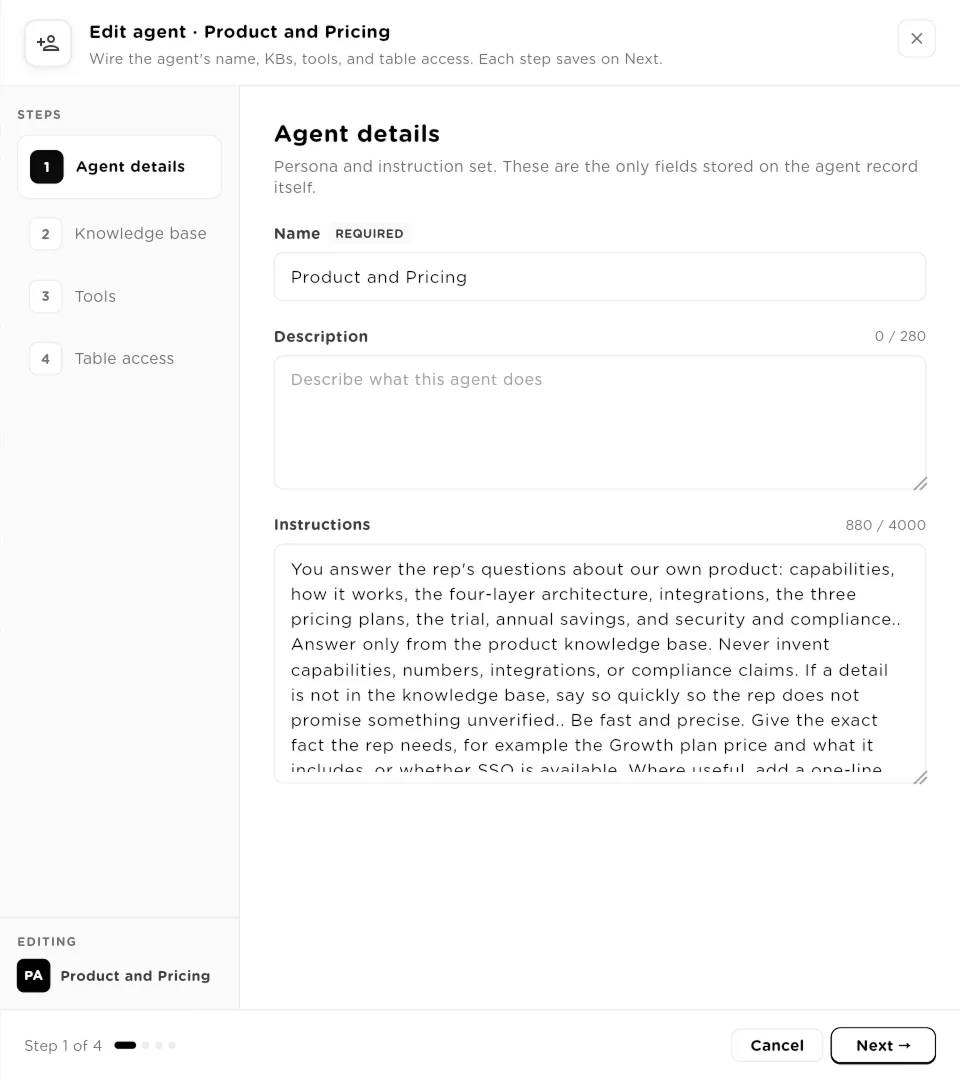
Step 1 of the member panel: name, description and instructions.click to enlarge 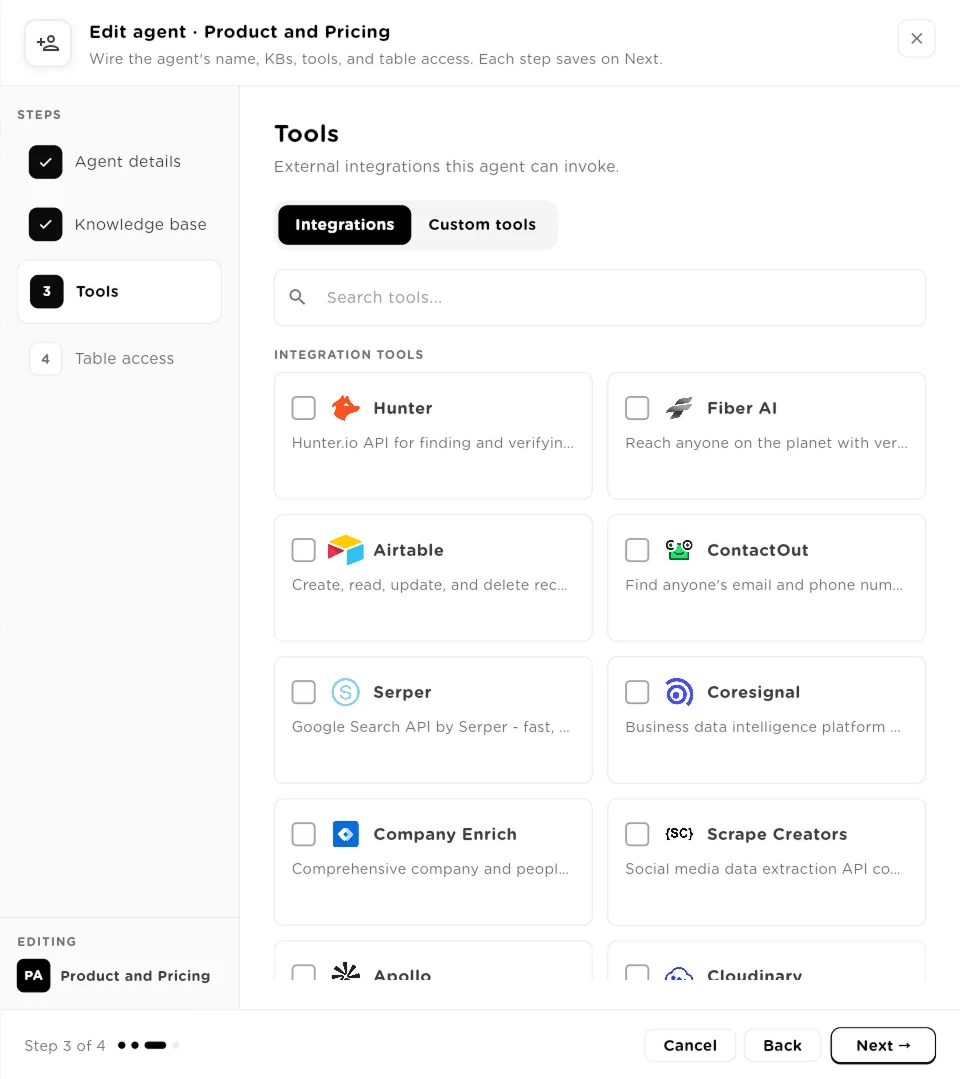
Step 3: pick integrations, custom tools, or custom MCP servers for this member.click to enlarge 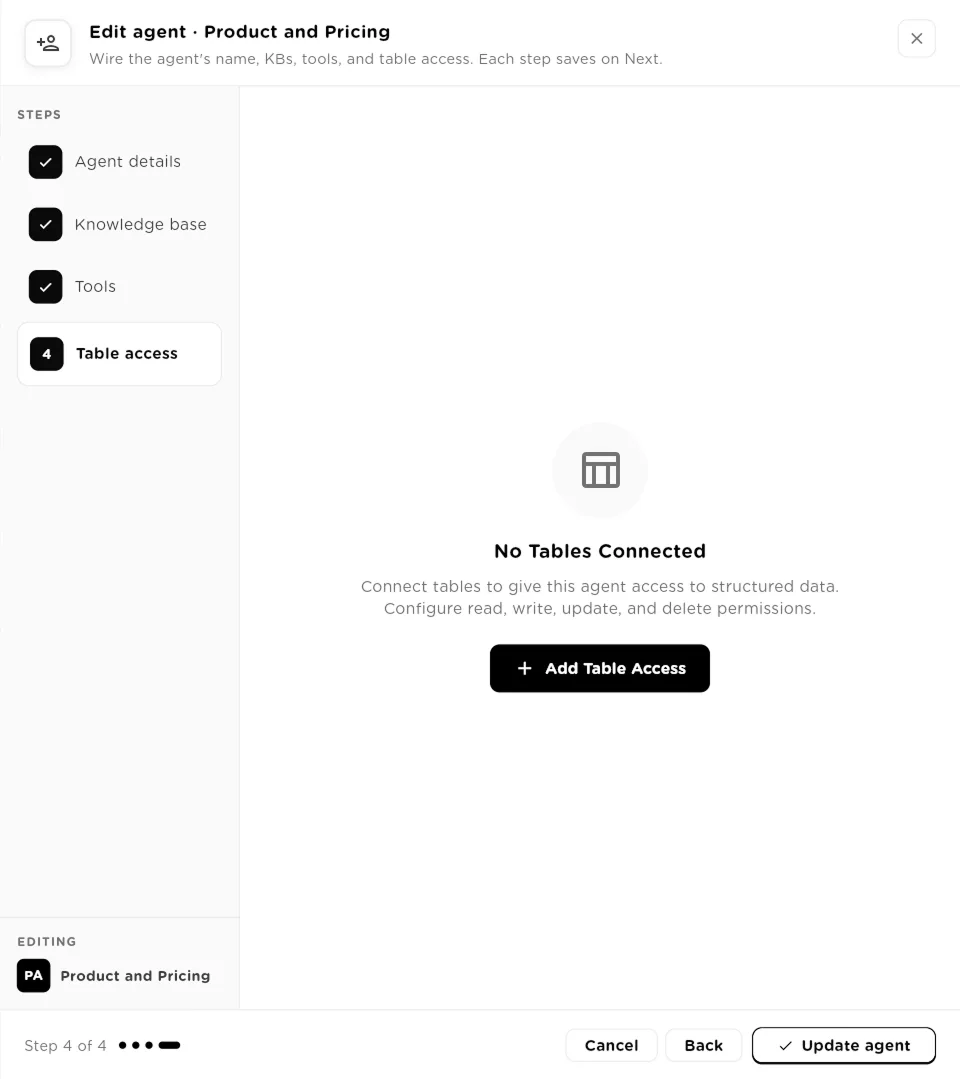
Step 4: grant table access with separate Read, Create, Update and Delete permissions.click to enlarge Generate the routing instructions
Once the team has members, the Basic Settings tab shows a Routing Status badge and aGenerate Instructions button (it reads Regenerate Instructions after the first time). It reads each member's name, description, instructions and tools and writes Team Instructions with clear routing rules and a default member. Review the text and edit it if you want. The badge turns amber when you change a member after the instructions were written, which is your cue to regenerate.
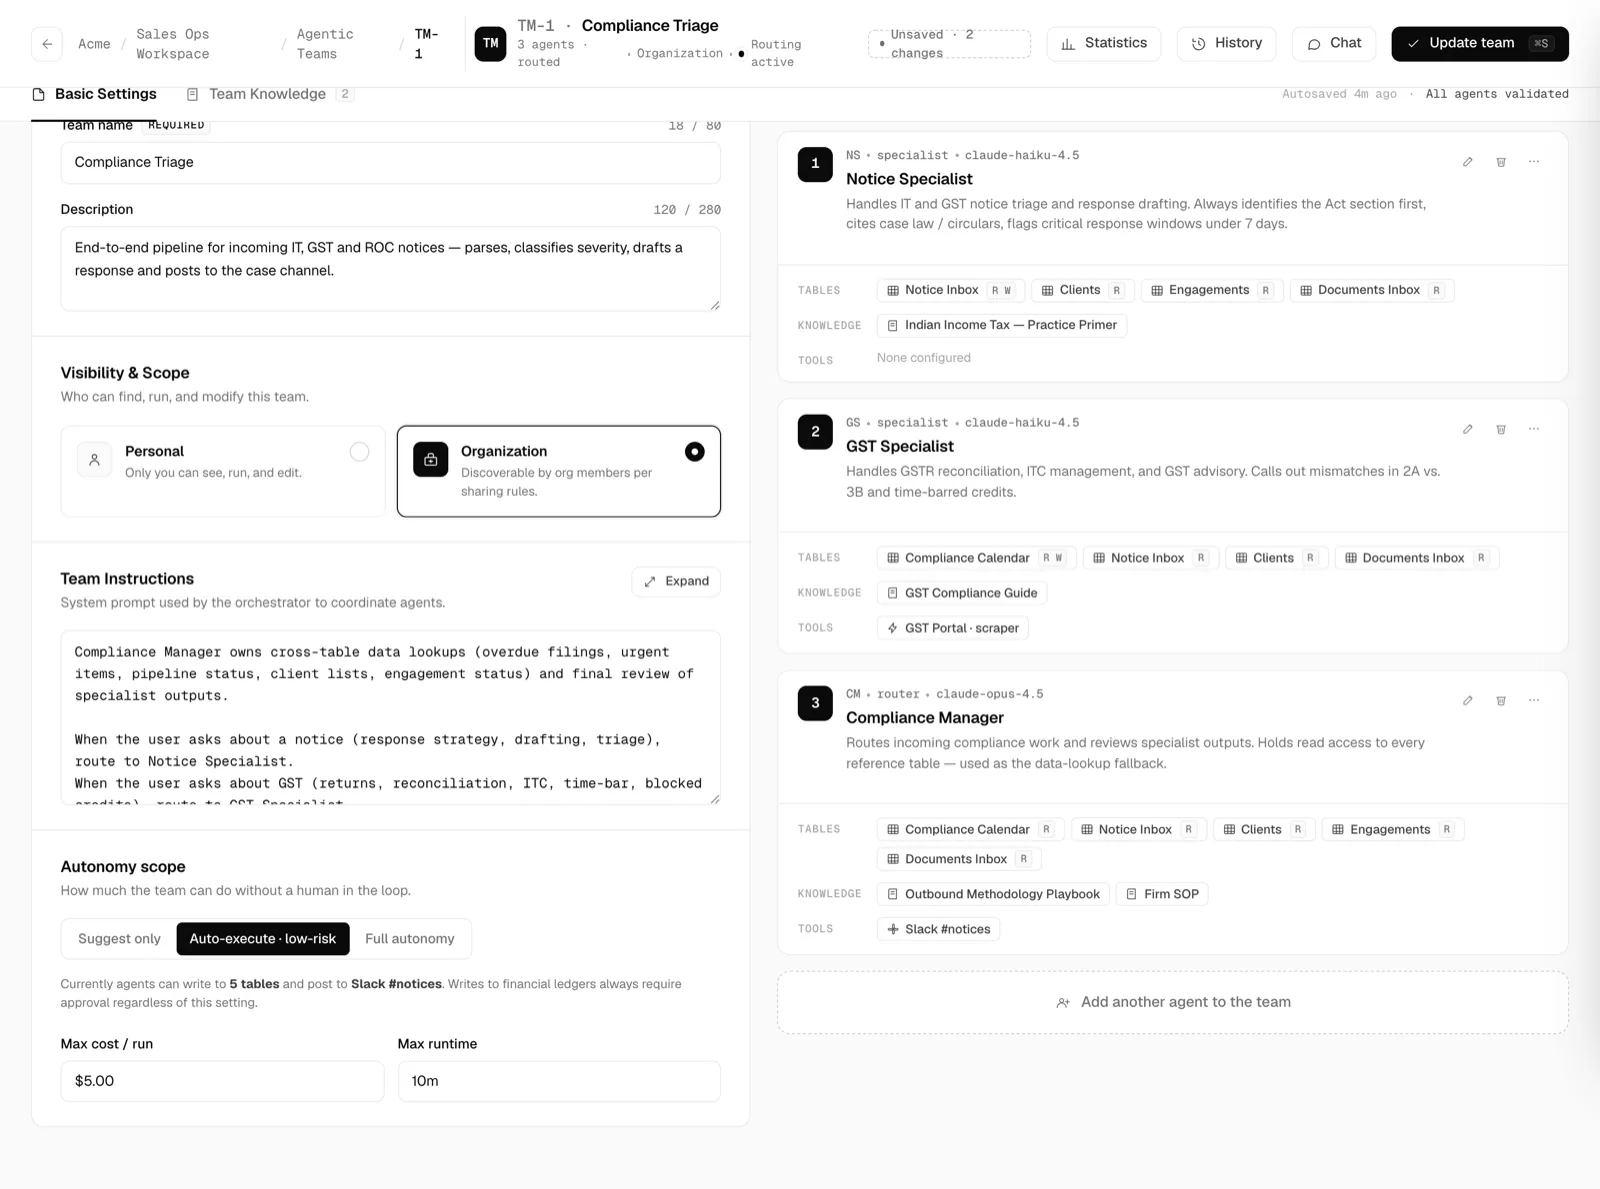
An existing team: routing status, instructions, model, and the member roster on the right.click to enlarge Attach team knowledge
Open the Team Knowledge tab to attach knowledge bases that every member can search. Tick a base under Available to move it to Attached to team, search with the box, or click Create KB to make a new one. Each row shows its documents, chunks, last sync and how many agents use it. Use team knowledge for facts the whole team needs, and a member's own knowledge base for material only that specialist should read.
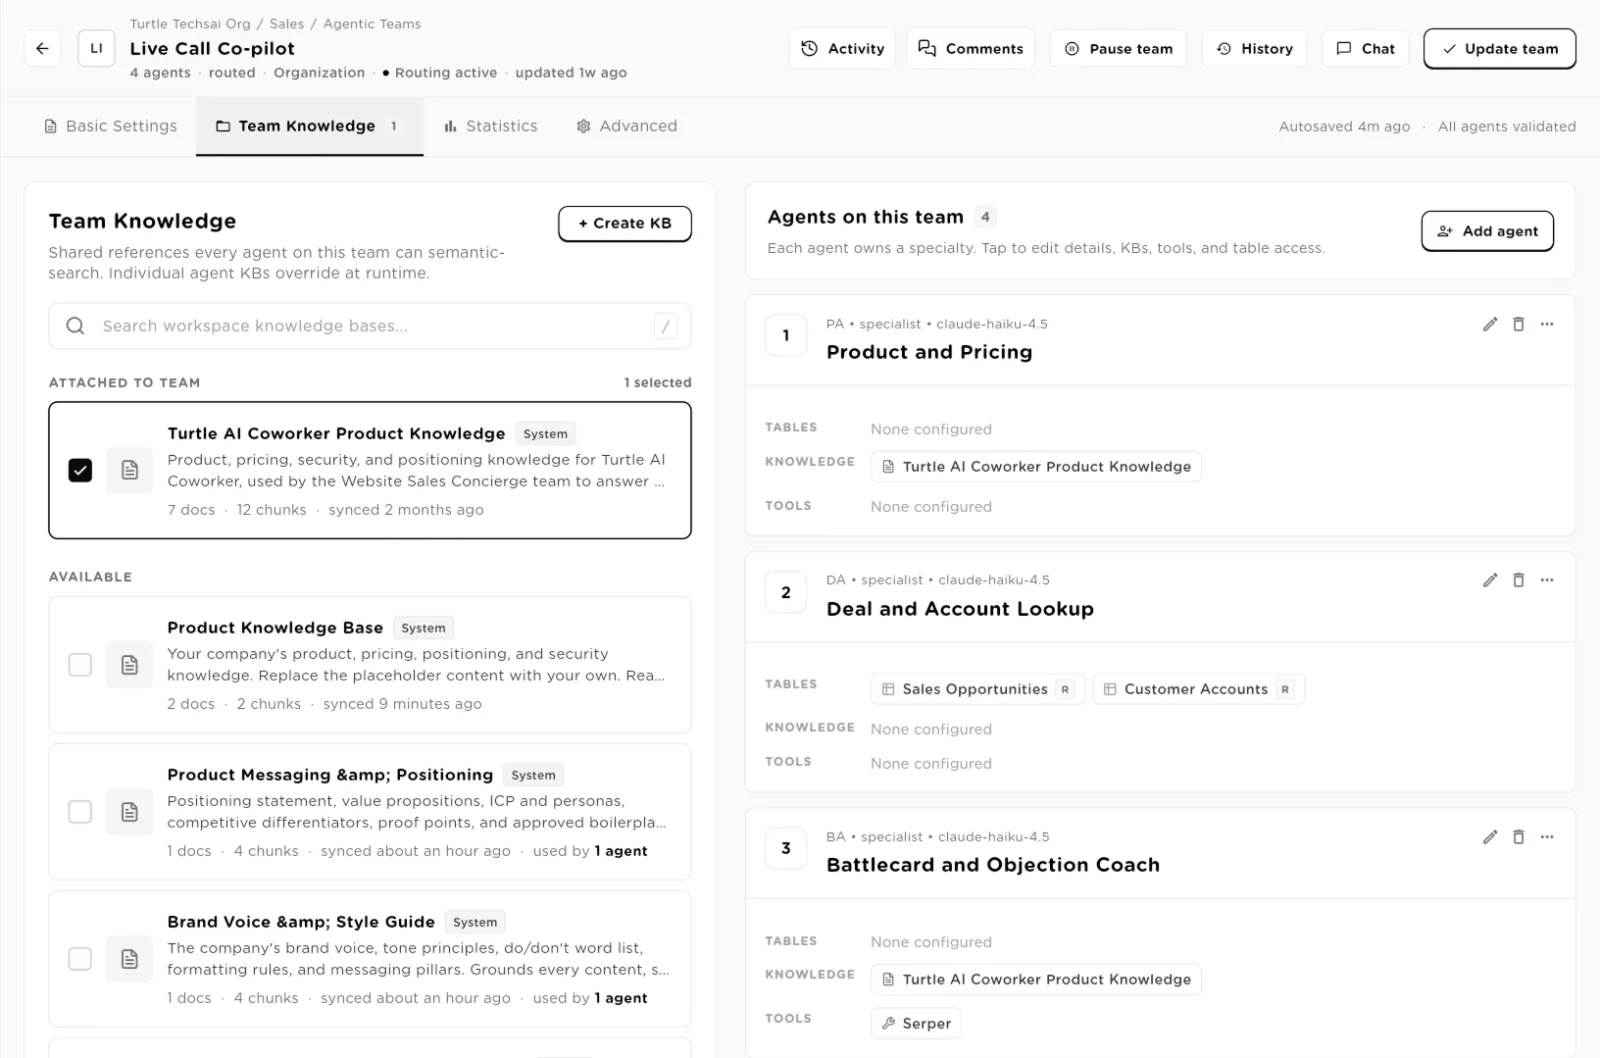
Team Knowledge: shared references every member can search.click to enlarge Chat with the team
Click Chat in the editor header (or Run team on the list). Type in the box and press Enter; Shift and Enter adds a new line. The supervisor picks a member for each message and the reply shows which member answered. The header counts Msgs, Tokens, Cost andLatency for the session. The Live audit trail on the right streams every event as it happens: which member started, each tool call and result, and each handoff.New chat starts a fresh session and History opens past ones.
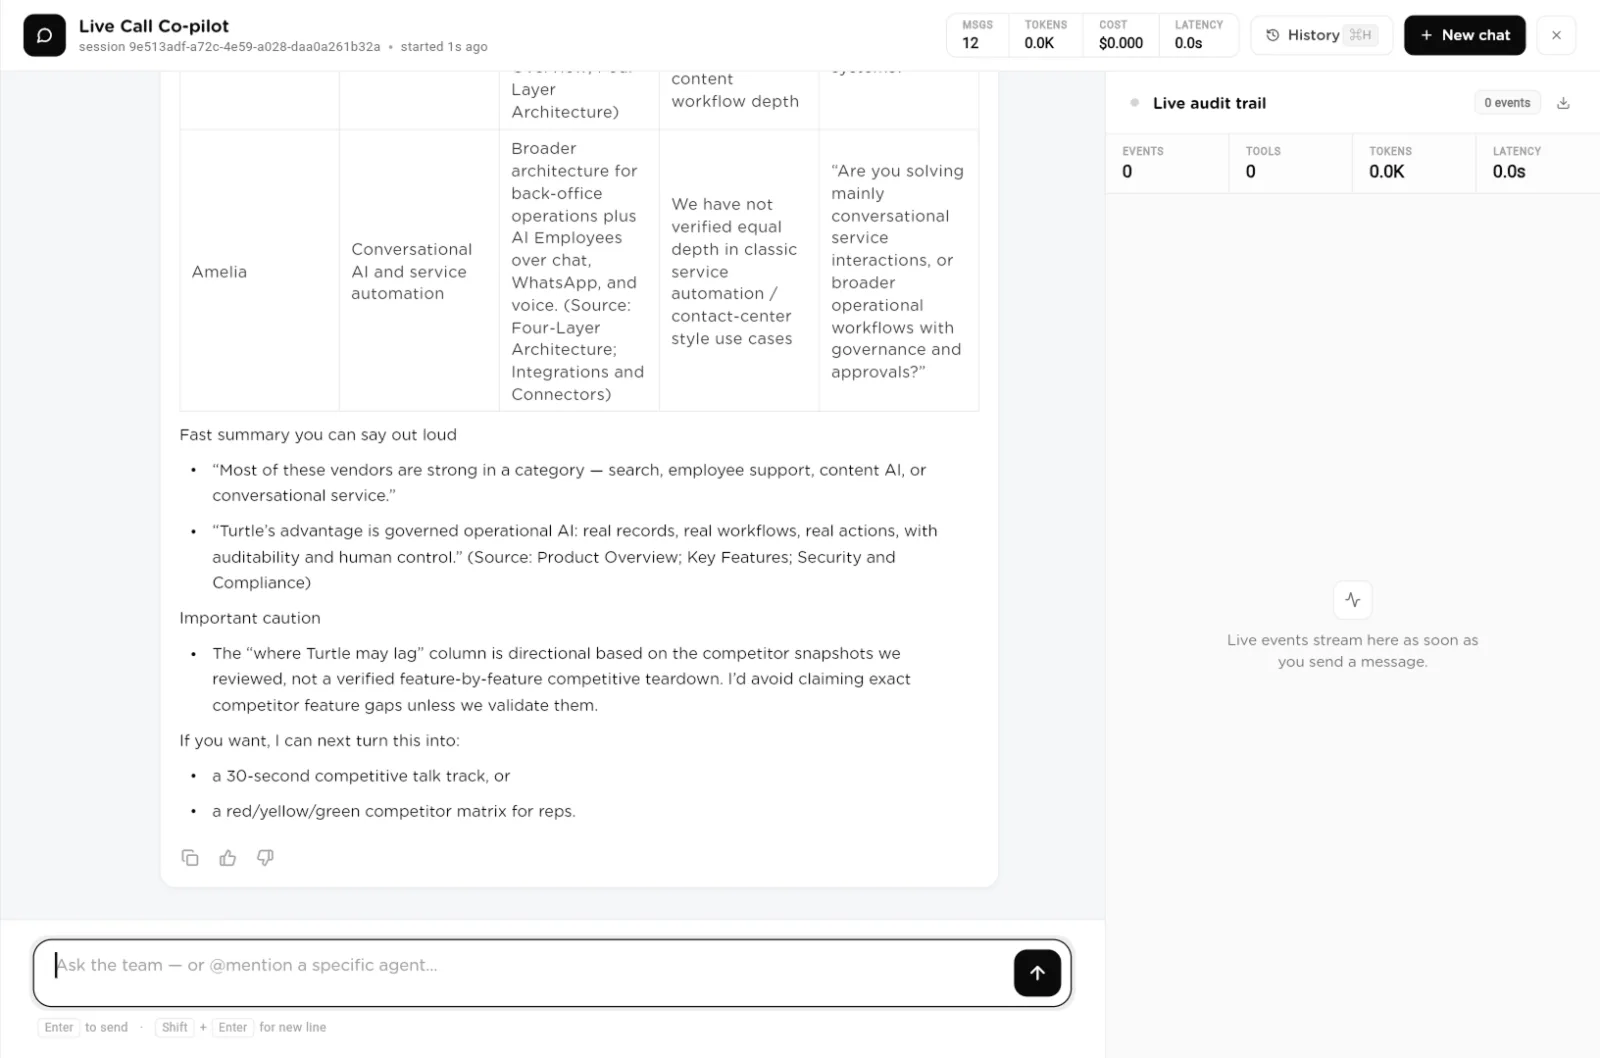
The team chat. Session totals sit in the header and live events stream into the right rail.click to enlarge If a member tries a tool call that a policy holds for approval, the member says so in the chat and the call waits until someone approves it. Approved and denied calls are recorded on the session. SeeApprovals.
Review sessions, history and cost
History in the editor (or Logs on the list) opensChat history. Sessions are grouped by date on the right, each with its message count and cost. Me shows your own sessions; Admin shows everyone's, for people allowed to see all sessions. Select a session to read it. The session header shows its message count, tool calls and total cost, and each reply shows its tokens, time and cost.Conversation shows the messages with a "routed here" line for each member that answered; Audit trail replays the stored events for that session.Export downloads the history.
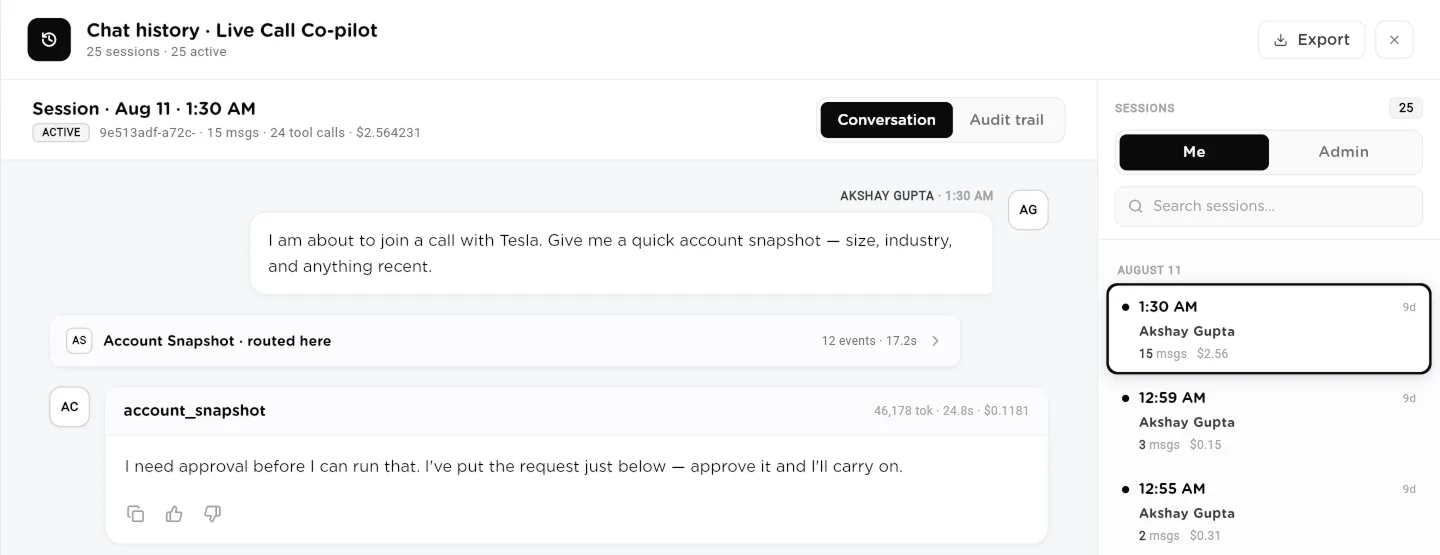
Chat history: every session with its messages, tool calls and cost.click to enlarge For trends, open the Statistics tab. Pick a date range and view it asMe or Admin. It shows Total sessions,Total cost (with cost per session), Msgs / session,Avg turn latency (with p95), and charts of sessions over time and of performance and cost.
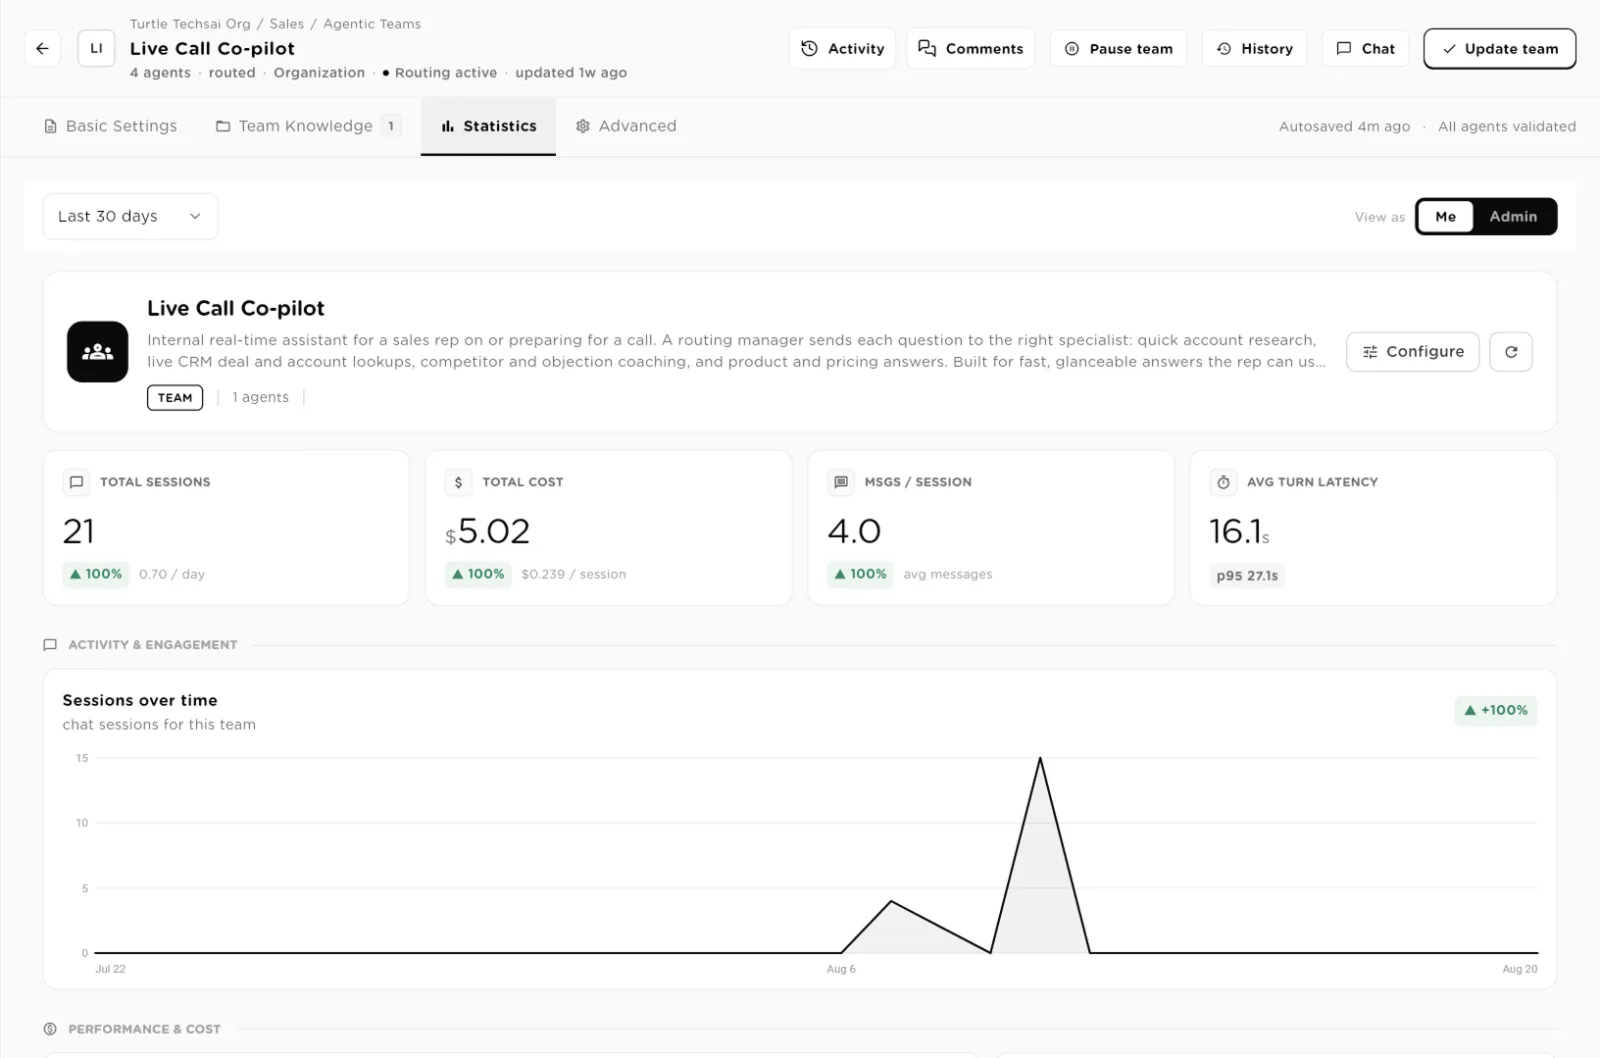
Statistics: sessions, cost and latency for the chosen period.click to enlarge Share the team
Open the Advanced tab. Distribution & Access controls where the team can be used outside the workspace. Each option is independent:
- Share with Users & Groups: pick Group or User, choose who, and click Add. Sharing gives Run Only access: they can chat with the team but cannot change its settings.
- Public Link Sharing: turn it on to create a link that people can chat with without signing in.
- Web Chat: turn it on to get embed code for a chat widget on your website.
- Connect to Slack: connect a Slack workspace, add channels, and run the team from a slash command.
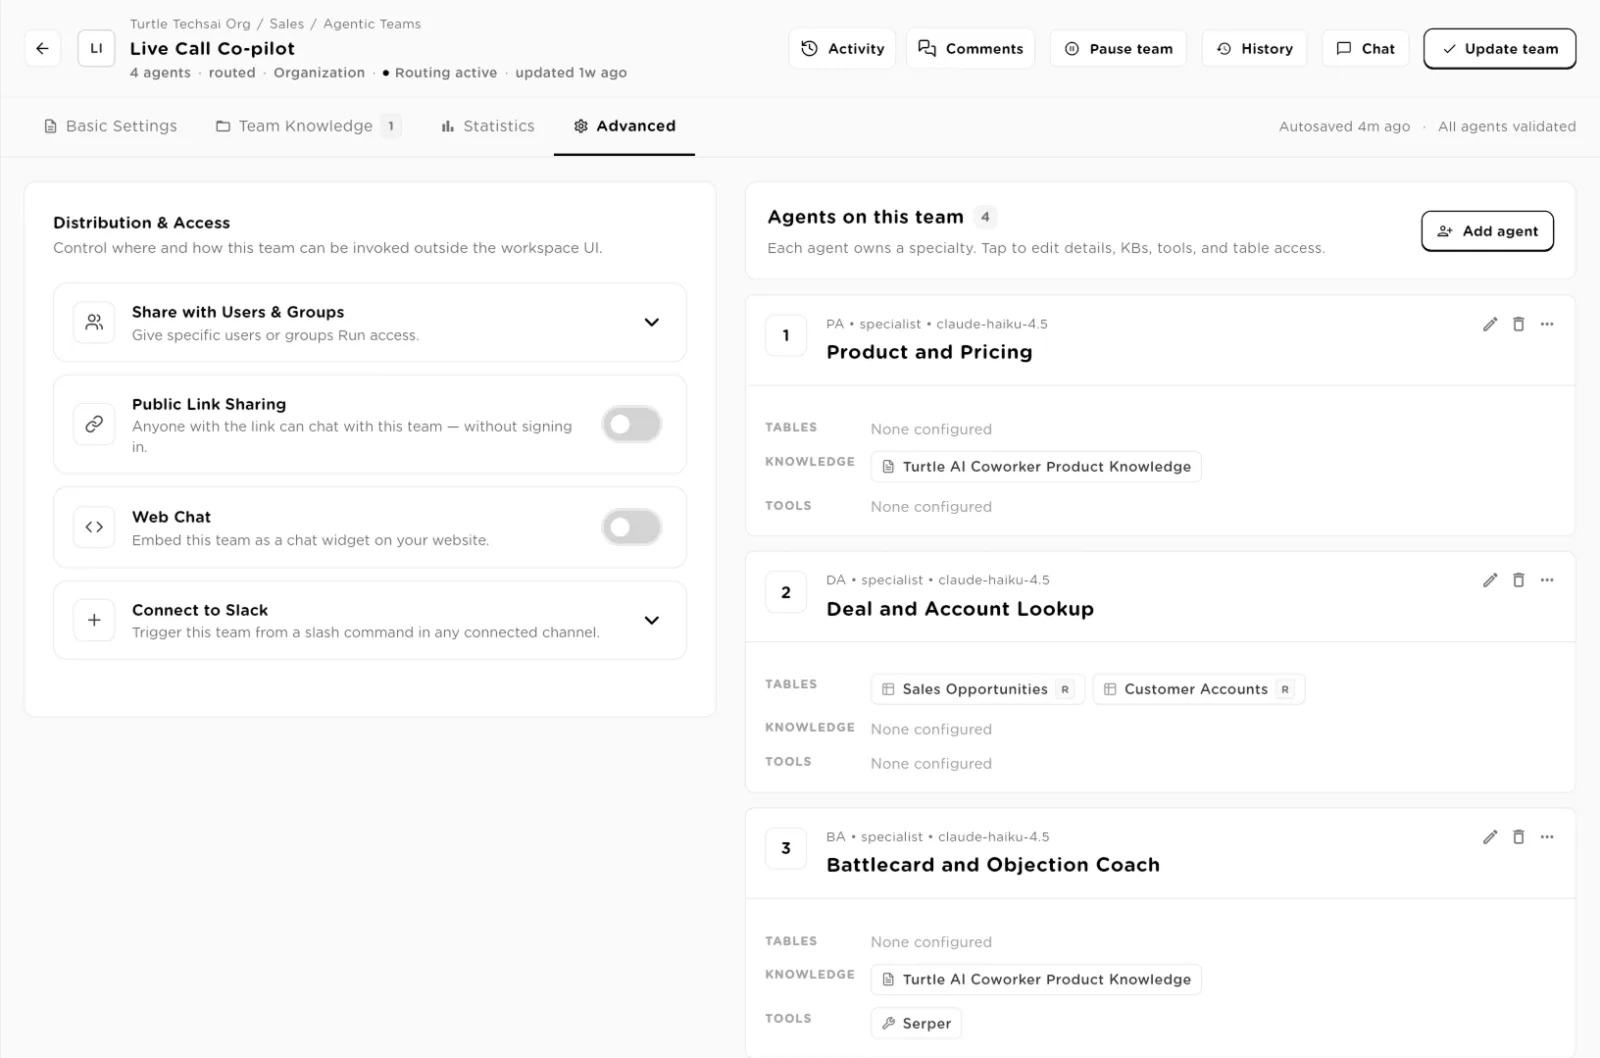
Advanced: four independent ways to use the team outside the workspace.click to enlarge Create a public or password-protected link
With Public Link Sharing on, choose the Link type:Public link (anyone with the link can chat) or Private link(visitors must enter a password). Give it a Link name, set aPassword for a private link, then set usage limits: Max chats(total conversations the link can start, blank for unlimited) and Max messages / session (turns allowed in one chat, 50 by default). Optionally set Expires at. Click Create link, then copy or open it. The link card shows its type, chat count, message limit and expiry.
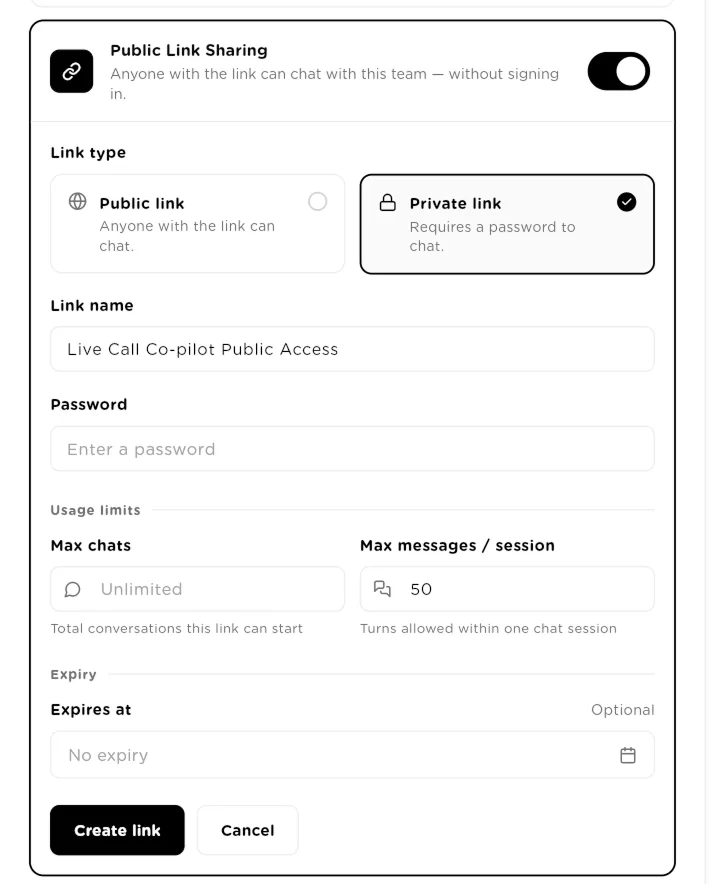
A private link needs a password. Limits and expiry are optional.click to enlarge Embed the team on your website
With Web Chat on, choose HTML or React and copy the code into your site. Under Tool access, decide what the widget may do:Full access lets it use every tool the members hold, Read-onlylimits it to tools that only read. The same Tool access choice appears on public and private links.
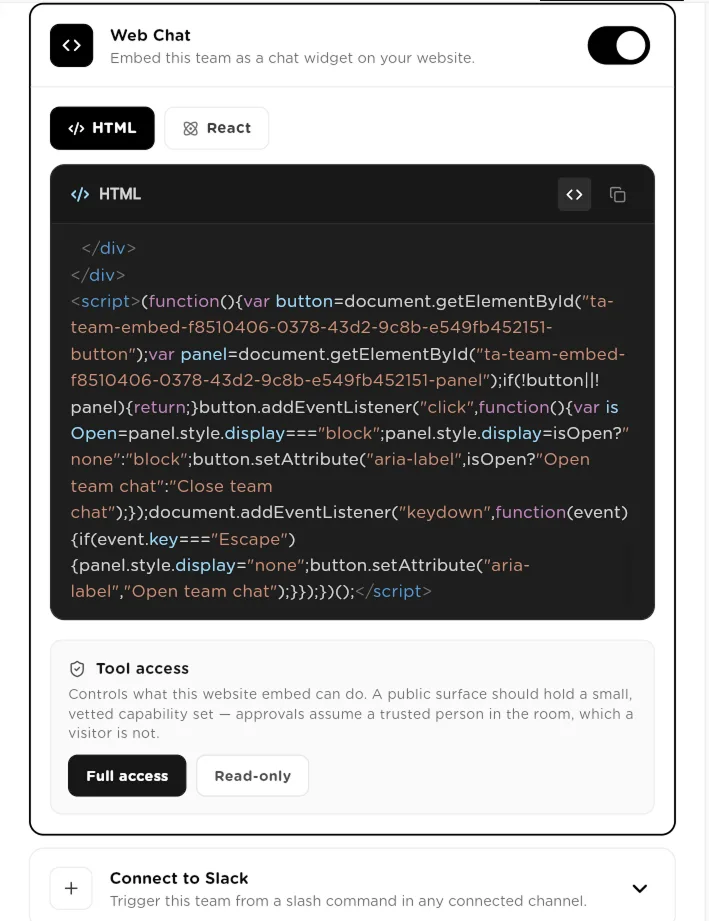
Web Chat: copy the embed code and choose the widget's tool access.click to enlarge Pause, comment and track changes
The editor header has Pause team: a paused team refuses new chats until you clickResume team, and it shows under the Paused tab on the list.Activity shows who changed the team and when, and Comments holds notes for your colleagues. Save changes with Update team.
The AI disclosure on anonymous chats
When someone chats with a team without signing in, through a public link, a private link or the website widget, Turtle AI Coworker tells them they are talking to an AI. The disclosure is shown in the chat and also saved as the first message of that conversation, so any transcript you pull up later shows it.
The default wording names your organization and your organization owner's email as the contact, for example: "You are chatting with an AI assistant operated by Acme. A person can be reached at" followed by the address. An owner or admin can reword it in the organization settings underAI disclosure. It cannot be left empty: you may change the wording, but it must still tell visitors they are talking to an AI. Because visitors can read the owner's email in the default wording, you may prefer to reword it with a shared inbox such as a support address.
Reference: team settings
| Setting | Type | What it does |
|---|---|---|
Team name | text, required | Name shown across the workspace. Up to 80 characters. |
Description | text | What the team does, shown on its card. Up to 280 characters. |
Team Instructions | prompt | The system prompt the supervisor uses to route messages to members. Generate Instructions writes it from the members' details. |
LLM Provider / LLM Model | select | The model the team runs on. Only models connected on the Models page are listed. |
Routing Status | badge | Shows the current routing plan. Turns amber when a member changed after the instructions were generated. |
Team Knowledge | KB list | Knowledge bases every member can search. Attach existing ones or click Create KB. |
Share with Users & Groups | Run Only | Lets chosen users or groups chat with the team without editing it. |
Public Link Sharing | toggle | A link for chatting without signing in. Public link or password-protected Private link. |
Web Chat | toggle | Embed code (HTML or React) for a chat widget on your website. |
Tool access | Full access | Read-only | What a link or widget may do: every tool the members hold, or only tools that read. |
Connect to Slack | integration | Run the team from a slash command in connected channels. |
Pause team | action | Stops new chats until you resume the team. |
Public and private link fields
| Field | Type | What it does |
|---|---|---|
Link type | choice | Public link: anyone with the link can chat. Private link: a password is required. |
Link name | text, required | A label for the link so you can tell links apart. |
Password | text | Required for a private link. Visitors enter it before they can chat. |
Max chats | number | Total conversations the link can start. Leave blank for unlimited. |
Max messages / session | number | Turns allowed within one chat session. 50 by default. |
Expires at | date, optional | The link stops working after this date. Leave blank for no expiry. |
Member agent fields
| Field | Type | What it does |
|---|---|---|
Name | text, required | The member's name, shown on its roster card and in routing lines. |
Description | text | What this member handles, up to 280 characters. The supervisor uses it to route. |
Instructions | prompt | How the member should work and answer, up to 4000 characters. |
Knowledge base | KB list | Knowledge bases only this member searches, on top of the team knowledge. |
Tools | 3 tabs | Integrations, Custom tools and Custom MCP servers (at most 2 active per member). |
Table access | R / C / U / D | Per-table Read, Create, Update and Delete permissions, enforced when the member runs. |
Related
- Sequential Agents: one worker running an ordered list of tasks.
- AI Employees: a named coworker that plans and runs tasks in the background.
- Knowledge Bases and Tables: the data members read and write.
- Tools & Integrations and Custom Tools & MCP servers: what members can call.
- Approvals and Audit trail: holding and reviewing what the team does.