
Sequential Agents
Build a single worker that does one job end to end: typed inputs, ordered tasks, scoped access to your tools, knowledge and tables, and a recorded result for every run.
A Sequential Agent is the core worker in Turtle AI Coworker. It takes a set of typed inputs, runs an ordered list of tasks with the tools, knowledge bases and tables you grant it, and returns a result. Every run is recorded: the inputs, each task's output, every tool call and what it cost. Reach for an agent whenever a job can be written as a repeatable procedure: given X, do these steps, produce Y.
You can run an agent by hand, on a schedule, from an event in a connected tool, from a webhook, when a table row changes, from a link, from Slack or through the API. An agent is also the building block you later hand to an Agentic Team or an AI Employee.
When to use a Sequential Agent
- Use a Sequential Agent when the job is one defined procedure with a clear start and finish: enrich a record, summarize a document, draft an email, extract fields, run a daily check.
- Use an Agentic Team when the work arrives as a conversation and different messages need different specialists.
- Use an AI Employee when you want a named coworker that owns a whole role, remembers context and plans its own work.
Because an agent has one job and a fixed shape, it is the easiest worker to test, price and audit. You can even write test cases for it: see Evals.
How a run works
Build an agent step by step
Agents live on the Agents screen under Build. Open one to edit it, or create a new one. The editor has tabs across the top that configure what the agent is and what it can touch, and aWorkflow panel on the right that holds the ordered tasks.
Open the Agents screen
The screen shows four totals at the top: Total agents, Runs · 24h,Avg success rate and Tokens spent · MTD. Below them you can switch between All and Paused, filter by name, tool or owner, sort byLast run, Name or Success rate, and switch between grid and list layouts. The workspace picker at the top chooses which workspace's agents you see.
Each card shows the agent's ID (for example
SA-498), its visibility, its status, its model, its tools and its success rate, average runtime, average tokens and last run. The card buttons are Edit (or View if you can only run it), Run agentand Logs. The ... menu holds Export andDelete.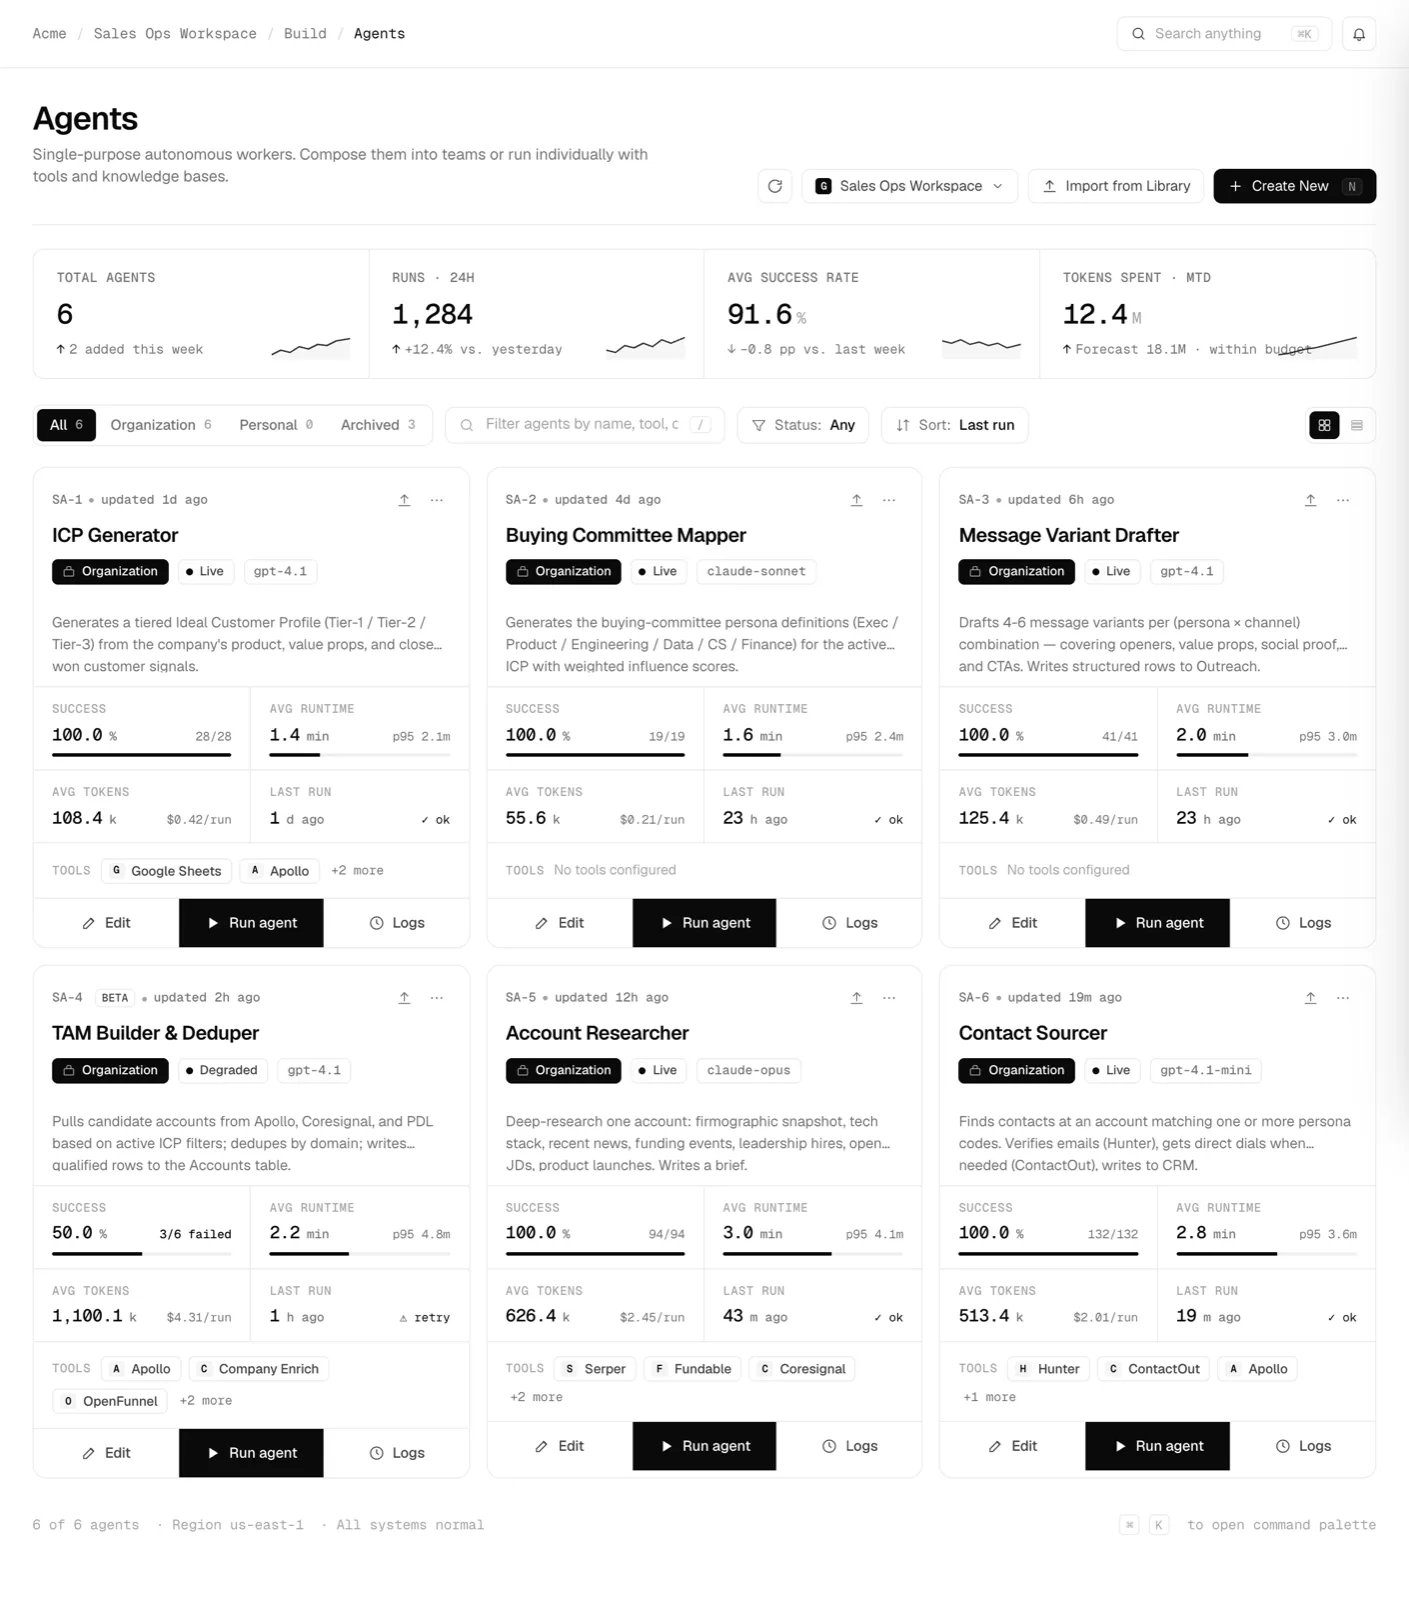
The Agents screen. Each card shows the model, tools and recent run numbers, with Edit, Run agent and Logs.click to enlarge Start from a template (optional)
Click Import from Library to start from a ready-made agent. The library can be filtered by source (All, Official, Partner,My/Org) and by department, and searched by name, vertical or tag. Click a card to see its overview, the model it runs on and everything it brings with it, such as knowledge bases and tables. Click Import to add it to your workspace. If the template's model is not available in your workspace, the button reads Choose model so you can pick one first.Import from file loads an agent you exported earlier.
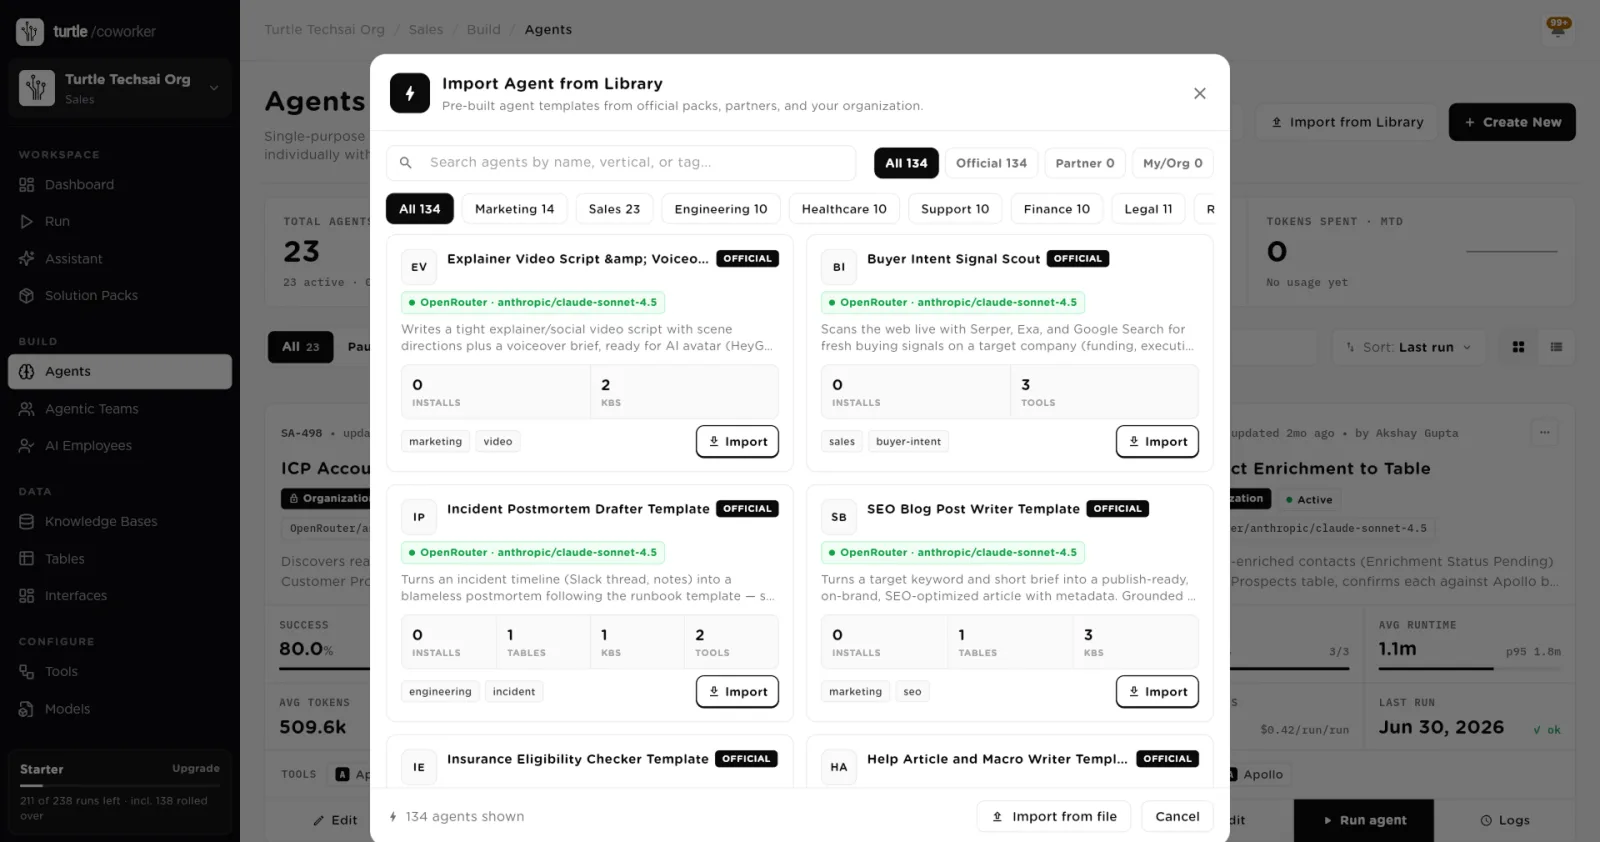
Import Agent from Library: official, partner and organization templates, filtered by department.click to enlarge 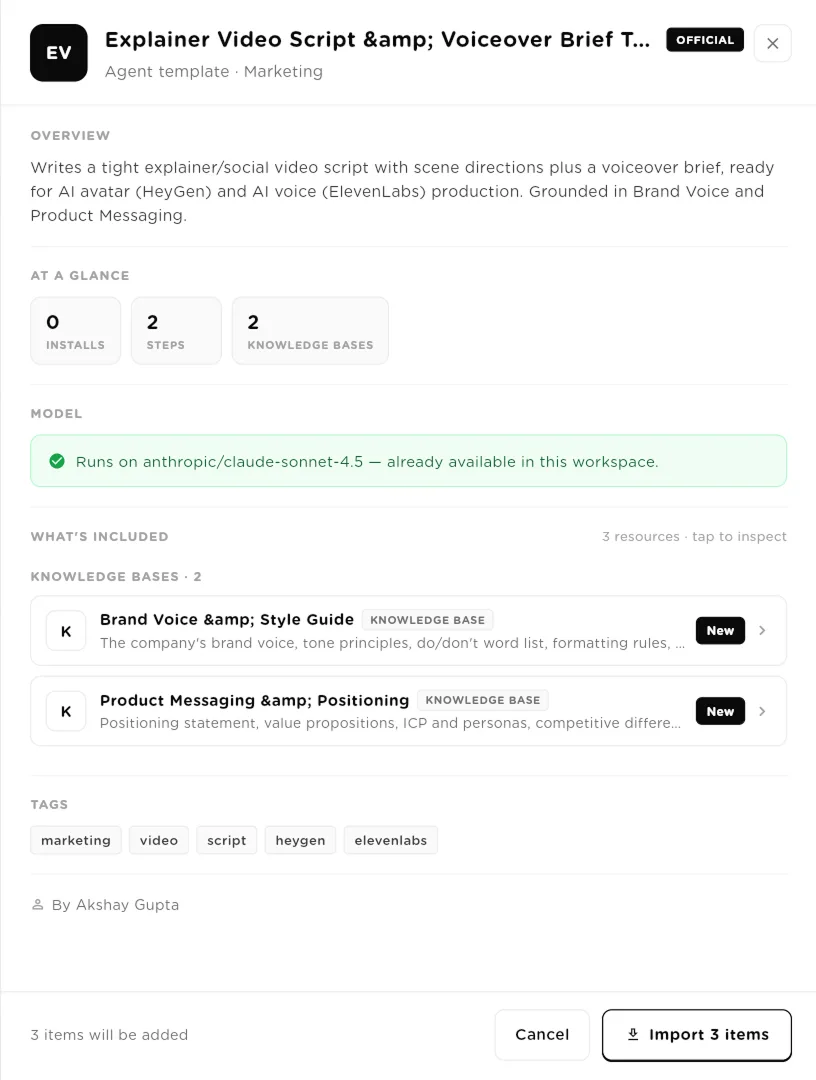
The template panel lists what will be added and checks that the model is available in your workspace.click to enlarge Create the agent and fill in Basic Settings
Click Create New. The new agent opens as
SA-Newwith four tabs:Basic Settings, Input Settings, Tools andKnowledge Base. The other tabs appear after the agent is saved.Under Identity, give the agent a Name (up to 90 characters) and aDescription (up to 280 characters) that appears on the agent card and in search. Under Behavior, write a one-line Agent Role that sets the persona, and the Agent Instructions: the rules every task follows. Instructions support Markdown and {{ params }} tokens, and Expand opens a larger editor.
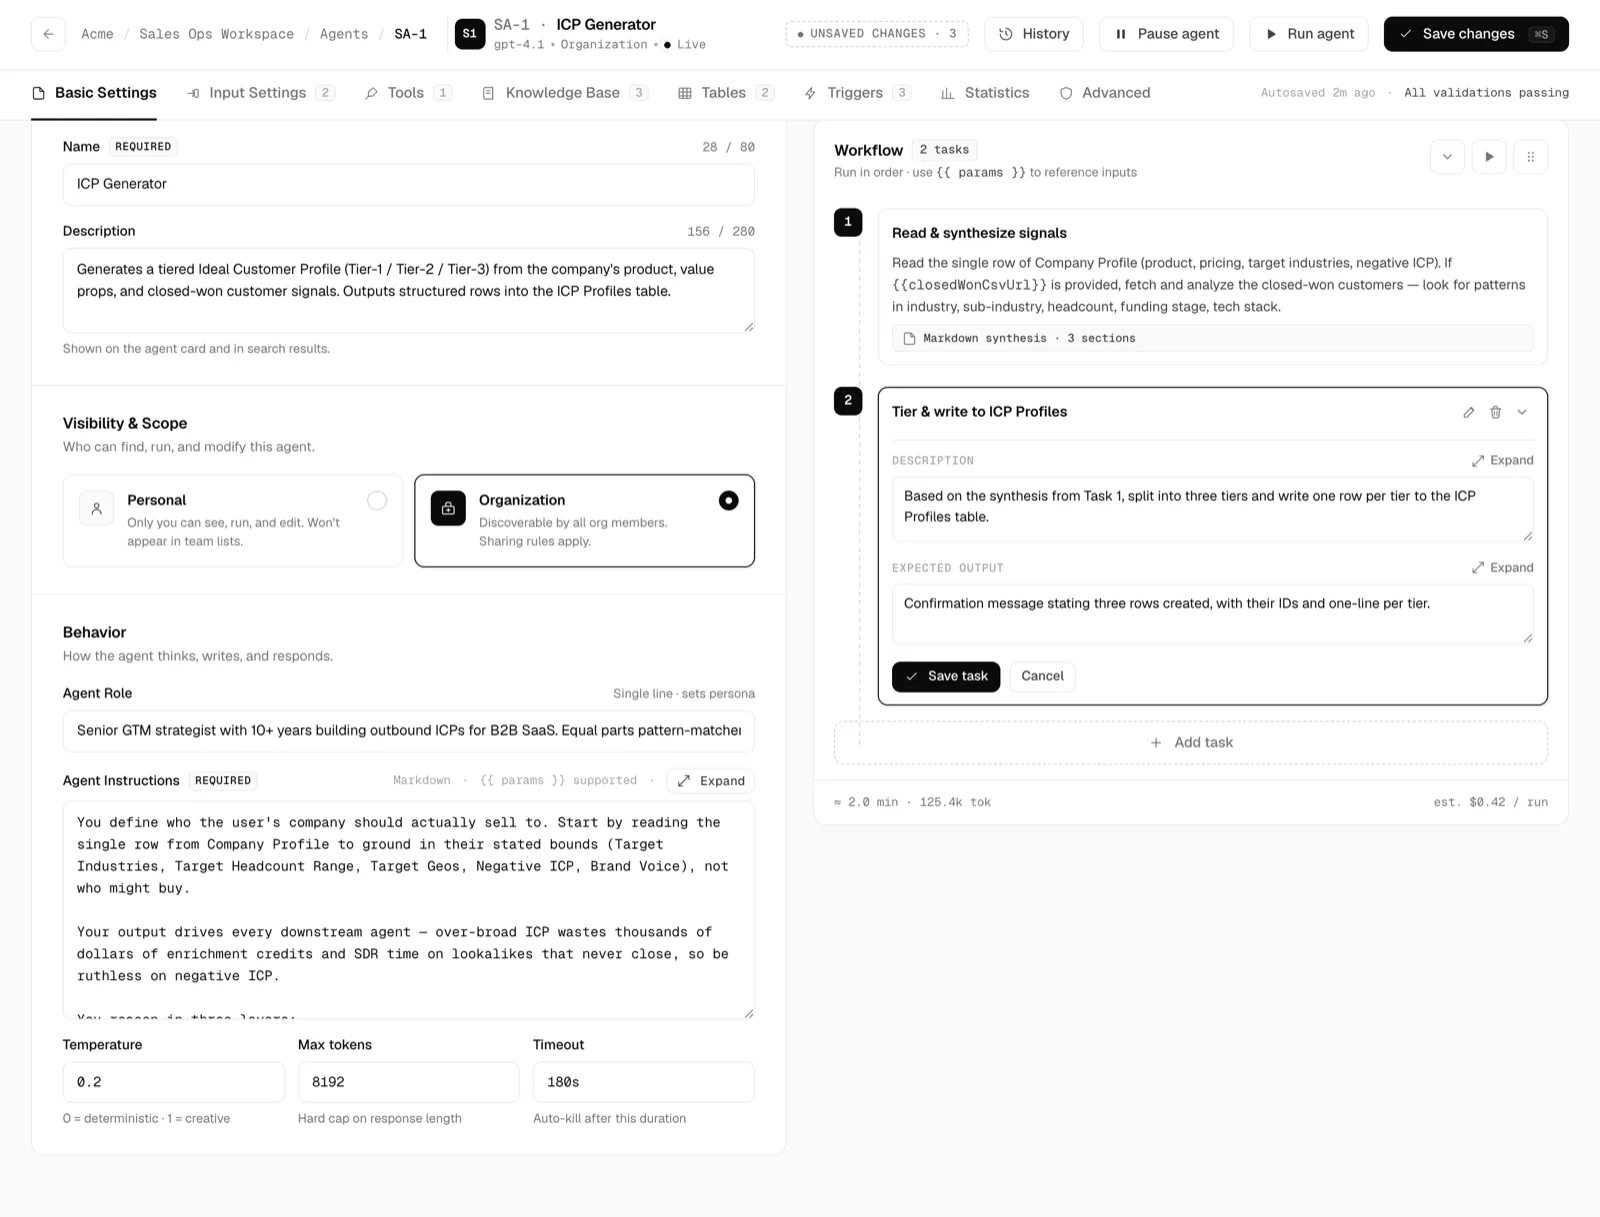
A new agent: Identity and Behavior on the left, the empty Workflow panel on the right.click to enlarge Choose the model
Scroll down to Model Configuration. Pick an LLM Provider and anLLM Model. The list shows the providers your organization has connected on theModels page, including Azure OpenAI, where the models are your own Azure deployments. If nothing is connected, the editor tells you to connect a provider on the Models page first.
Set the Temperature with the slider, from 0 (deterministic) to 2 (creative). The default is 0.7. Use a low value for structured, repeatable output and a higher one for drafting.
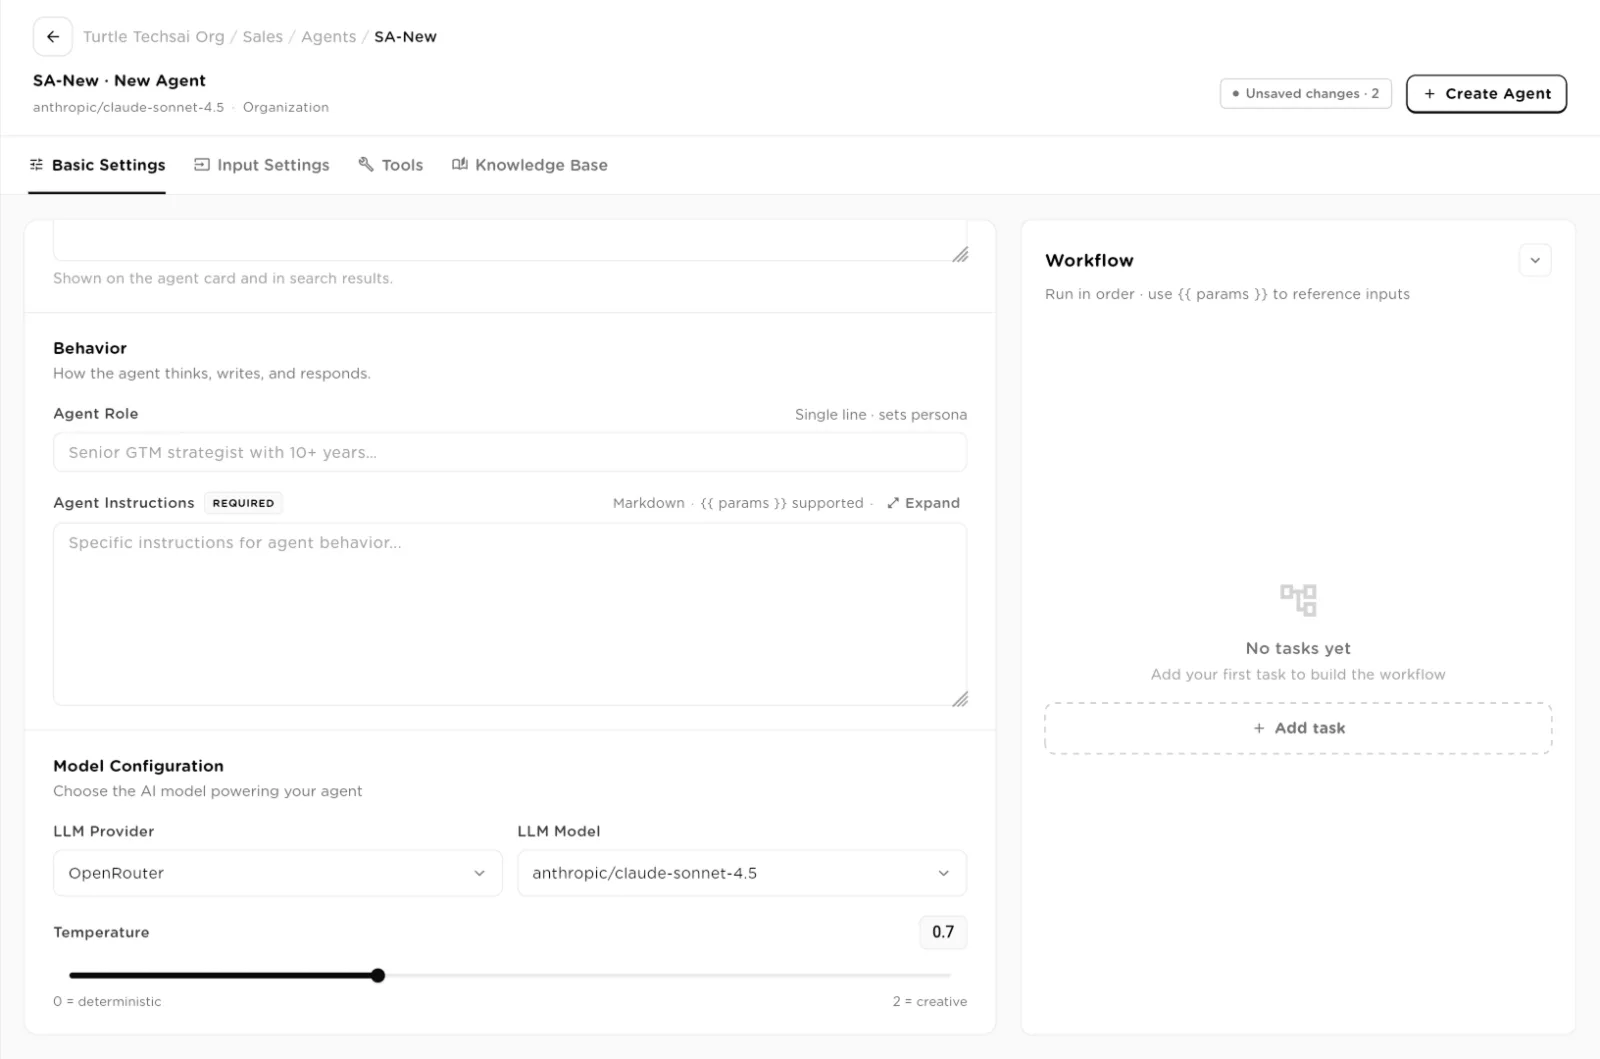
Model Configuration: provider, model and temperature, set per agent.click to enlarge Add input parameters
On Input Settings, define the values a caller supplies at run time. ClickAdd Input, then set the Name (shown in the run form), theKey (used in tasks as {{ key }}), the Type, and tickRequired field for anything the agent cannot work without. Inputs are validated on every run.
There are six types: Short Text, Long Text, URL,Number, Upload File and Scrape URL. The run form checks that a Number is a number and a URL is a valid address. An Upload File input lets the person running the agent attach a file (up to 25 MB by default), which the model can read if it supports files.
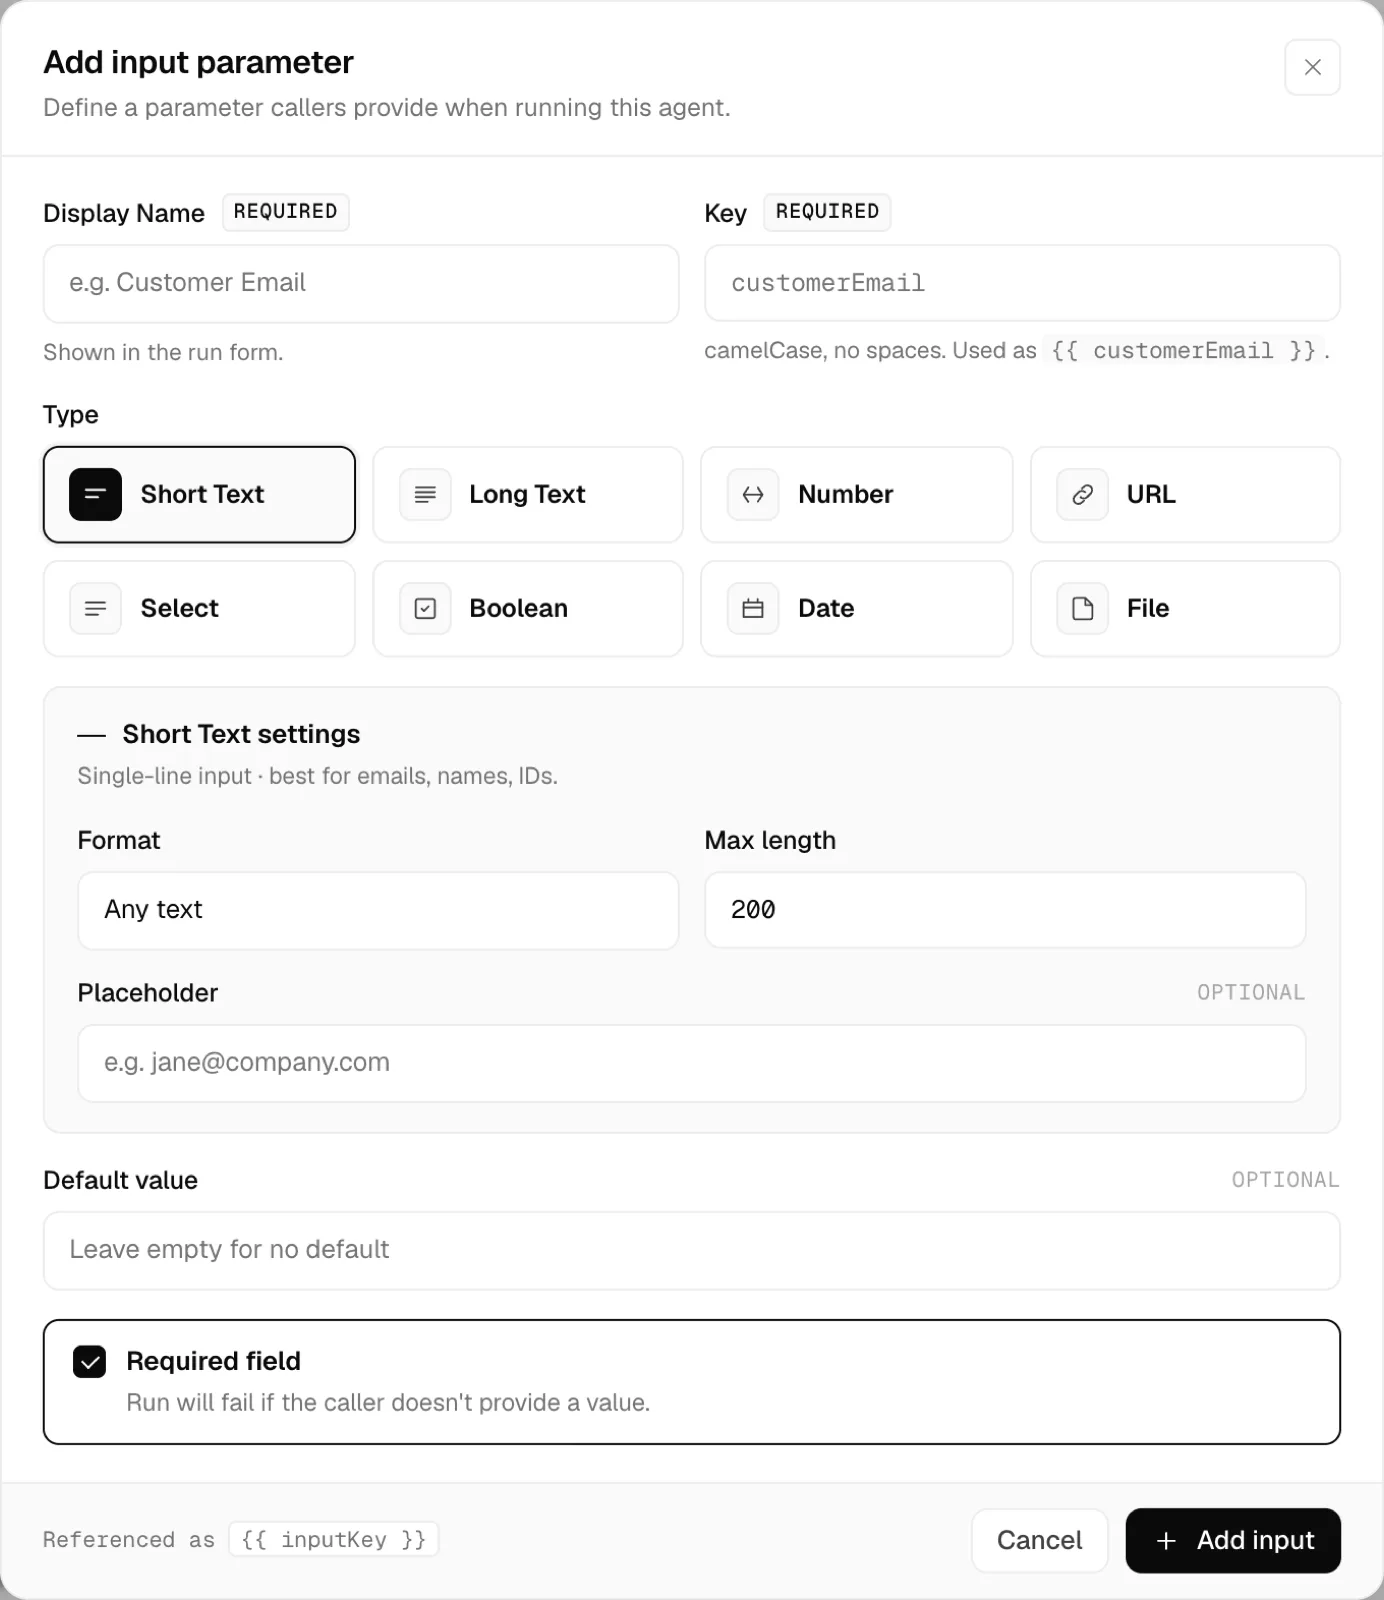
Add New Input: name, key, type and whether it is required.click to enlarge 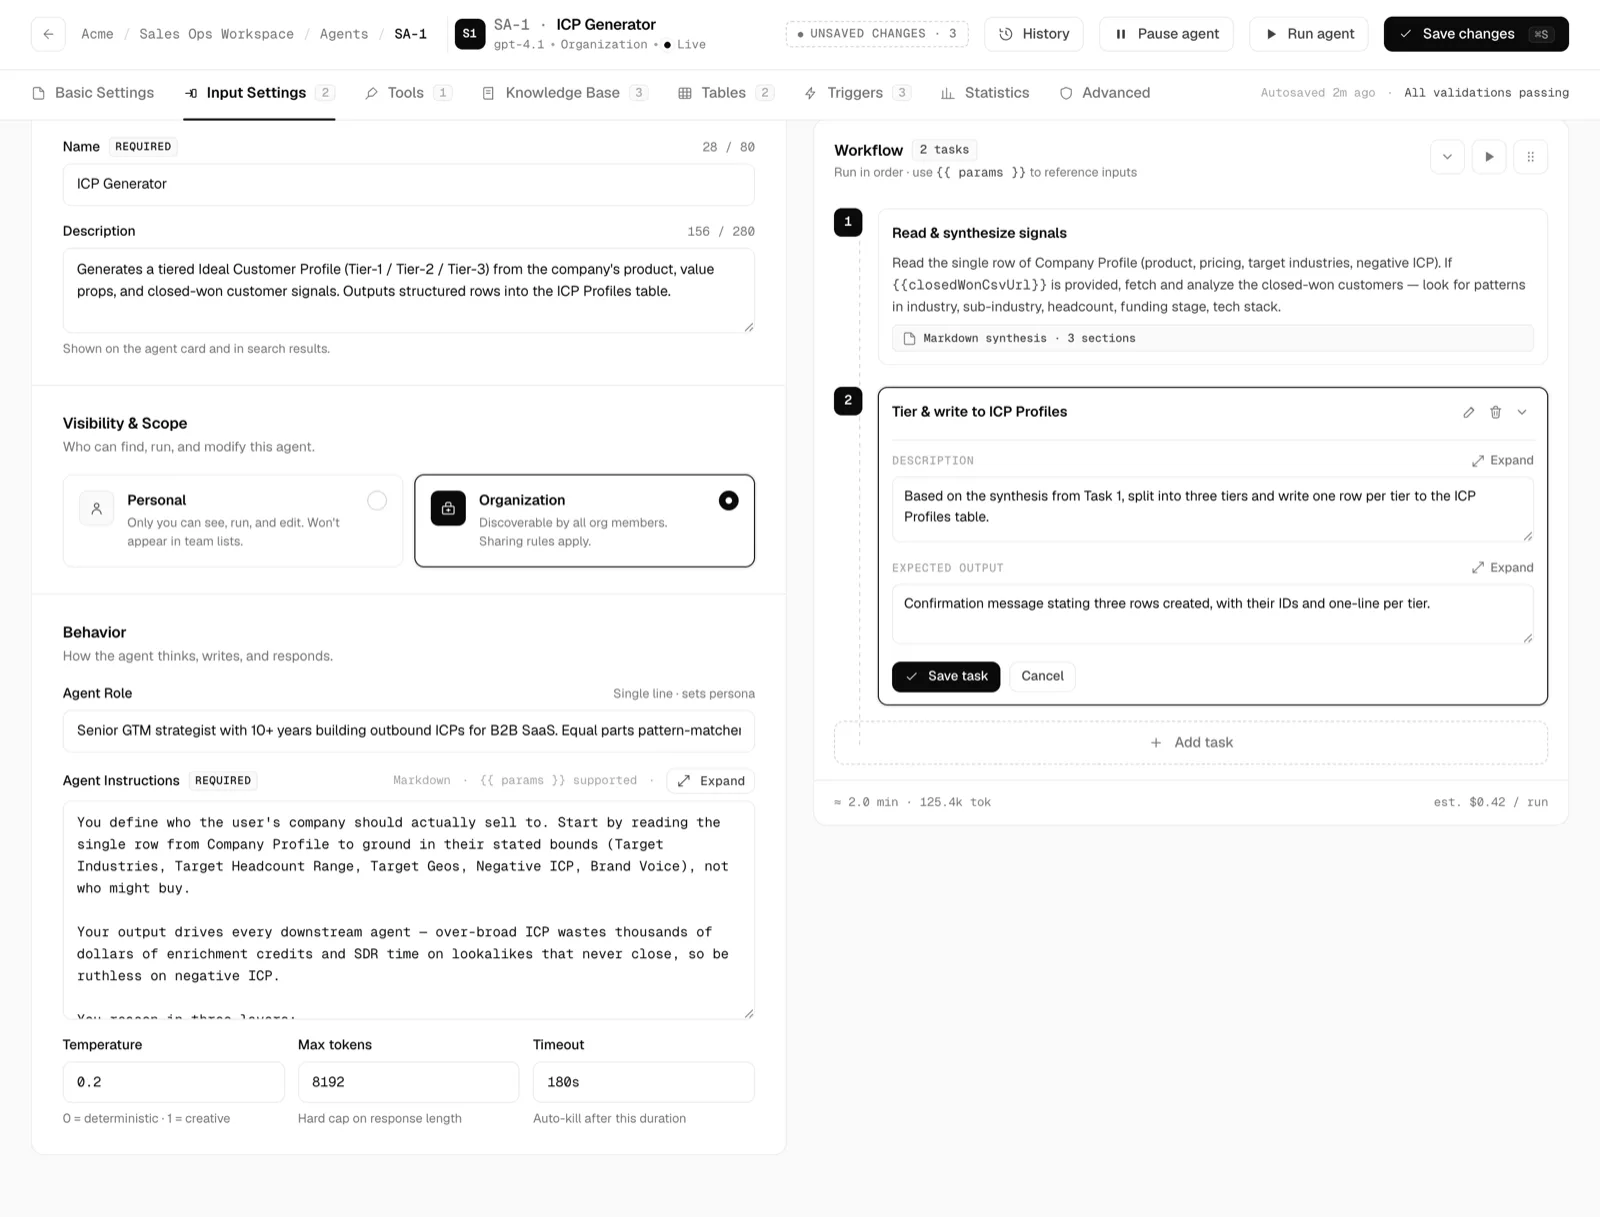
Each input shows its type, key, default and whether it is required. Edit or delete it from the row.click to enlarge Attach tools
On Tools, grant the external capabilities the agent may call. Tools are connected once at the organization level on the Tools page and then allowed per agent. The tab has three sub-tabs:
- Integrations: catalog tools such as search, enrichment, email or CRM. Click Add Tool or Browse tool library, search or filter by category (or Connected), tick the tools and click Done. Each attached tool shows its auth method and scope; the cross on the right removes it from this agent.
- Custom tools: click Add Collection to link a custom tool collection, a set of your own API endpoints built on the Tools page.
- Custom MCP servers: click Add Server to attach an MCP server your organization added under Tools. The agent asks the server which tools it has at run time, so new tools on your server work without any change here. An agent can have at most 2 custom MCP servers, and you must save the agent before you can attach one.
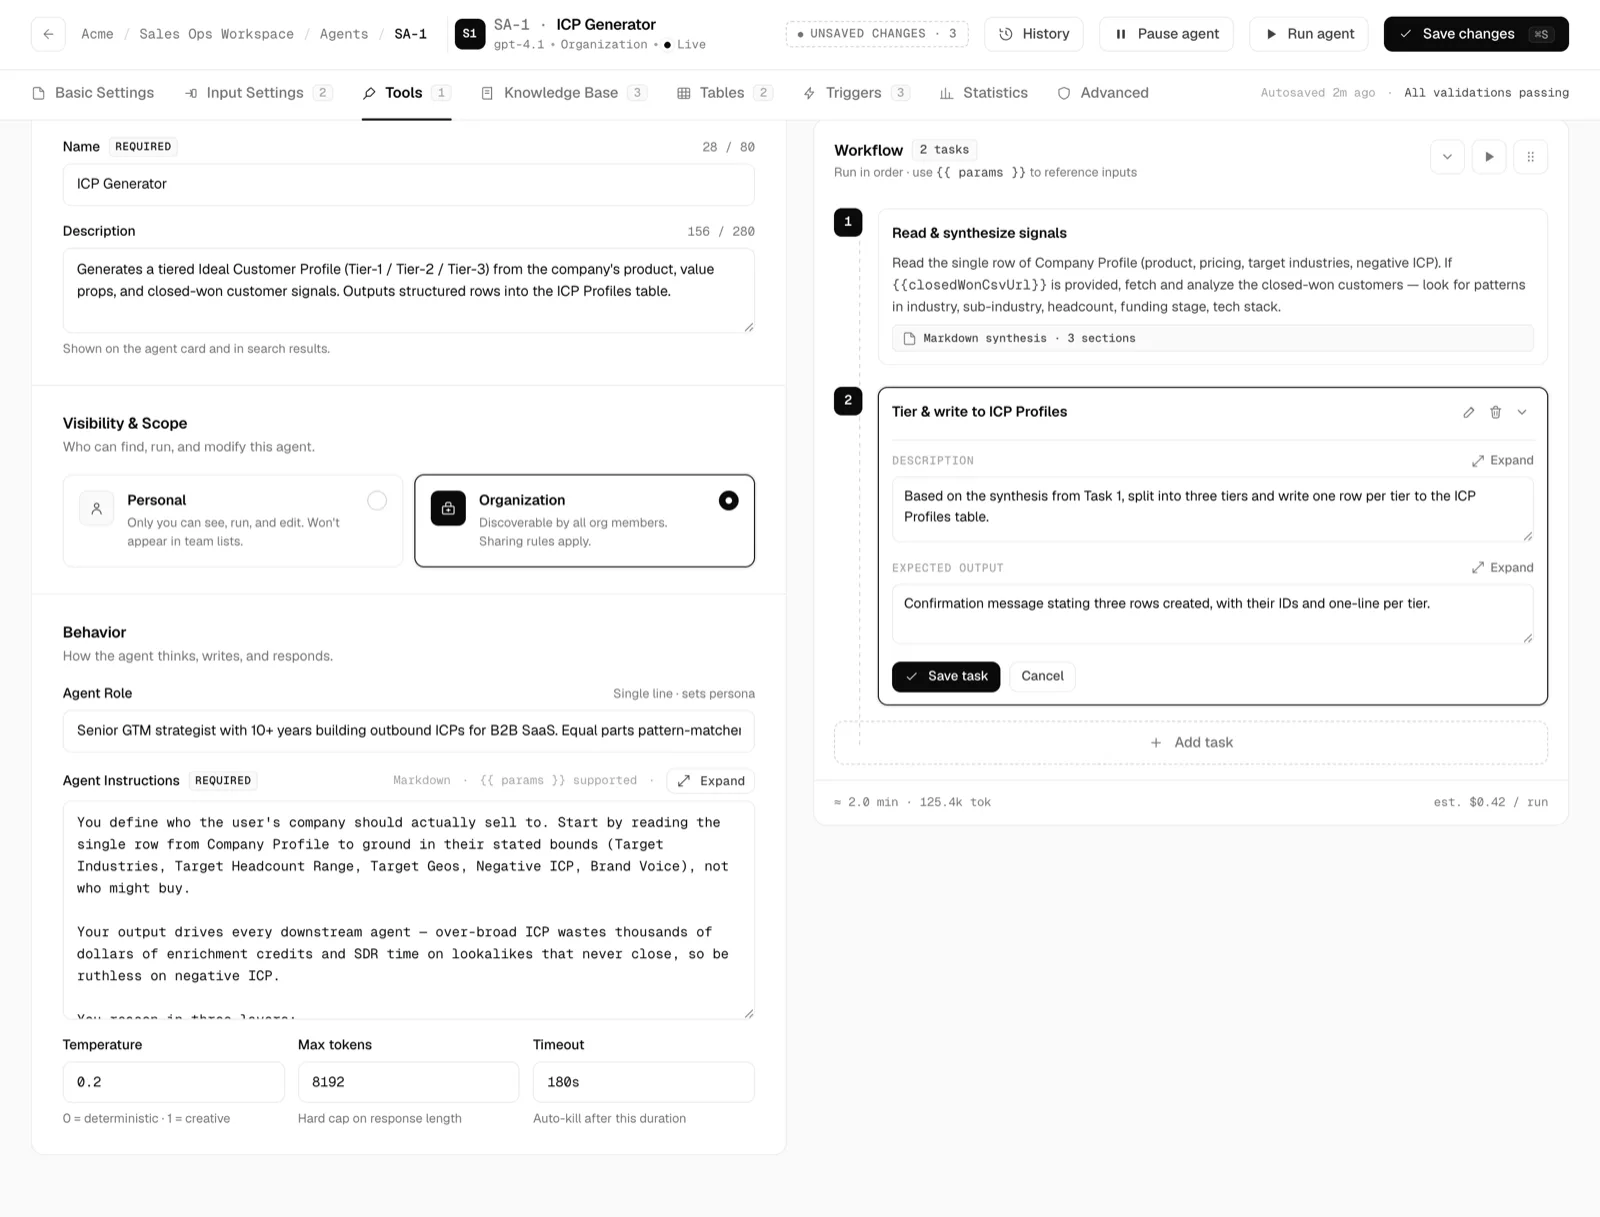
Attached integrations show their auth method and scope. The cross removes a tool from this agent only.click to enlarge 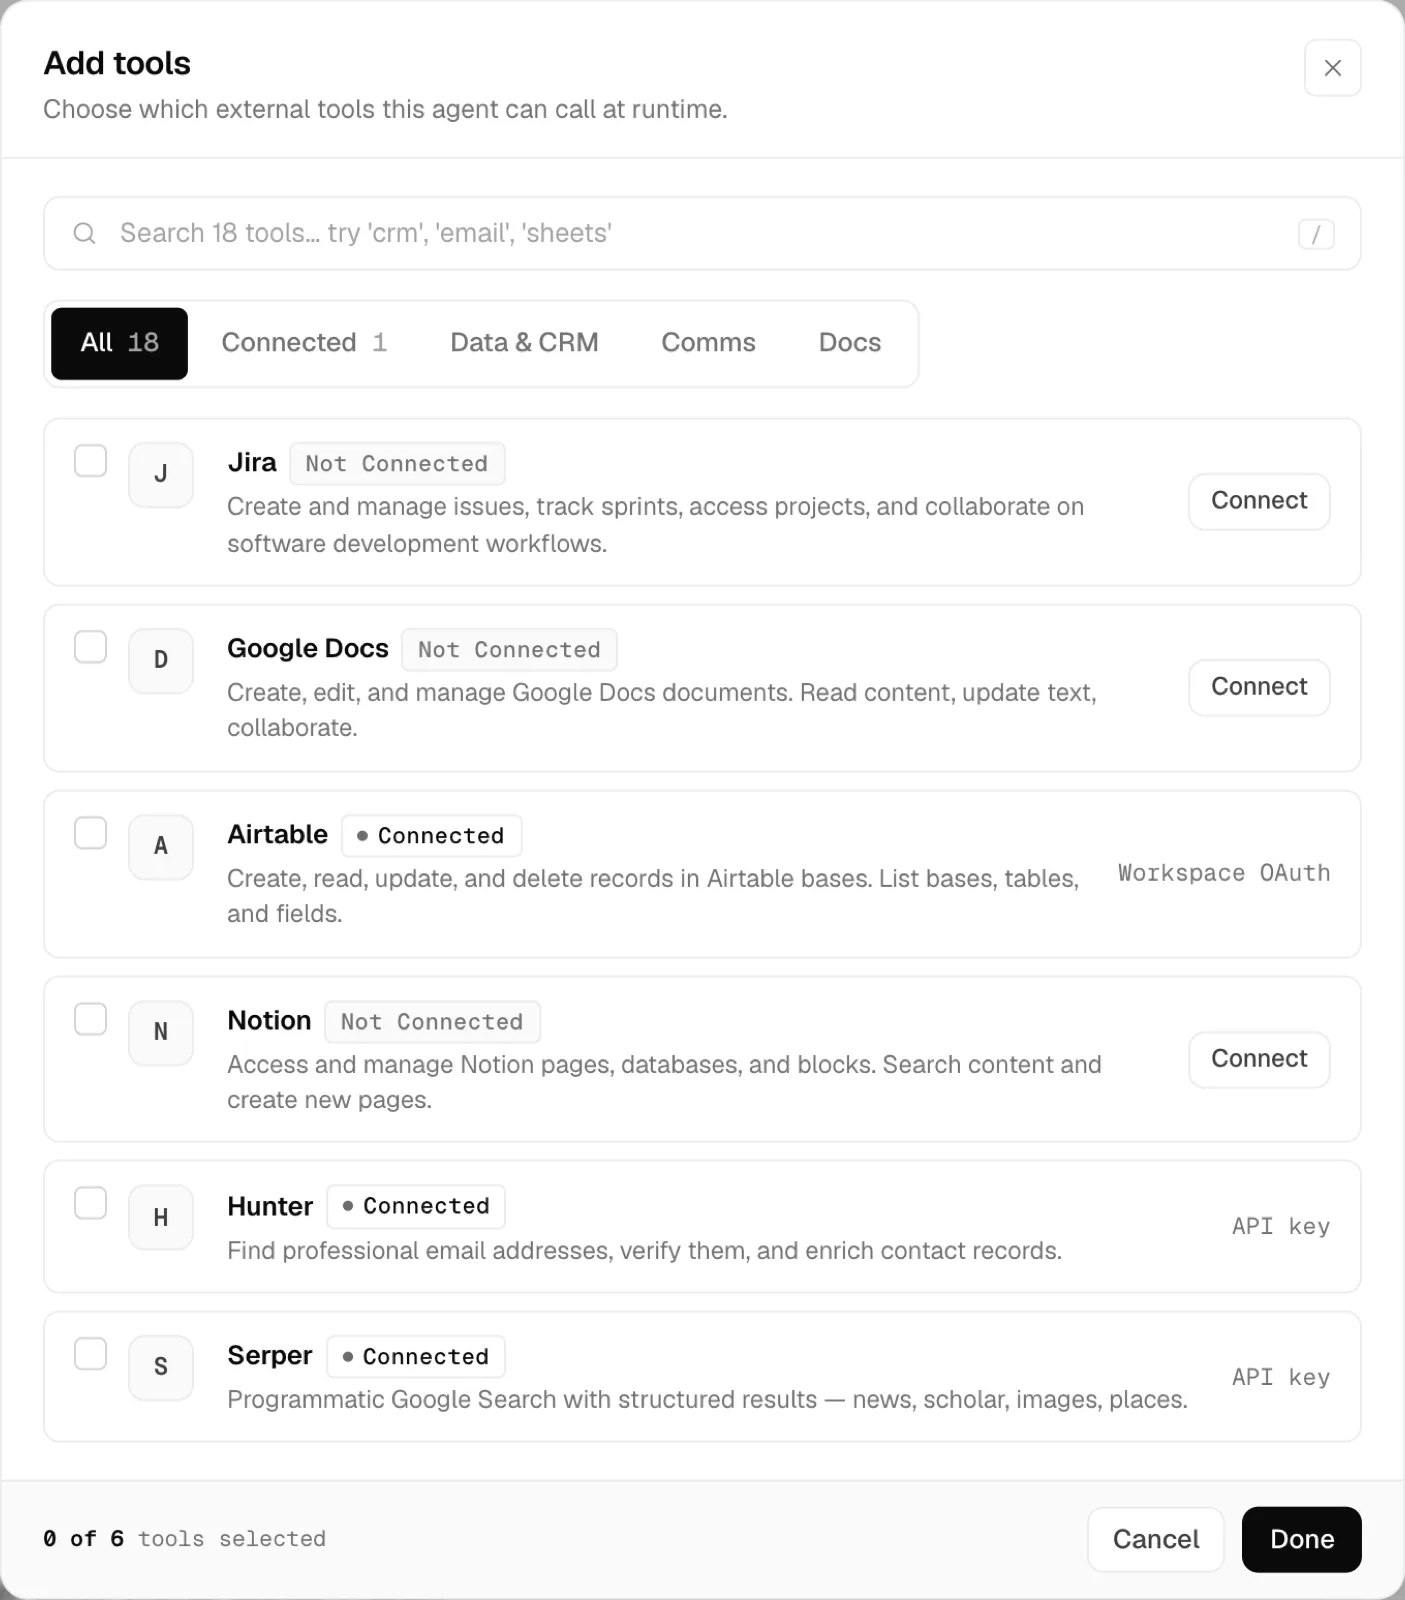
Add tools: tick connected tools to grant them. Tools marked Not Connected must be connected on the Tools page first.click to enlarge Attach knowledge bases
On Knowledge Base, click Add Knowledge Base. Search the list, tick the knowledge bases the agent may search and click Done. Each entry shows its scope and its document and chunk counts. Knowledge is read only: the agent searches it but never writes to it. Use it for reference material such as playbooks, product docs and policies.
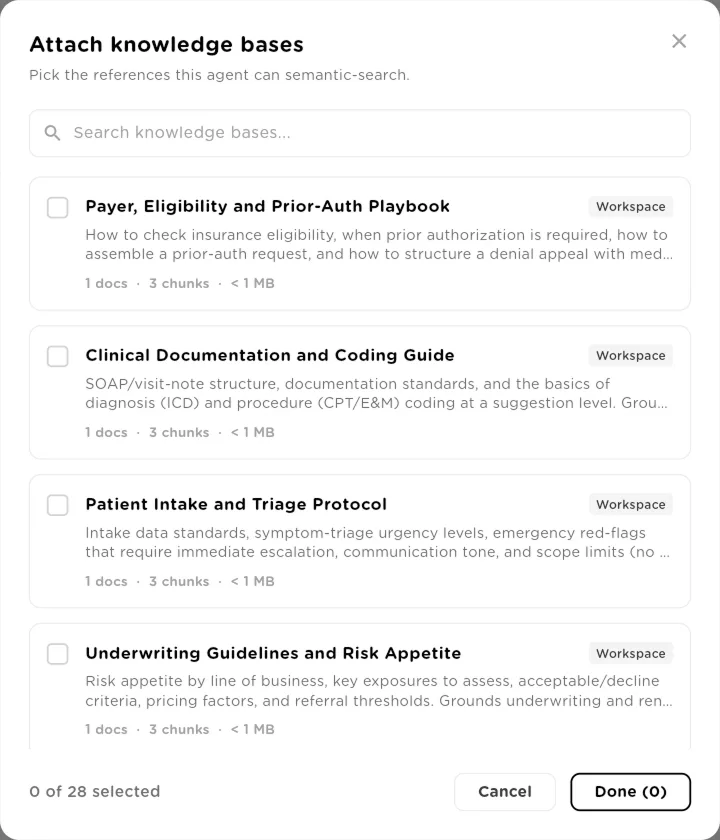
Attach knowledge bases: pick the references this agent can search.click to enlarge Build the workflow
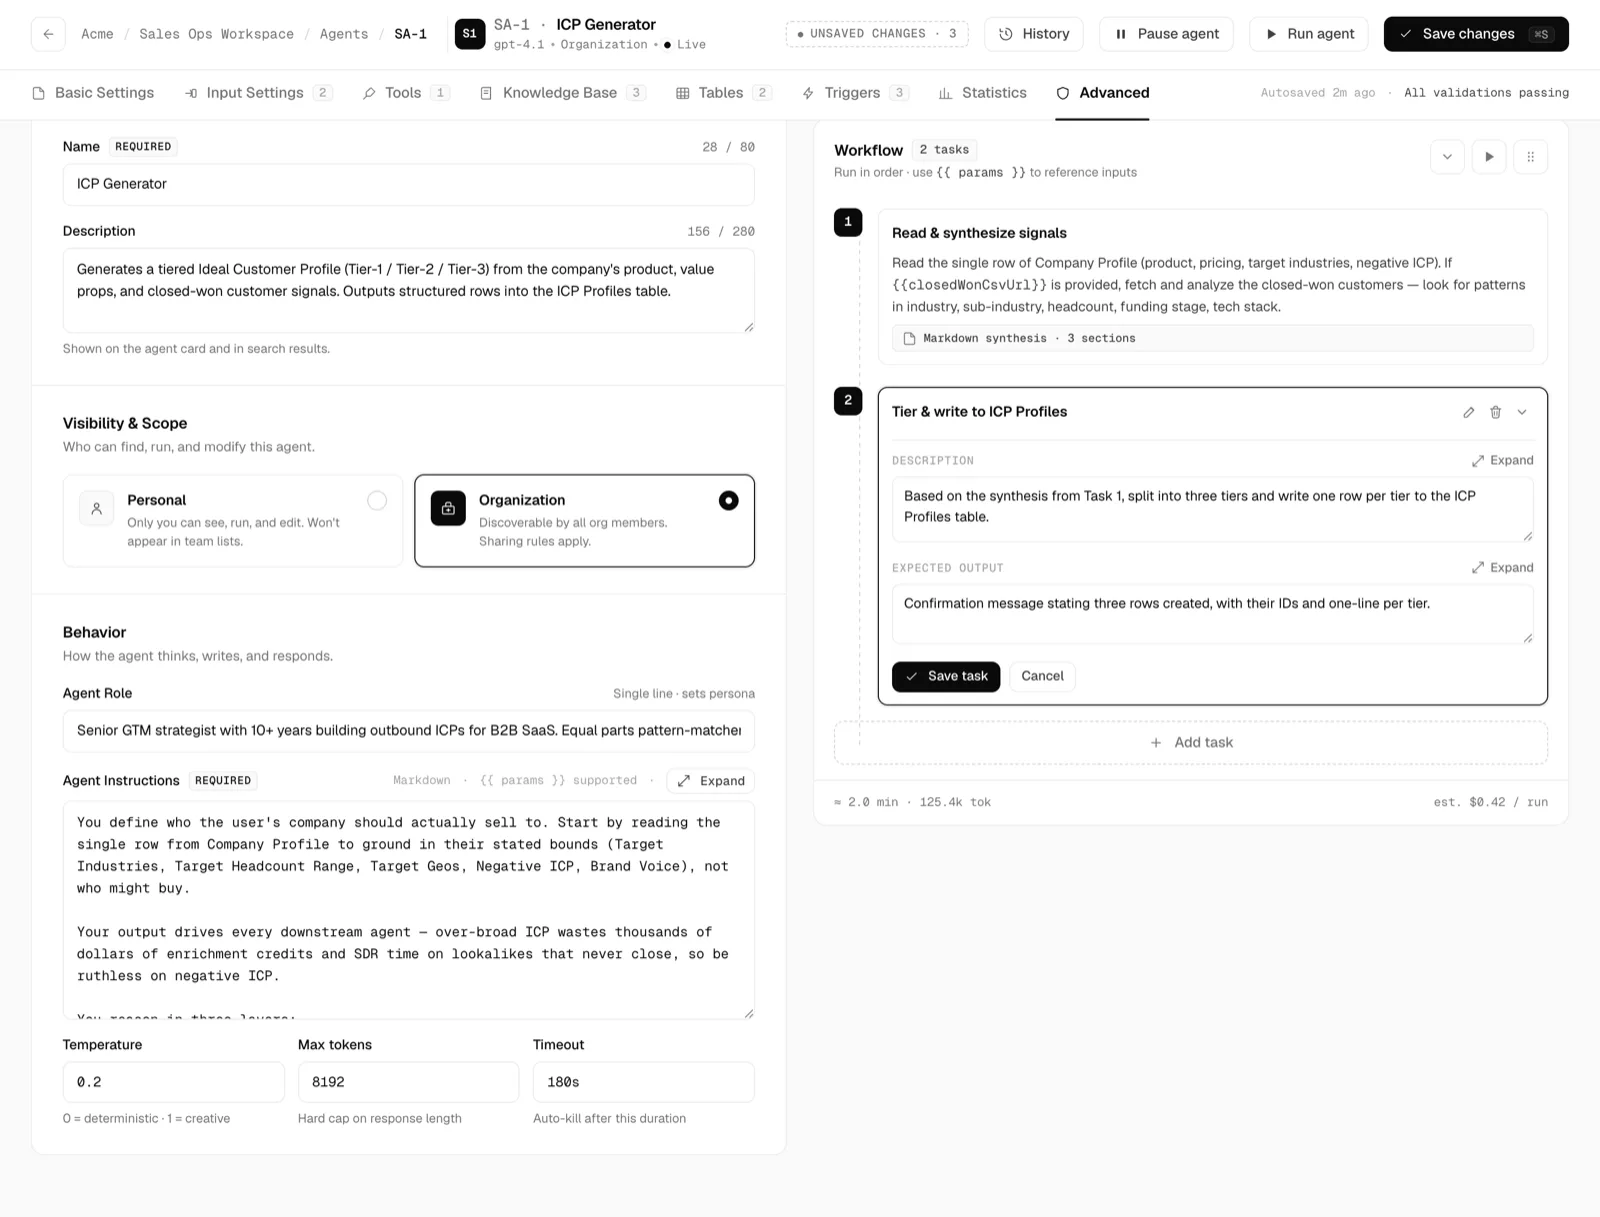
The Workflow panel on the right is the ordered list of tasks. The tasks run in order, top to bottom. Click Add task, write the Description (what this task should do) and the Expected Output (what it should produce), then clickSave task. A task can use run inputs with {{ key }} tokens and can build on the output of the tasks before it. Use the pencil to edit a task and the bin to delete it.
Keep each task to one clear job. Describe the expected output as labeled plain text, for example "A short list: company, domain, fit rating, one-line reason", so the next task knows exactly what it receives.
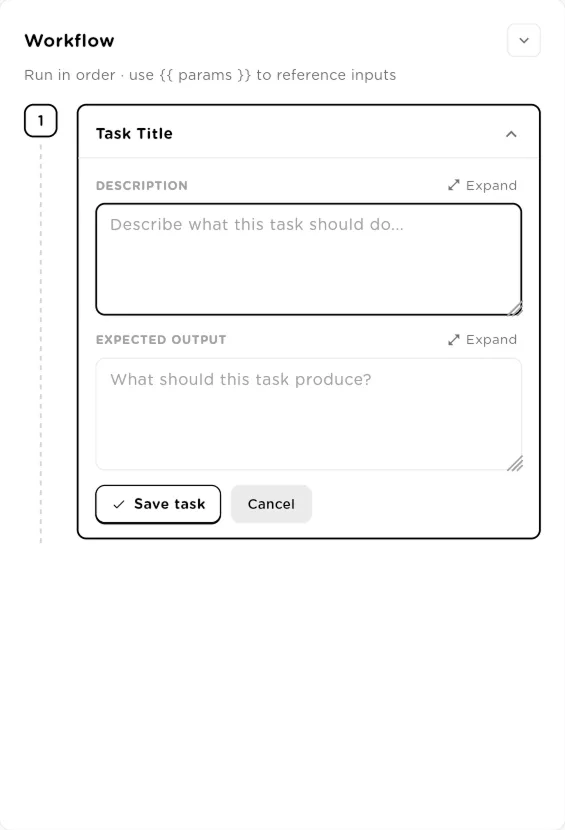
A new task: Description, Expected Output, then Save task.click to enlarge Save the agent
The header shows Unsaved changes with a count while you edit. ClickCreate Agent for a new agent, or Save changes for an existing one. After the first save the agent gets its ID, and the Tables, Triggersand Statistics tabs appear. On organization agents, people allowed to share the agent (its creator, and organization owners and admins) also see Advanced. Visibility is shown under Basic Settings and cannot be changed after creation.
The header of a saved agent also has Activity (a log of changes to the agent),Comments, History (its runs), Pause agent andRun agent.
Give the agent access to tables
On Tables, click Add Table. The Grant table accessdialog lists your workspace tables with their row and column counts; click + on the ones you need. Then click Edit permissions on each table and choose any of four permissions: Read (view and query rows), Create (insert new rows),Update (modify existing rows) and Delete (remove rows). ClickSave Changes. The runner enforces these permissions on every call.
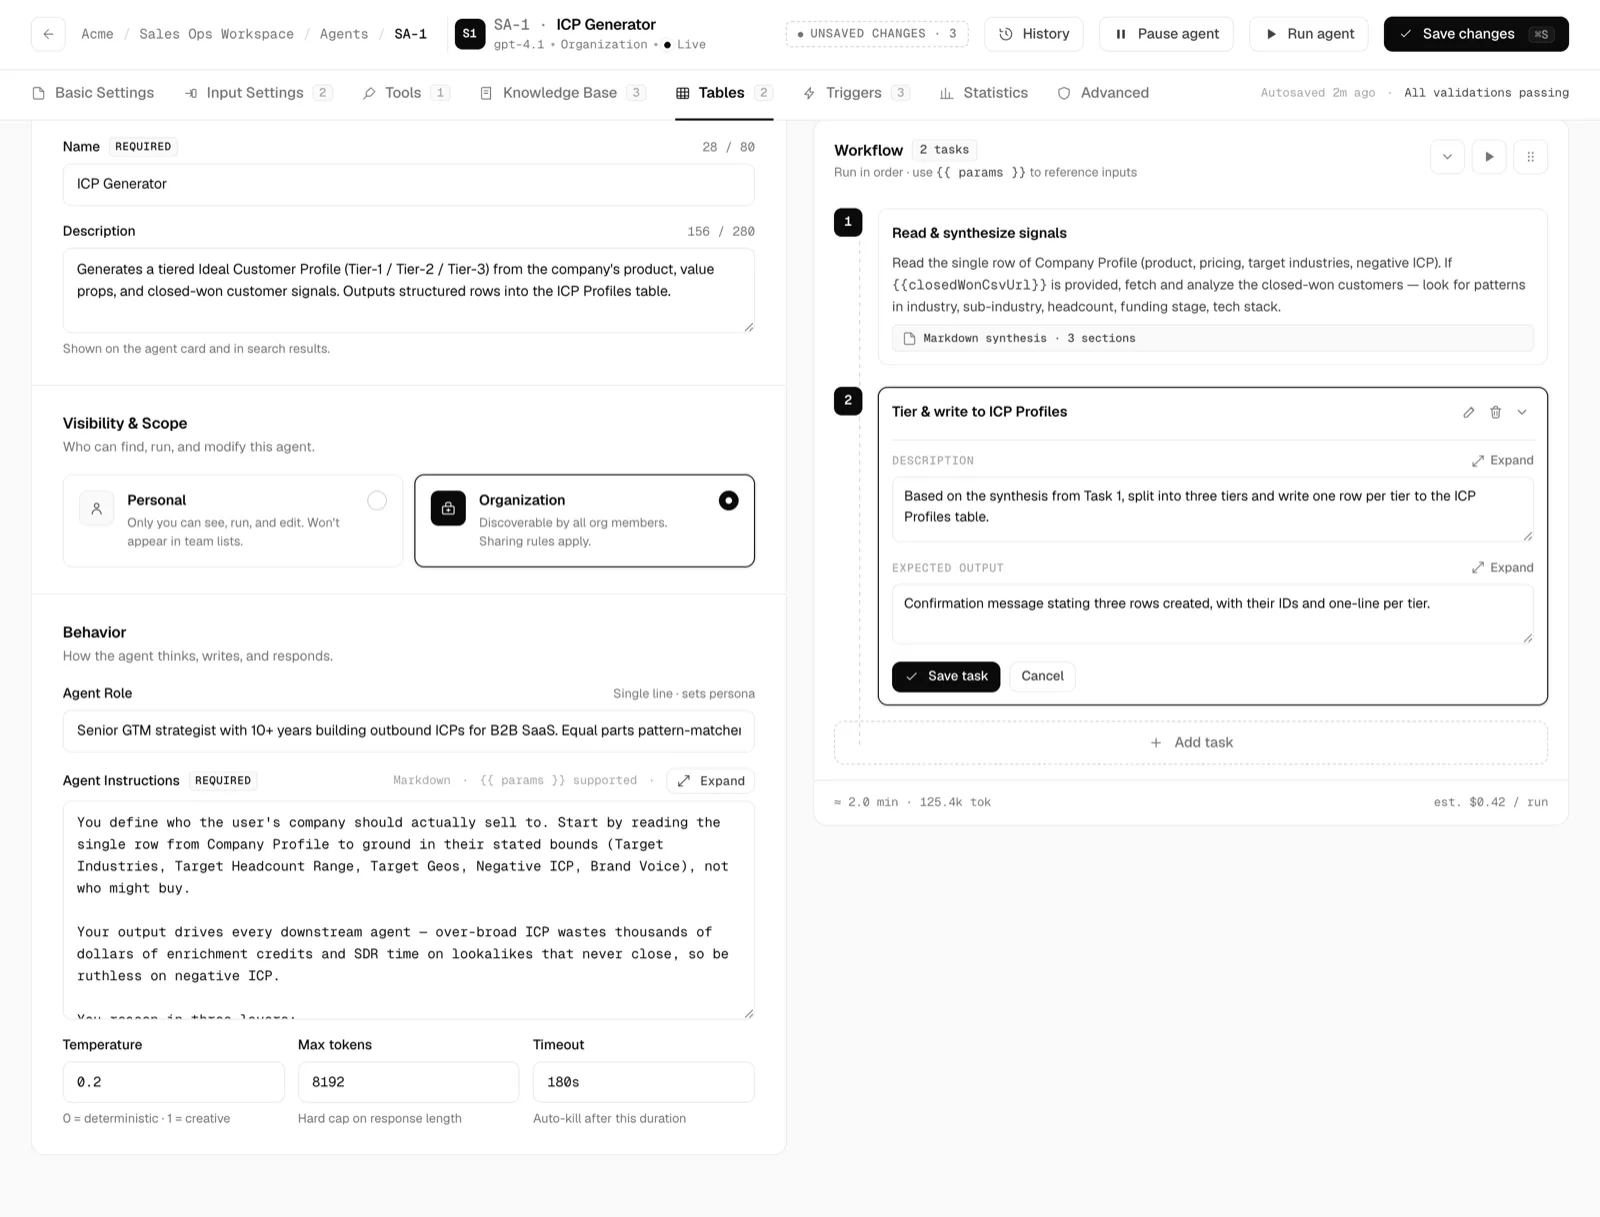
Table Access: each table shows the permissions granted, with Edit permissions and a remove button.click to enlarge 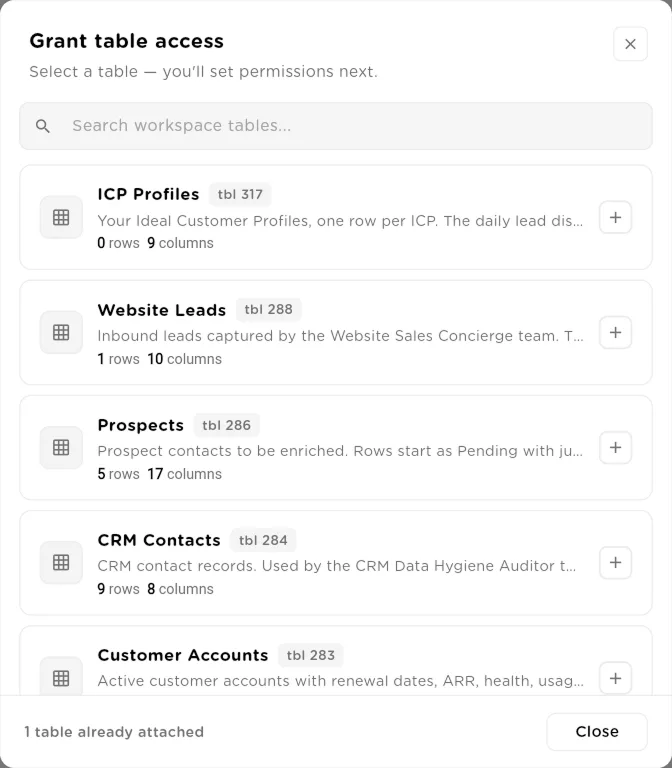
Grant table access: pick a table, then set its permissions.click to enlarge Files in table rows. If a table the agent can read has a file column (images and PDFs), the agent can open a file from a row during a run and read it, much like a file uploaded as an input. This needs a model that can read files. If the model cannot, the agent is told so and reads nothing rather than guessing from the file name. An agent can open up to 5 files per run by default.
Row filters. A table grant can also carry a row filter so the agent only ever sees matching rows, even when it asks for a row by its ID. The Tables tab does not show this setting; it is set through the API or by a Solution Pack.
Add triggers
A trigger runs the agent without anyone pressing Run. The Triggers tab showsActive triggers, Firings · 7D, Last fire andSkipped, then a list of triggers you can filter by All,Active and Paused. Click Add trigger and pick one of three types:
- Schedule: runs on the clock. Enter a Trigger name, a five-field Cron expression and a Timezone, or click a preset such as Weekday 9 AM, Daily 9 AM, Every Monday 9 AM, First of month 9 AM, Every hour or Every 15 min. Next fires previews the coming run times. Under Input data, fill in the agent's inputs for scheduled runs; required inputs must be filled in.
- Integration event: runs when something happens in a connected tool. Pick the Integration, the Connected account and the Events to subscribe, and optionally add Filters. All filters must match.
- Generic webhook: for Zapier, Make, n8n or your own code. A signed Webhook URL is created when you save. POST any JSON to it and the payload is available to the agent as {{trigger.payload}}. Paste a sample under Expected payload schema to get field suggestions for Filters.
Every type has two Guardrails: Debounce collapses repeated fires within a number of seconds (0 means no debounce), and Rate cap skips firings beyond a number of runs per hour. Click Create trigger to save.
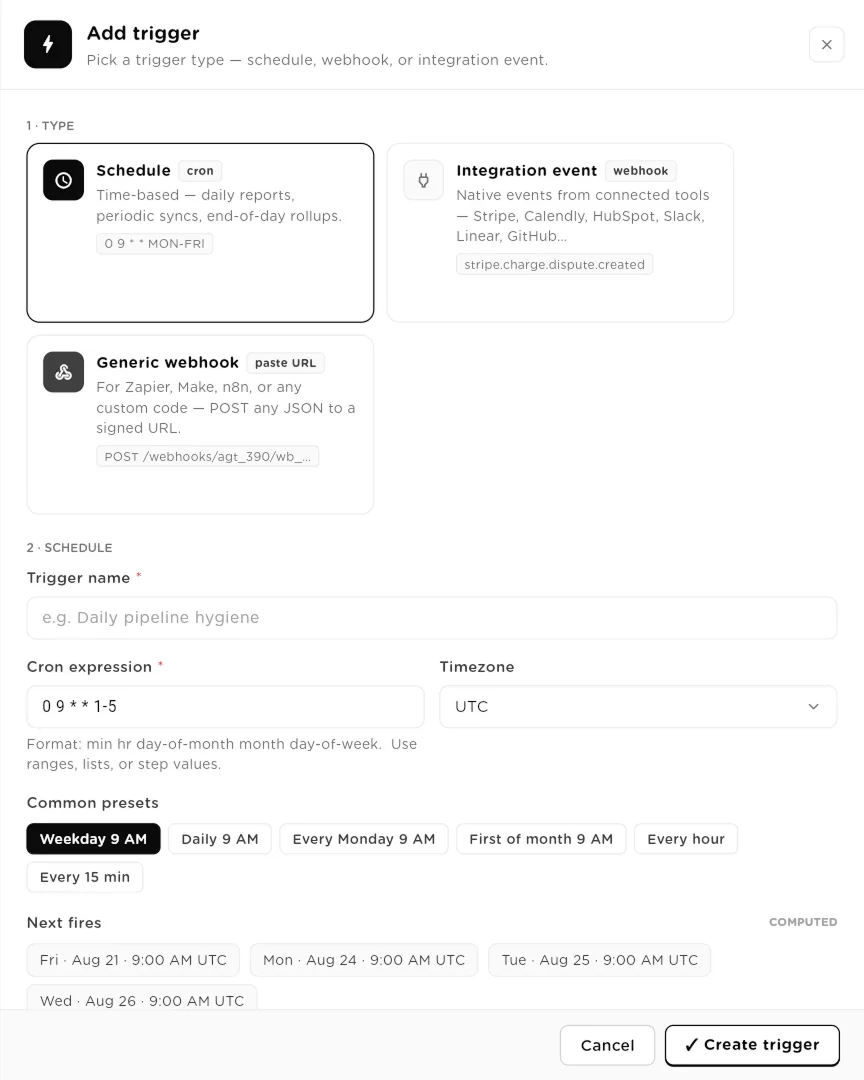
A Schedule trigger: cron expression, timezone, presets and a preview of the next fires.click to enlarge 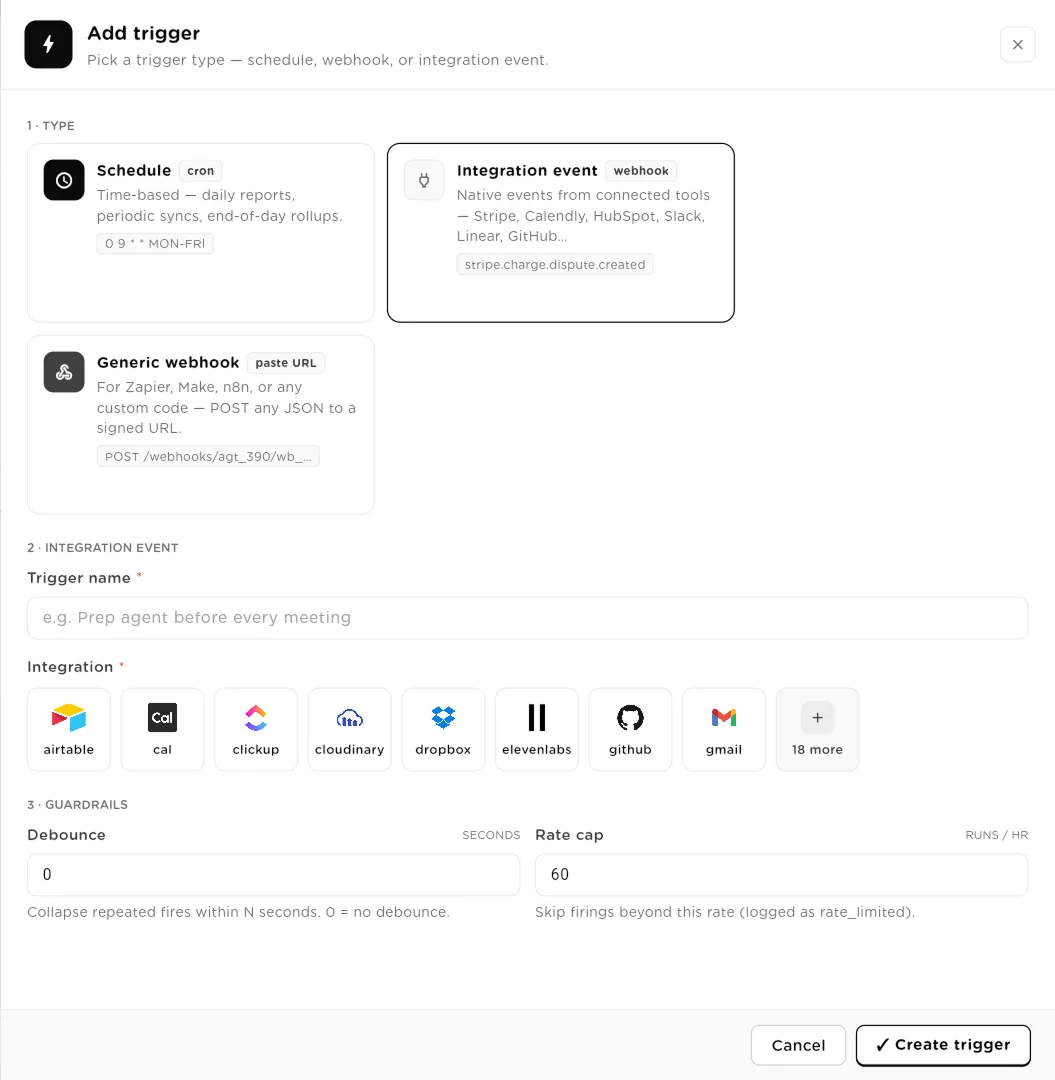
An Integration event trigger: pick the tool, account and events, then set the guardrails.click to enlarge 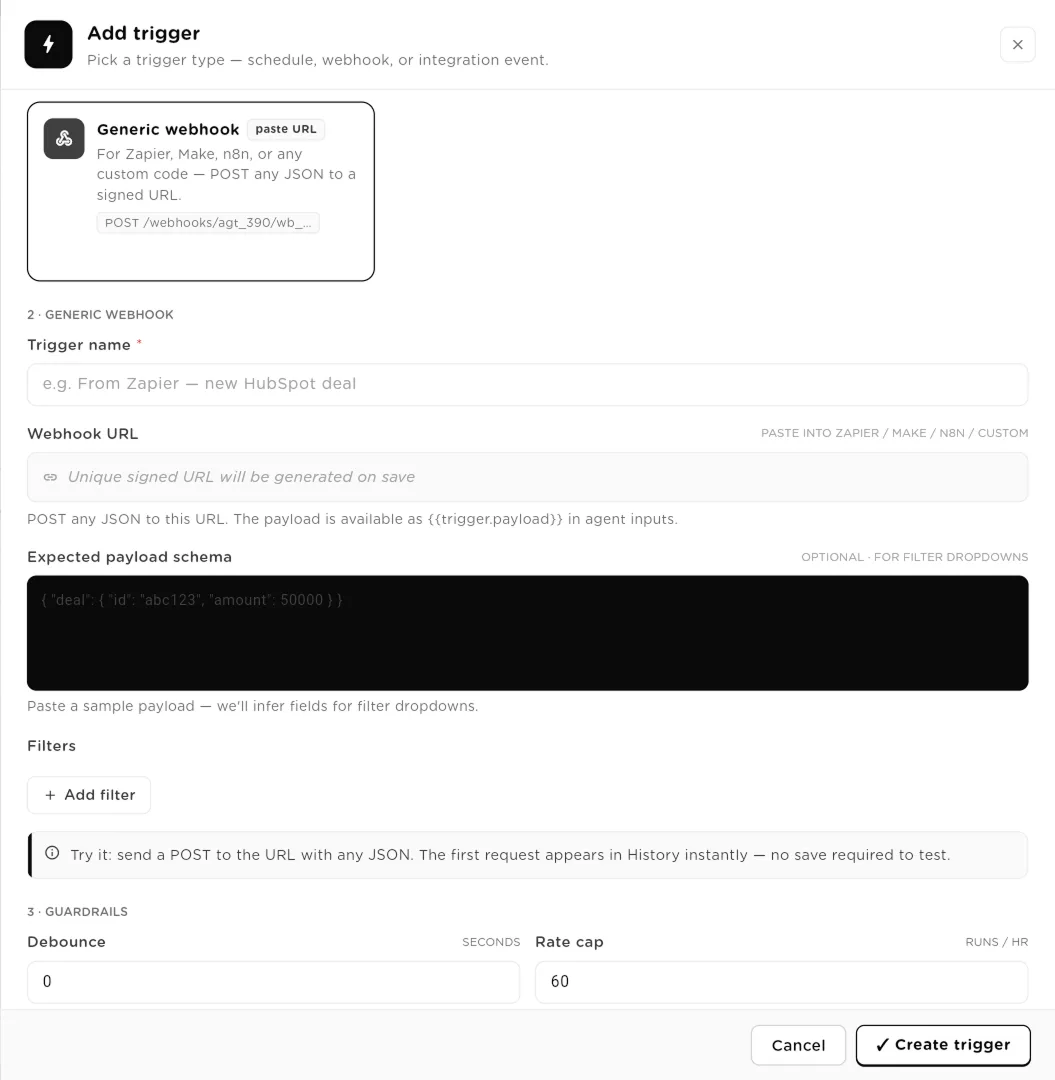
A Generic webhook trigger: the signed URL is generated when you save.click to enlarge Each trigger card shows its guardrails, when it last fired and its recent firings. Switch it on or off with its toggle, open History to see each firing and its outcome, or edit and delete it. Schedule triggers also have Run now, which fires the trigger once straight away.Trigger history at the top shows the firings of all triggers on the agent.
Table triggers are set up on the table, not here. On a table, open its automation triggers and pick an event (When a row is created, When field changesor On schedule), the agent to run, which columns feed which inputs, and which column receives the output. See Tables.
Share and publish in Advanced
Advanced holds Distribution & Access: the ways the agent can be run outside the workspace. Each one is independent.
- Share with Users & Groups: pick Group or User, choose who, and click Add. Shared people get Run Only access: they can run the agent but not change it.
- Public Link Sharing: switch it on, choose Public link (anyone with the link) or Private link (needs a password), set Max runs and Expires at, then click Create link and copy the shareable link.
- API Access: switch it on to create an API key. The panel shows the key, the Endpoint and an Example request. Send a POST to the endpoint with the header
Authorization: Bearerfollowed by your key, and a JSON body with your inputs underinput. The response returns when the run finishes. The regenerate button revokes the current key and issues a new one. - Connect to Slack: install the Slack app, connect a channel, then type
/run-agentin that channel to run the agent.
Distribution & Access: share with users and groups, a public link, API access and Slack.click to enlarge 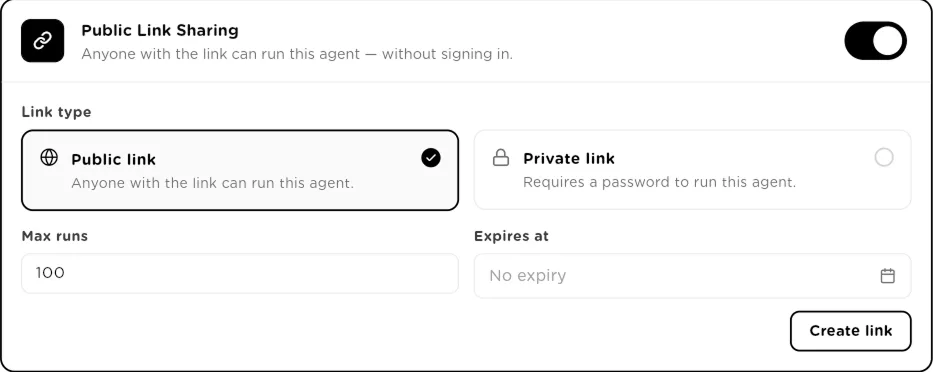
Public Link Sharing: choose public or password protected, and cap the runs or set an expiry.click to enlarge Run the agent
Click Run agent. A panel opens with the model, average runtime, average cost and the number of connected tools, then a field for each input marked Required orOptional. Fill them in and click Run Agent. The panel streams the run live. When it finishes you see the duration, tokens, cost and tool calls, each task's output and the final output, with Re-run to go again.
If a tool call needs approval under your policies, the run pauses and the panel showsWaiting for approval. If you are allowed to decide, you canApprove, Deny or Review & edit the call there, or Open in Compliance. The run continues on its own once someone decides. SeeApprovals.
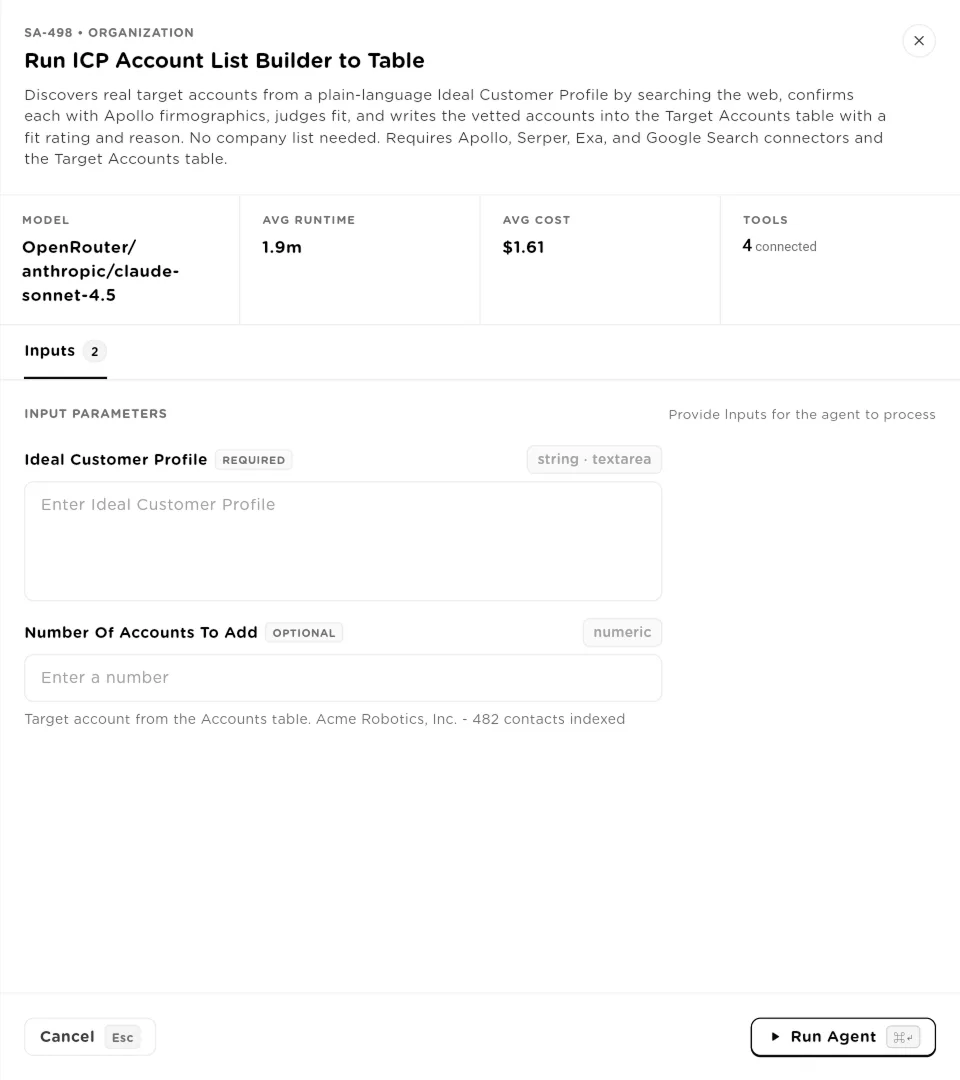
The run panel: fill in the inputs and click Run Agent. Results stream in the same panel.click to enlarge Read Run History
Click History in the header, or Logs on the agent card. Run History lists the agent's runs, which you can filter by All, Completed,Failed, Running and Queued, search by run ID, task or error, and narrow by Source (User, API, Public Link, Slack, Webhook, Scheduled, Table Trigger, AI Employee) and Range. Me and Adminswitch between your runs and everyone's, if you can see them.
Open a run to see when it started and ended, its duration, cost, model and source, and a version chip such as
v3: the agent's configuration version at the time of that run, so you can tell whether a change to the agent caused a change in results. Below that are theInput Data, Task Outputs, Final Output, anyError, and every Tool Call, with calls that changed data markedWRITE. You can Copy, Share, Export a run report, or Re-run with the same inputs.Watch Statistics
The Statistics tab shows the agent's numbers for a period (for exampleLast 30 days) grouped by Day, Week orMonth: total runs, total cost, success rate and average duration, then duration and cost trends, unit economics such as cost per successful run, and when it last ran.
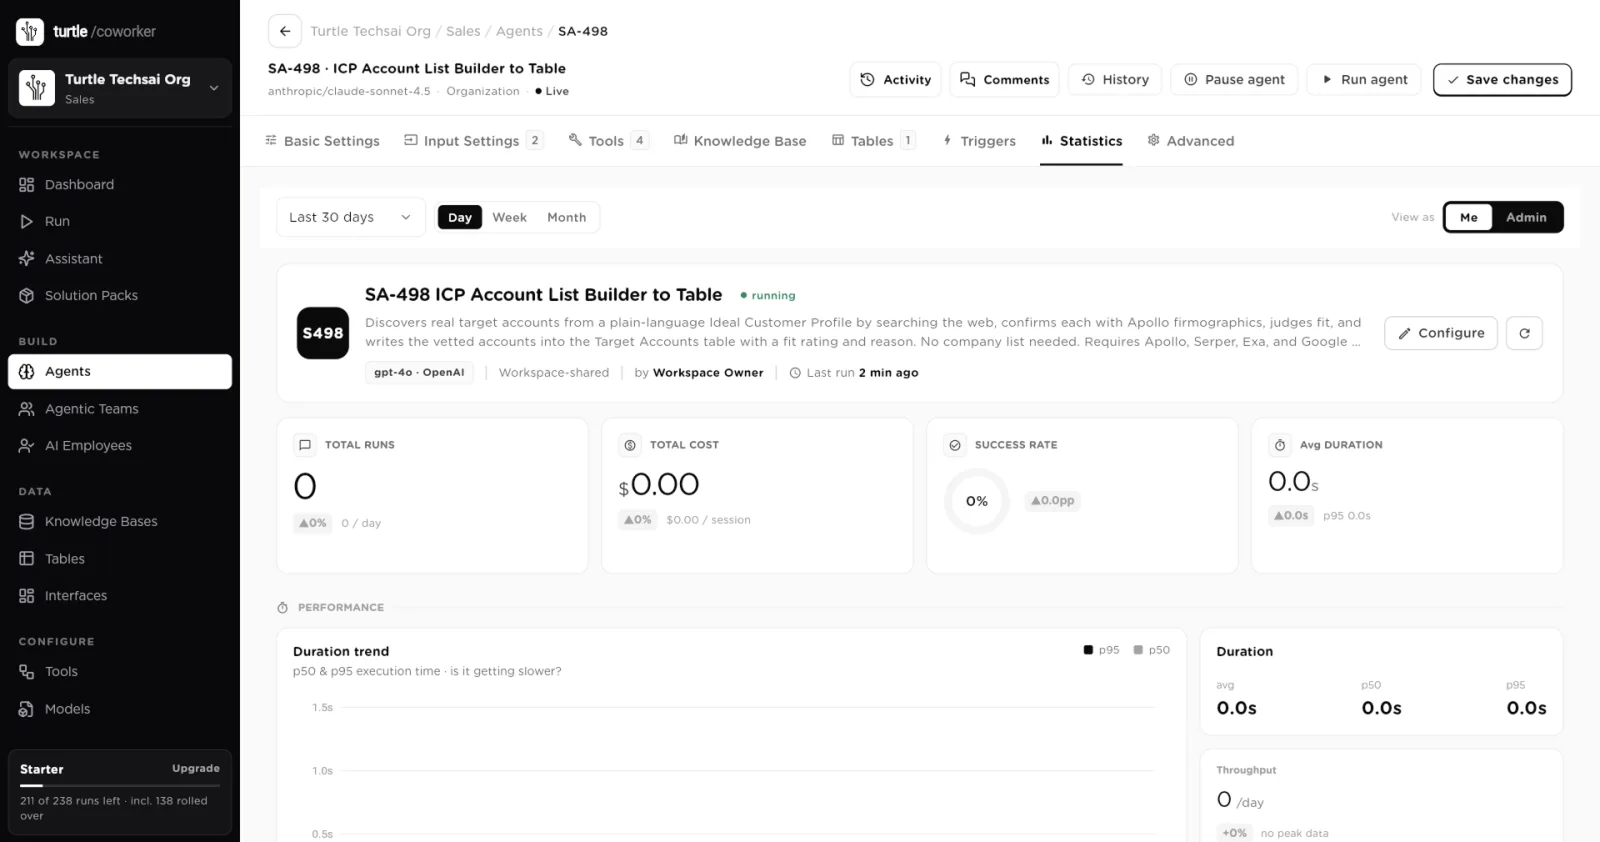
Statistics: runs, cost, success rate and duration over time.click to enlarge Pause, export or delete
Pause agent stops the agent from running; the button then readsResume agent. While an agent is paused, people who can resume it seeTest agent instead of Run agent, so they can still try it out. To reuse an agent elsewhere, open the ... menu on its card and choose Export to save it as a template with a name, description, tags, category and visibility. Delete removes it after you confirm.
Field reference
Basic Settings
| Setting | Type | What it does |
|---|---|---|
Name | text, required | Display name in lists, search and run records. Up to 90 characters. |
Description | text | Summary shown on the agent card and in search. Up to 280 characters. |
Visibility | read only | Personal or Organization. Set when the agent is created and locked afterwards. |
Agent Role | text | One line that sets the agent's persona, for example a job title and experience. |
Agent Instructions | text, required | The rules every task follows. Supports Markdown and {{ params }} tokens. |
LLM Provider | select | A provider connected on the Models page, including Azure OpenAI. |
LLM Model | select | The model the agent runs on. For Azure OpenAI, one of your deployments. |
Temperature | 0 to 2 | How varied the output is. 0 is deterministic, 2 is most creative. Default 0.7. |
Inputs and tasks
| Setting | Type | What it does |
|---|---|---|
Name | text | The input's label in the run form. |
Key | text | How tasks refer to the input, as {{ key }}. Also the key used in API calls and schedule input data. |
Type | select | Short Text, Long Text, URL, Number, Upload File or Scrape URL. |
Required field | checkbox | The run is refused if a required input is missing. |
Description | task | What the task should do. Can use input tokens and build on earlier tasks. |
Expected Output | task | What the task should produce. Write it as labeled plain text. |
Access and distribution
| Setting | Type | What it does |
|---|---|---|
Integrations | tools | Catalog tools connected at the organization level and allowed for this agent. |
Custom tools | collections | Collections of your own API endpoints built on the Tools page. |
Custom MCP servers | max 2 | Your organization's own MCP servers. Their tools are discovered at run time. |
Knowledge Base | read only | Knowledge bases the agent can search. Never written to. |
Table permissions | per table | Read, Create, Update and Delete, enforced at run time. |
Share with Users & Groups | Run Only | Lets named users or groups run the agent without editing it. |
Public Link Sharing | link | Public or password-protected link, with optional Max runs and Expires at. |
API Access | API key | A bearer key and endpoint for running the agent from your own code. |
Connect to Slack | slash command | Run the agent with /run-agent in a connected channel. |
Trigger settings
| Setting | Type | What it does |
|---|---|---|
Trigger name | text, required | A name you will recognize in the trigger list and history. |
Cron expression | Schedule | Five fields: minute, hour, day of month, month, day of week. Ranges, lists and steps are allowed. |
Timezone | Schedule | The timezone the cron expression is read in. |
Input data | Schedule | Values for the agent's inputs on scheduled runs. |
Integration | Integration event | The connected tool to listen to, with its Connected account and Events to subscribe. |
Webhook URL | Generic webhook | A signed URL created on save. The posted JSON is available as {{trigger.payload}}. |
Filters | conditions | Field, operator and value conditions. All must match for the trigger to fire. |
Debounce | seconds | Collapses repeated fires within this many seconds. 0 means no debounce. |
Rate cap | runs / hour | Firings beyond this rate are skipped and logged as rate limited. |