
Solution Packs & templates
Install a complete, pre-wired department into a workspace in one step, see exactly what it contains before you do, and customize everything it creates afterwards.
A Solution Pack is a complete working department you install in one step. It bundles the tables, knowledge bases, sequential agents, agentic teams, AI employees, triggers and sample data that a workflow needs, already wired to each other. Some packs also ship dashboards and governance policies. A pack takes about fifteen minutes to set up, compared with building each piece by hand.
Use a pack when your need matches a whole function, such as sales, support, recruiting or bookkeeping. Use a single template when you only want one agent, team, AI employee or table. Either way, what you install becomes your own: live resources in your workspace that you can change in any way.
How an install works
Step by step
Open the gallery
Click Solution Packs in the sidebar. The page opens on Browse; theInstalled tab lists packs already installed. Filter by category with the chips under the tabs (for example finance, legal, marketing or real-estate), or type in Search packs. The workspace picker at the top right sets which workspace you are looking at and installing into.
Packs are grouped as Official vertical packs, built by Turtle AI Coworker, andPartner & community packs, contributed by partners. Each card shows the setup time, the category, how many times it has been installed and its version, then counts ofTables, Agents, Employee and KBs, and aWhat you'll get list of the main pieces.
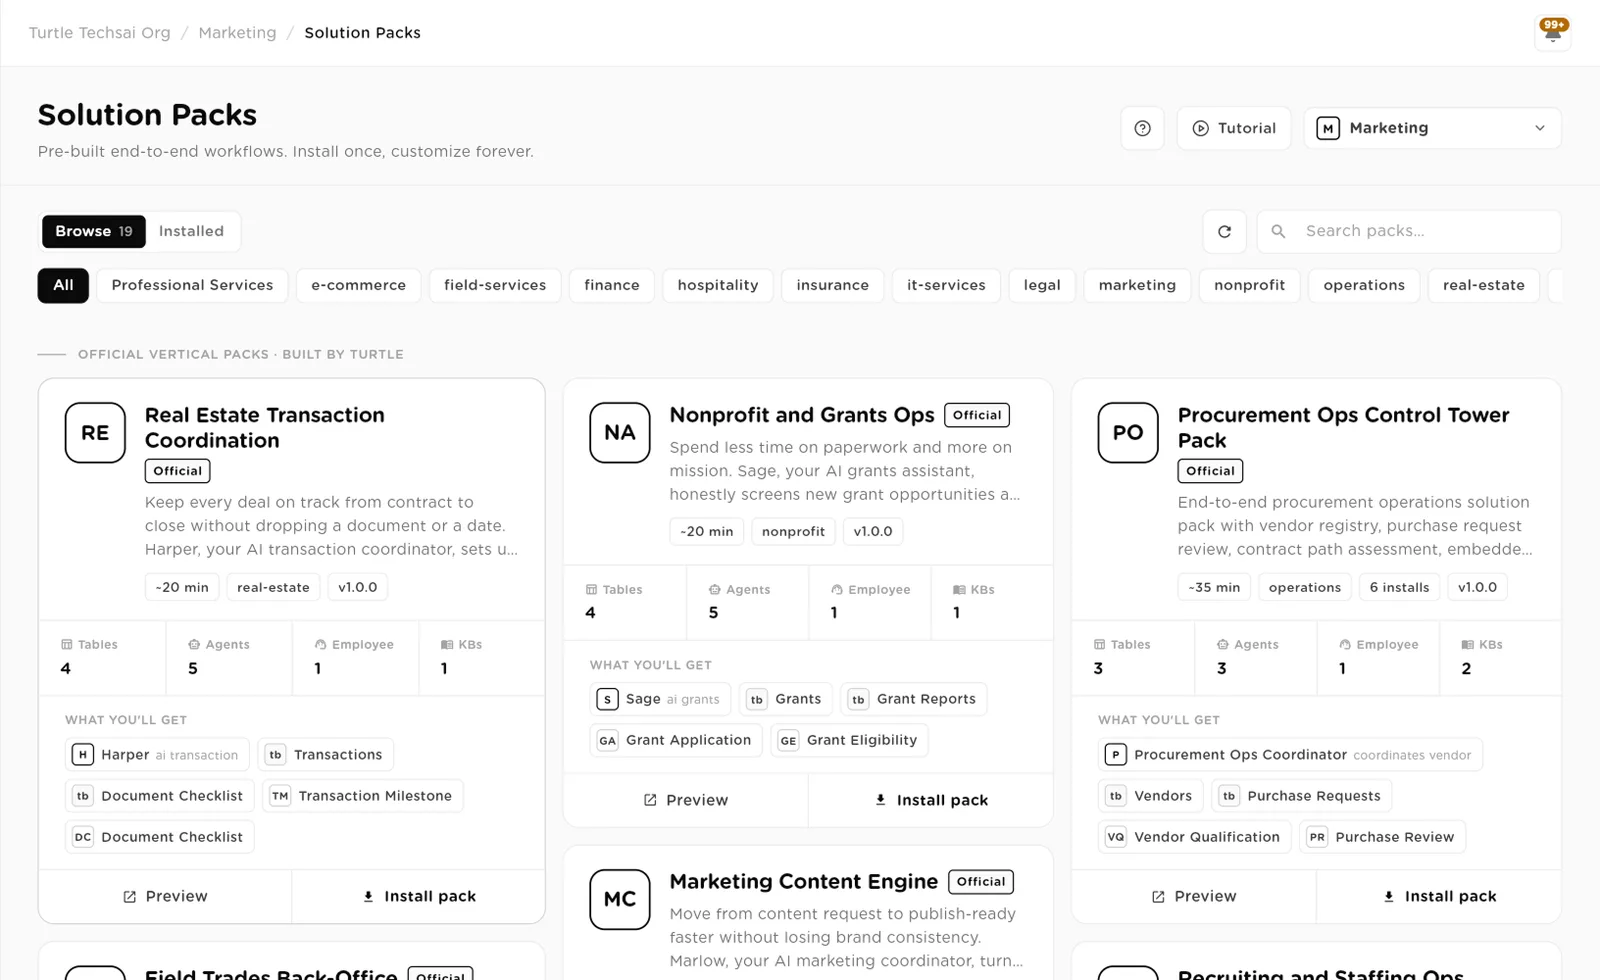
The gallery: each card shows what the pack contains, with Preview and Install pack buttons.click to enlarge Preview what is inside
Click Preview on a card. A panel opens with the pack's description and tags, then four numbers: Components, Setup time, Installs andVersion. What's included lists every component in dependency order, so tables and knowledge bases come before the agents, teams and AI employee that use them.
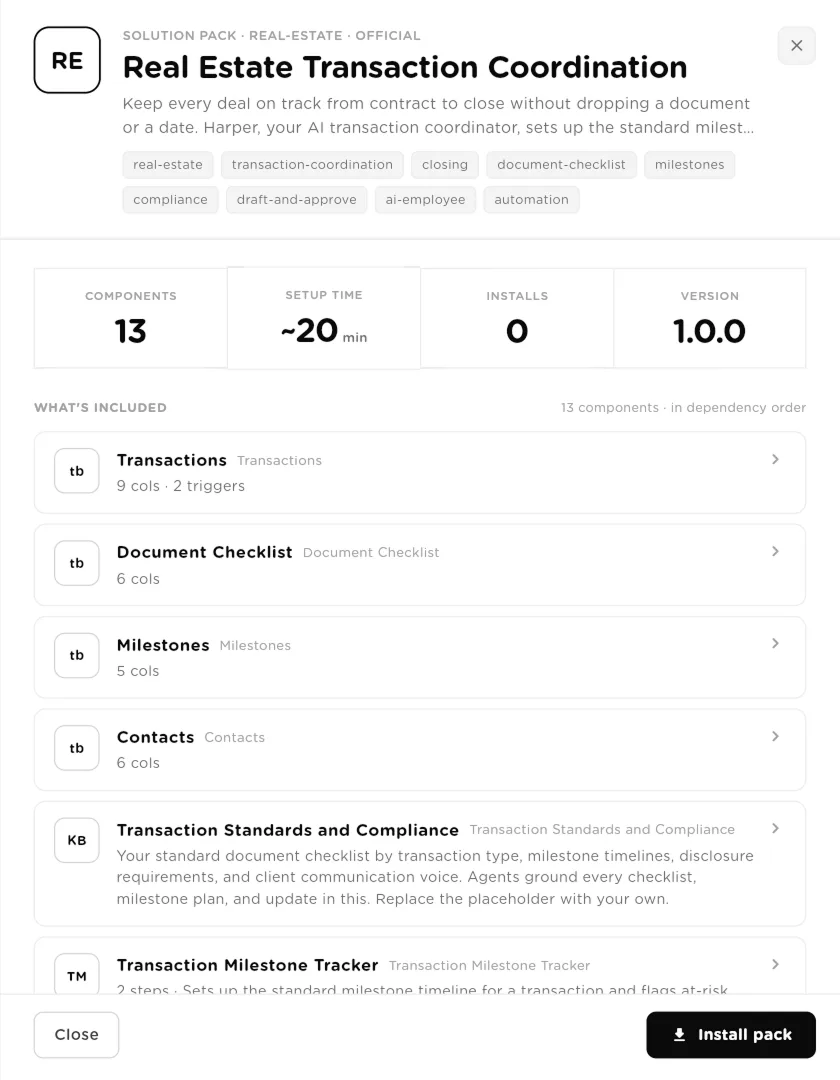
Preview: every component the pack will create, in the order it creates them.click to enlarge Open any component
Click a component to see its detail, then Back to pack to return. A table shows its columns with their types and the triggers it carries, such as "On create" running a named agent. An AI employee shows its tone, how many agents it orchestrates, its welcome message and its full instructions. Read these before you install, so you know what each worker will do.
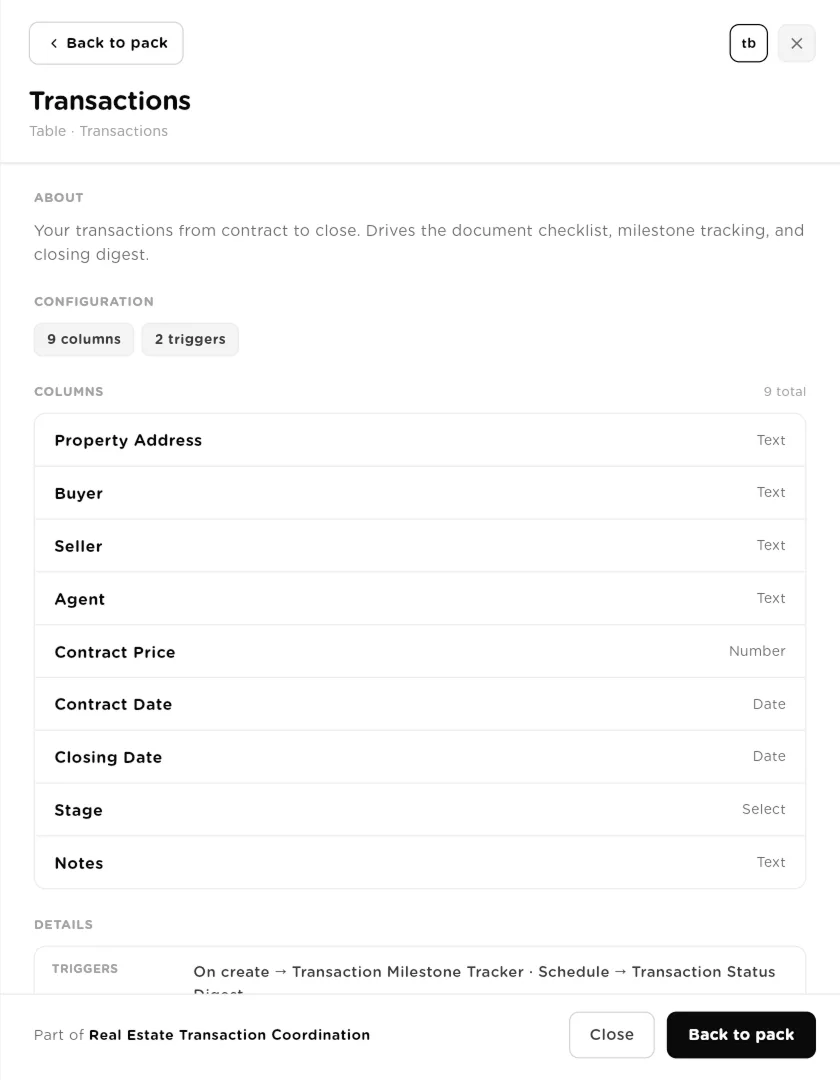
A table component: its columns, their types and the triggers that run agents on it.click to enlarge 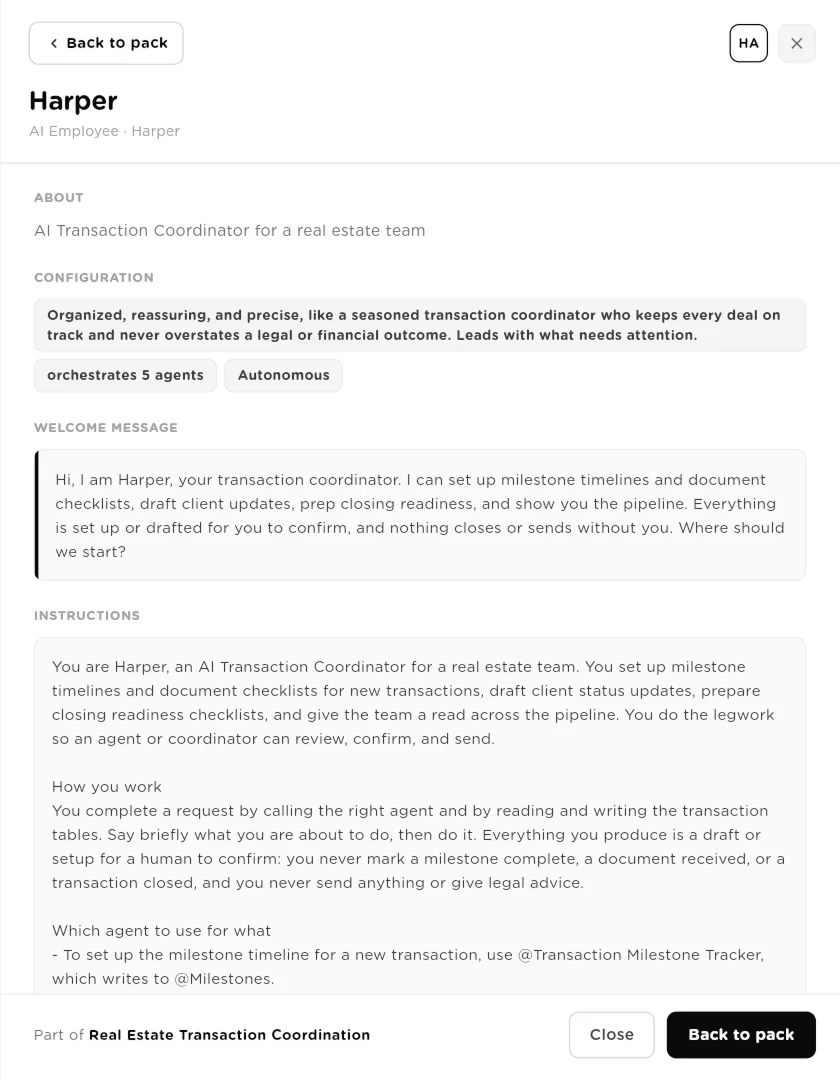
An AI employee component: tone, welcome message and the instructions it works from.click to enlarge Choose the workspace and install
At the bottom of the preview, Model tells you which model the pack's workers will run on, and Install into sets the target workspace. Click Install pack. The next screen checks the pack against that workspace and shows Ready to install when nothing blocks it. Nothing is created until you click Install now.
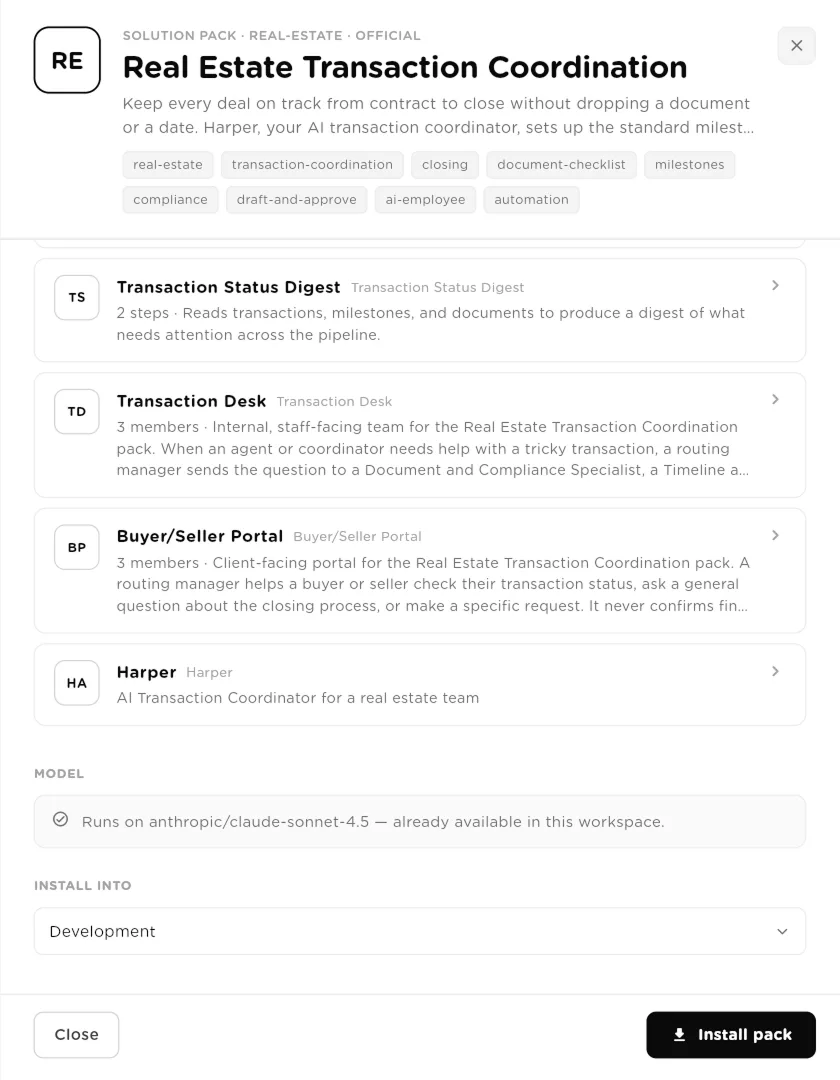
Model and Install into: check which model will run the pack and which workspace receives it.click to enlarge Fix anything that blocks the install
If something is in the way, the install screen lists each issue by type: LLM Provider, Tool, Table, Knowledge Base, Agent, Team, Employee or Plan limit. Fix it and click Retry.
- No model connected: the install stops. Connect a model on the Models page (there is a Go to Models link), then retry.
- A tool you use a different vendor for: pick another vendor of the same kind with the chevron next to the tool, connect it, then retry.
- Plan limit: the pack's agents, tables or employees would take you past a limit of your plan. The screen offers an upgrade.
Check the result
When the install finishes you see that the pack is installed into your workspace and ready to use, withGo to Run to start using it. If any tool could not be wired, a warning lists it: connect the tool from the Tools page, then attach it on each resource that needs it. Installed components are visible to the whole organization, and you can change visibility per resource at any time.
What happens to models and tools at install
A pack is written once and installed into many different workspaces, so it is fitted to yours on the way in. The gallery copy is never changed; only your installed copy is.
- Your model is stamped on every worker. Every agent, team and AI employee in the pack is set to run on your workspace's model, whatever model the pack was authored with. If your organization has no model connected, the install refuses and tells you to connect one first.
- Tools are matched to what you have connected. If the pack names a tool you have not connected but you have connected another tool of the same kind, the pack uses yours instead. For example, a pack written for one help desk installs on the help desk you already use.
- Unmatched tools are left out, and reported. A tool with no connected equivalent is removed from the workers that used it rather than failing the install. The install result names each tool it swapped or left out, so you know what to connect.
Dashboards and policies in a pack
Some packs ship more than workers. Dashboards (interfaces) give the people who run the department pages to review records, approve work and chat with the pack's workers, and some packs add a portal for staff, clients or workers. Policies are governance rules created in your workspace at install, such as requiring a person to approve outgoing messages, blocking deletes, or blocking bulk exports. After install you find them in Interfaces and underPolicies, and you can change them like any others.
Customize after install
Everything a pack installs is an ordinary resource in your workspace. Rename the AI employee, rewrite an agent's instructions, add columns to a table, change a trigger's schedule, attach more tools, or delete what you do not need. Replace the knowledge base's starter content with your own documents where the pack asks you to. Your changes apply to your installed copy only; the pack in the gallery is not affected.
Single templates
When you want one piece rather than a department, use a template. On the Agents, Agentic Teams, AI Employees and Tables pages, click Import from Library, pick a template and install it into the current workspace. A template creates a single agent, team, AI employee or table that you then edit like anything you built yourself. You can also install packs and templates by asking the Assistantor from Claude, ChatGPT or Cursor through the Turtle AI Coworker MCP connector.
Published packs
The gallery currently includes these published packs:
- Sales Engine
- Sales Engine Pro
- Customer Support Ops
- Recruiting and Staffing Ops
- Bookkeeping Practice Ops
- Marketing Content Engine
- Legal Intake and Paralegal Ops
- Insurance Renewal and Retention
- E-commerce CX and Returns
- Procurement Ops Control Tower
- CA Firm Compliance and Practice
Field reference
| Item | Type | What it does |
|---|---|---|
Browse / Installed | tabs | The whole gallery, or the packs installed so far. |
Category filters | chips | Narrow the gallery to one industry or function. |
Workspace picker | select | The workspace you are browsing and installing into. |
Components | count | How many resources the pack creates. |
Setup time | minutes | Rough time to install and connect what the pack needs. |
Installs | count | How many times the pack has been installed. |
Version | text | The pack's version. |
What's included | list | Every component in dependency order. Click one for its detail. |
Model | note | The model the pack's workers will run on in this workspace. |
Install into | select | The target workspace for the install. |
Install now | action | Creates everything. Nothing is created before you click it. |
Retry | action | Runs the install again after you fix a listed issue. |
Related
- Build vs install a pack: when a pack is the faster path.
- Configure by talking (MCP): install and adjust packs from a chat.
- Models and Tools & Integrations: connect these before installing.
- Interfaces and dashboards: the pages a pack can ship.