
Tables
Store the records your agents read and write, add views, forms and AI-filled columns, and run agents automatically when rows change.
A Table is a typed grid of rows and columns that lives in a workspace. It is the structured memory of your AI workforce: leads, invoices, tickets, candidates, anything with one row per record. Agents, Agentic Teams and AI Employees can read and write a table once you grant them access, and people can work in the same table from the grid, a form or an interface.
Use a table whenever work needs state that outlives one run: a list that agents fill in over time, a queue that a trigger works through, or a reference list an agent looks things up in. Where aKnowledge Base holds documents to search, a table holds facts you can filter, sort and update.
How a table works
Rows arrive by hand, from an import, from a form or from an agent. A row event fires a trigger, the trigger runs an agent with values from the row, and the agent's answer is written back into a column.
Step by step
Open the Tables page
Go to Data then Tables in the sidebar. The top strip counts yourTables, Rows total, AI columns andTriggers · 24h. Use the All and Archived tabs, the search box (it matches table and column names), the Sort menu (Last write, Name, Rows count, Columns count) and the grid or list toggle. The workspace picker at the top switches between workspaces.
Each card shows the table's reference key, its schema, row count, last write, how many resources use it, and its triggers. Open or Manage opens the table, andAdd trigger opens its triggers. The ... menu has Add Row, Export as Template, Archive and Delete.
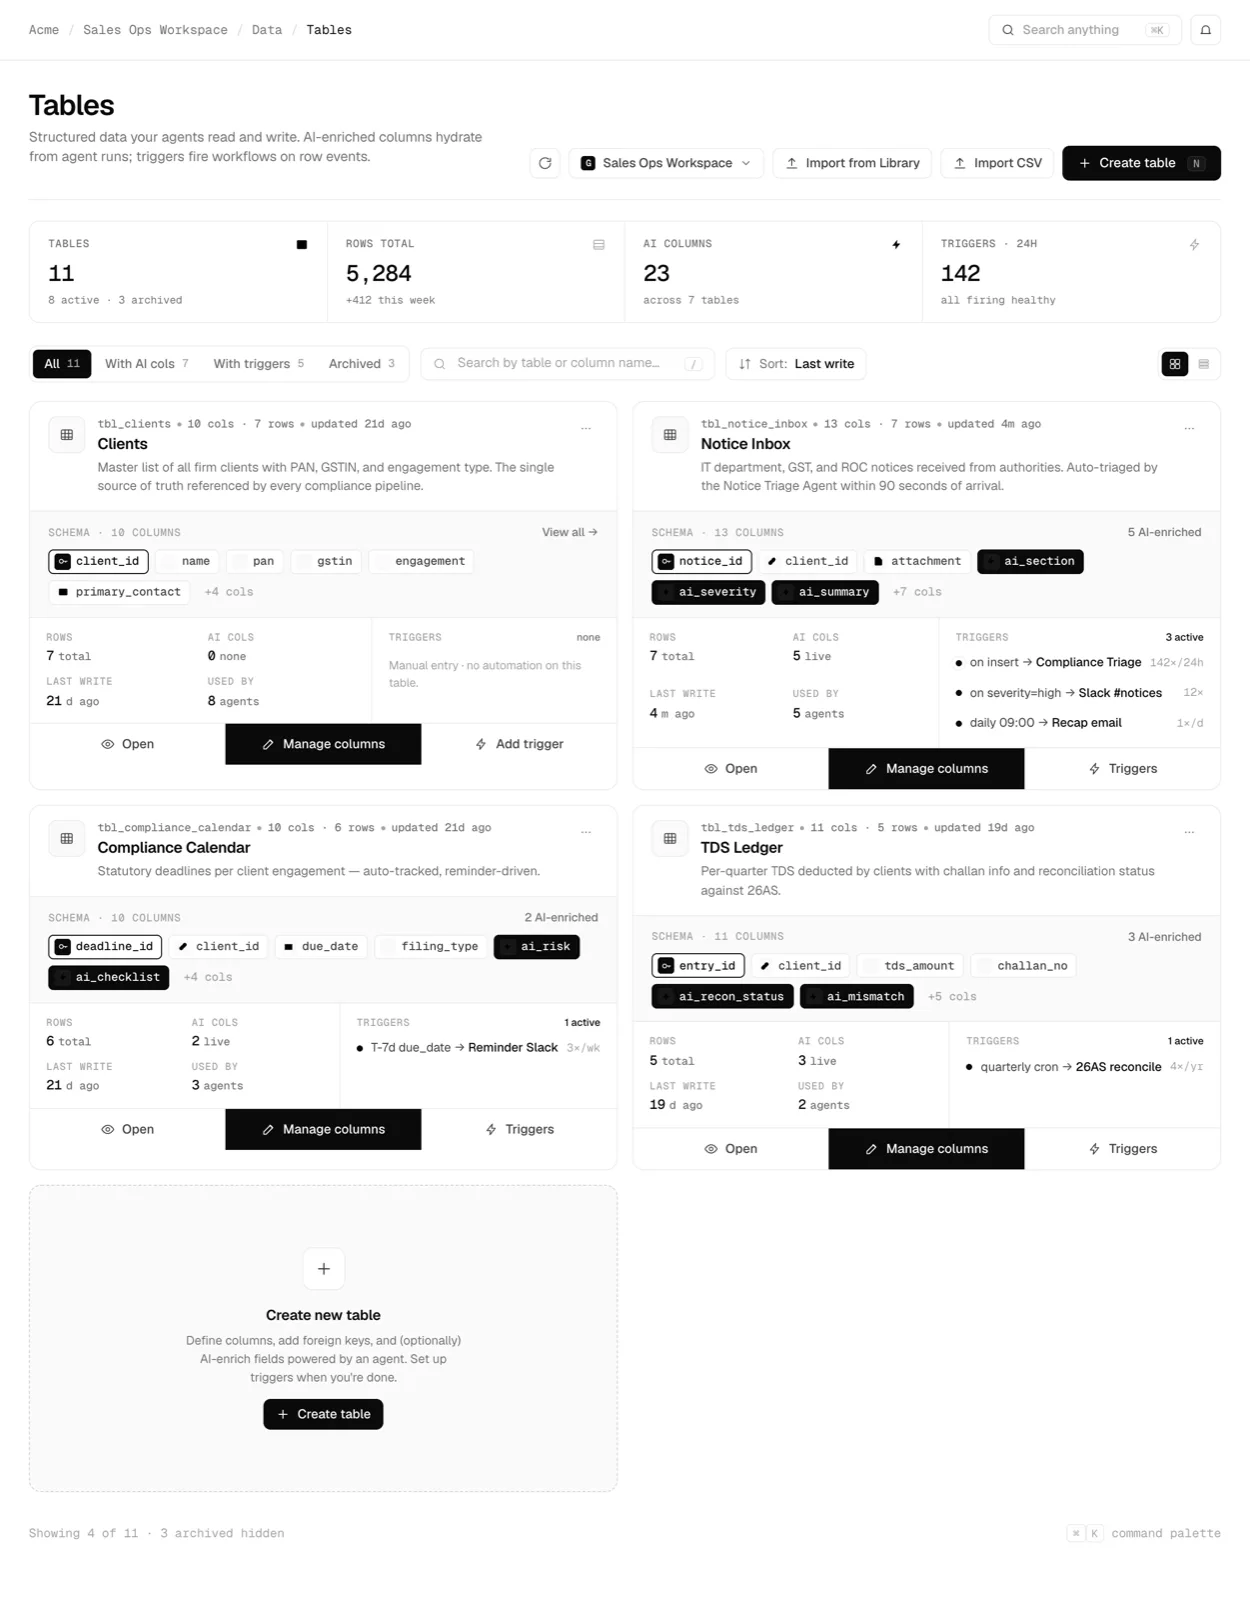
The Tables page: every table in the workspace with its schema, activity and automations.click to enlarge Create a table
Click Create Table. Enter a Table name (required, up to 100 characters) and an optional Description. Write the description for your agents: it is how they decide whether a table is the right one to query. Then add columns. Each row in theColumns list has a name, a type picker and a uniq box for unique values. Press Shift + Enter to add another column, or use Add column. Choosing Select asks for its options, and choosing Foreign Key asks for the table and column it points at.
Tick Reference-able from other tables if other tables should be able to link to this one with a Foreign Key column. Click Create table to finish.

Create new table: name it, describe it, and add typed columns.click to enlarge Or install a ready-made table
The download icon next to Create Table opens Import table from library. Filter by Official, Partner or My/Org, or by tag. Click a card to see its columns, then Import. Templates that include AI columns showChoose model first, so the AI columns run on a model your organization has connected.
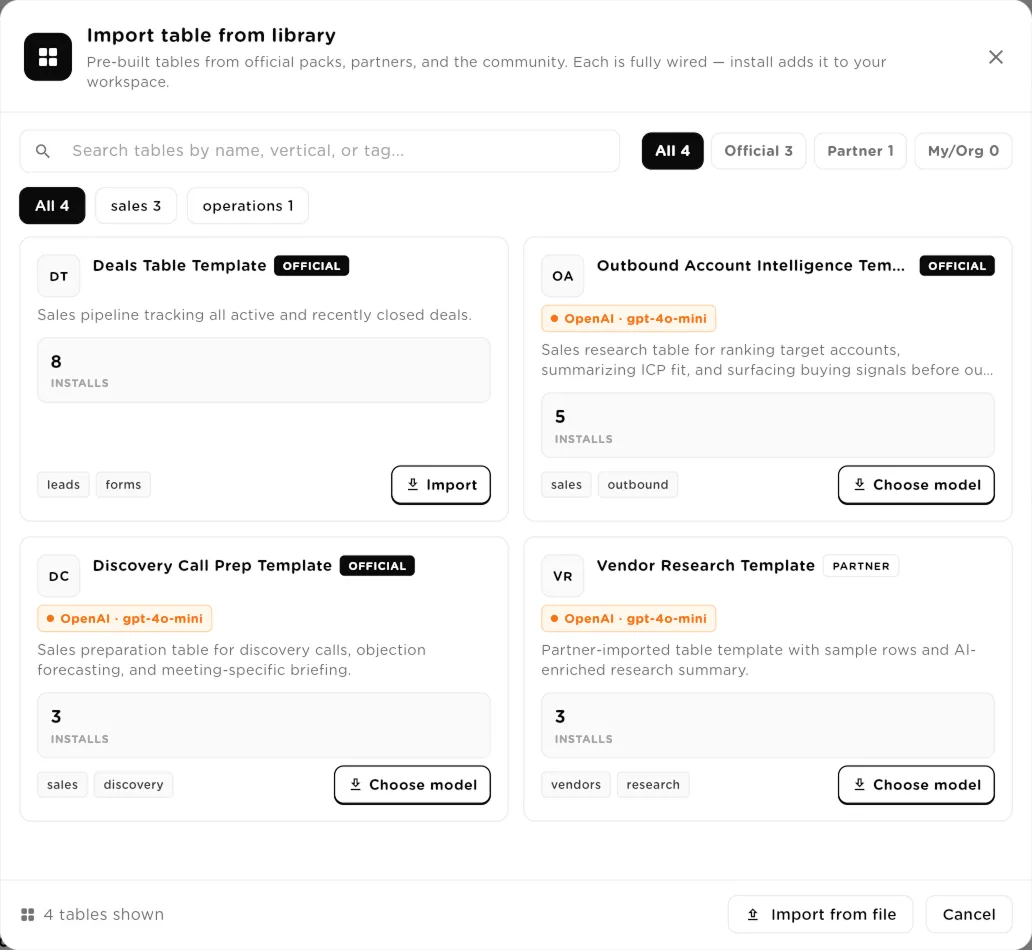
The table library: install a pre-built table into your workspace.click to enlarge Work in the grid
Opening a table shows the Grid. The toolbar holds Add row,Triggers, Import and Export on the left, andFilter, Sort, Columns, the density buttons and the settings gear on the right. Activity and Comments sit at the top of the page. Tweaks in the footer changes row density, text wrapping, zebra stripes and which helper columns show.
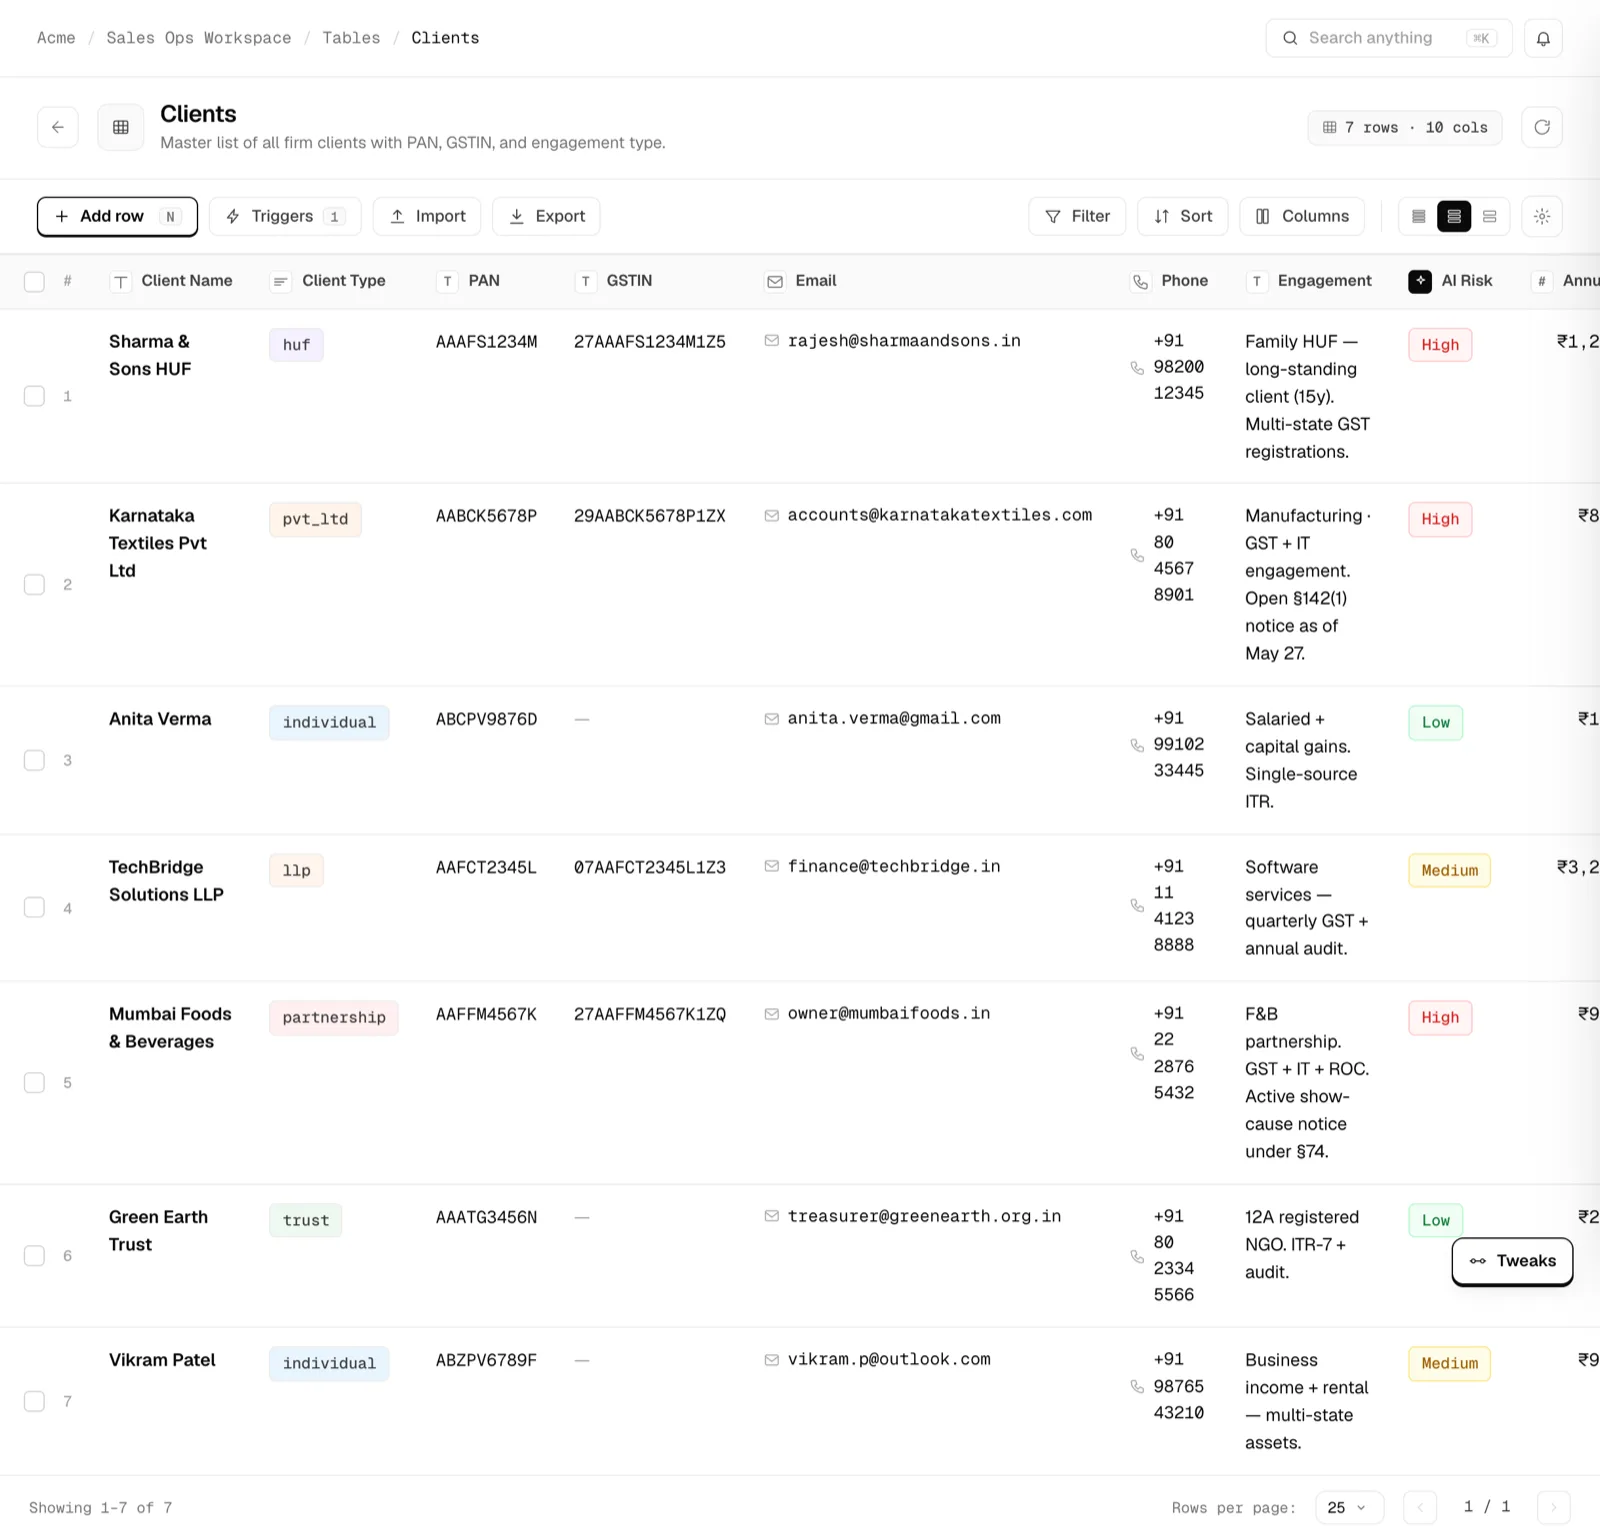
The Grid: typed cells, the toolbar, and pagination in the footer.click to enlarge Add, edit and delete rows
Add row opens Add new row with one field per column. Required fields are marked with a star and the footer counts required and optional fields. AI Enrich columns are not on the form: they fill in on their own after the row is saved.
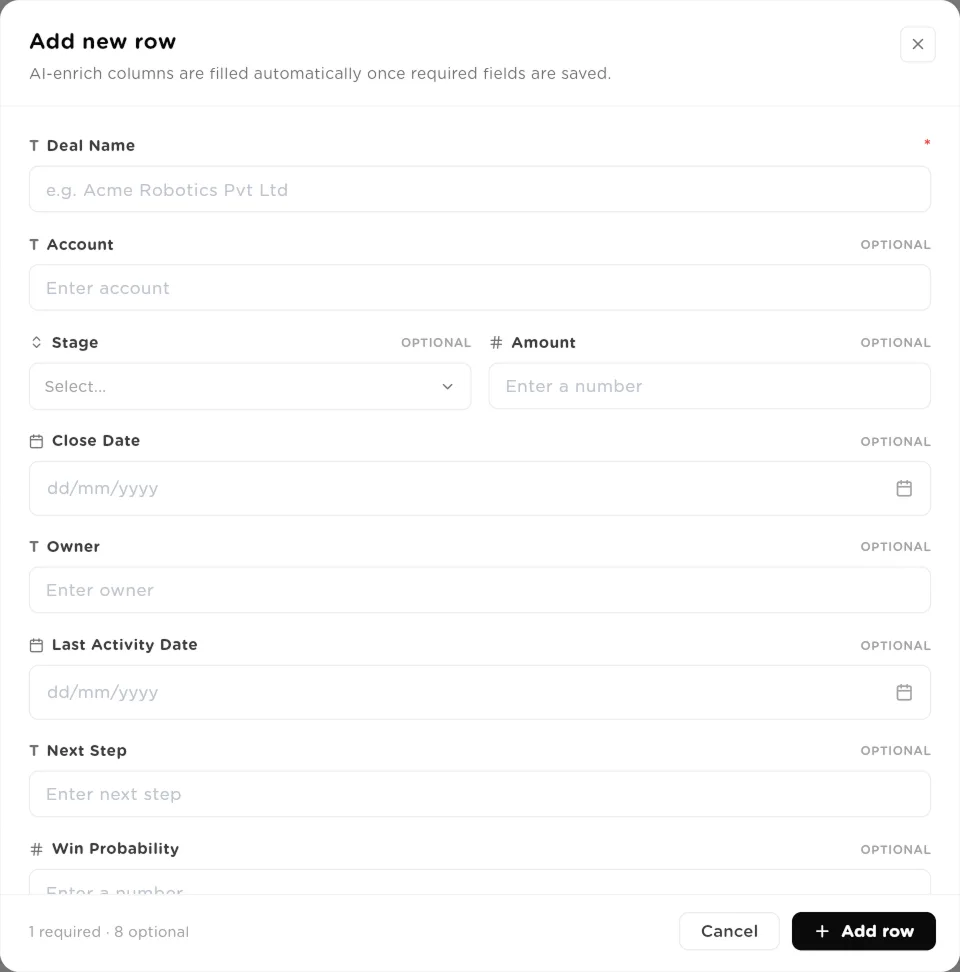
Add new row: one typed field per column.click to enlarge Click any row to open its drawer. Every field is editable there; click Save changeswhen you are done. The arrows at the top move to the previous or next row. Duplicatecopies the row and Delete row removes it. Created At and Updated At are shown but cannot be edited.
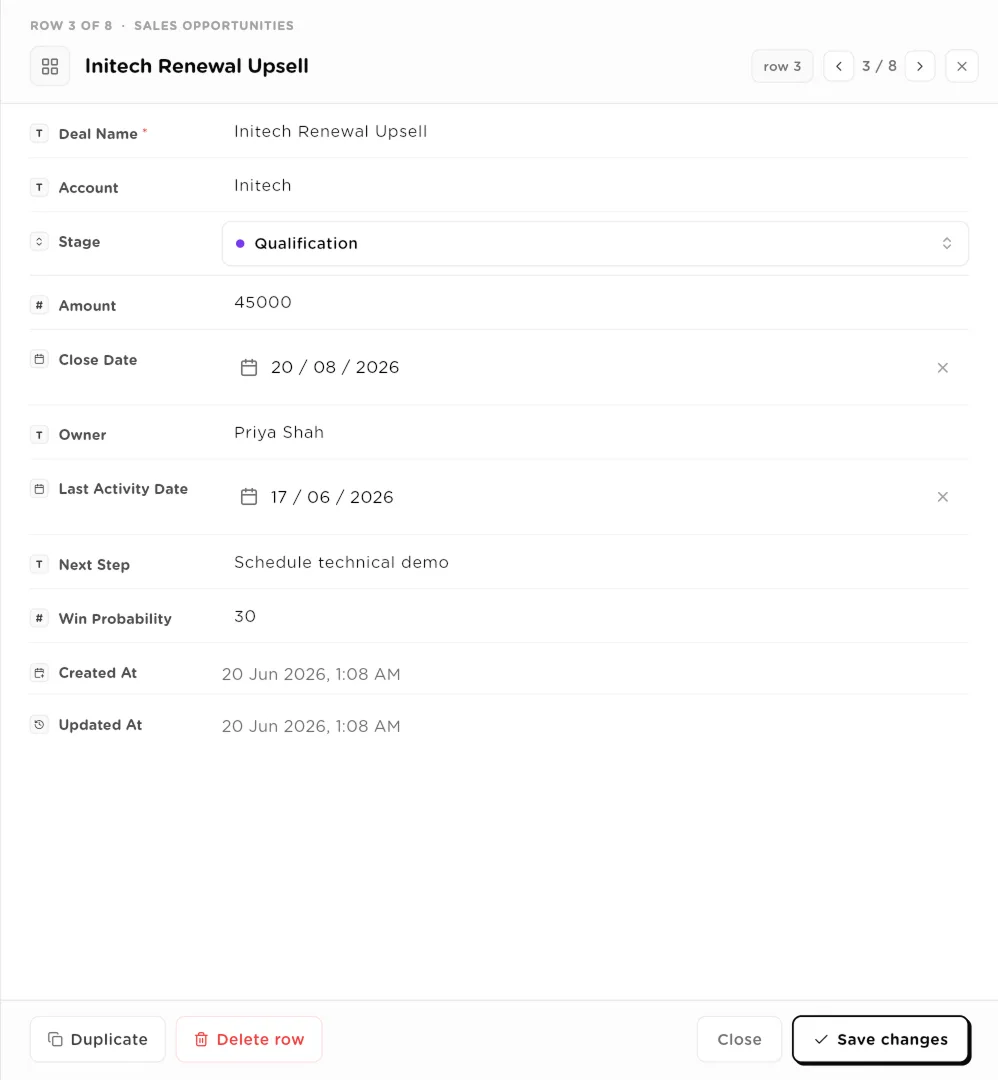
The row drawer: edit one record, step through rows, duplicate or delete.click to enlarge To act on many rows, tick their boxes. A bar appears with Export CSV andDelete. A row that another table links to through a Foreign Key cannot be deleted until that link is removed.
Manage columns
Click Columns to open Manage columns. Drag rows by the grip to reorder, use the pencil to edit a column and the bin to delete it. Deleting a column removes all data in it. Click Add column to add one.
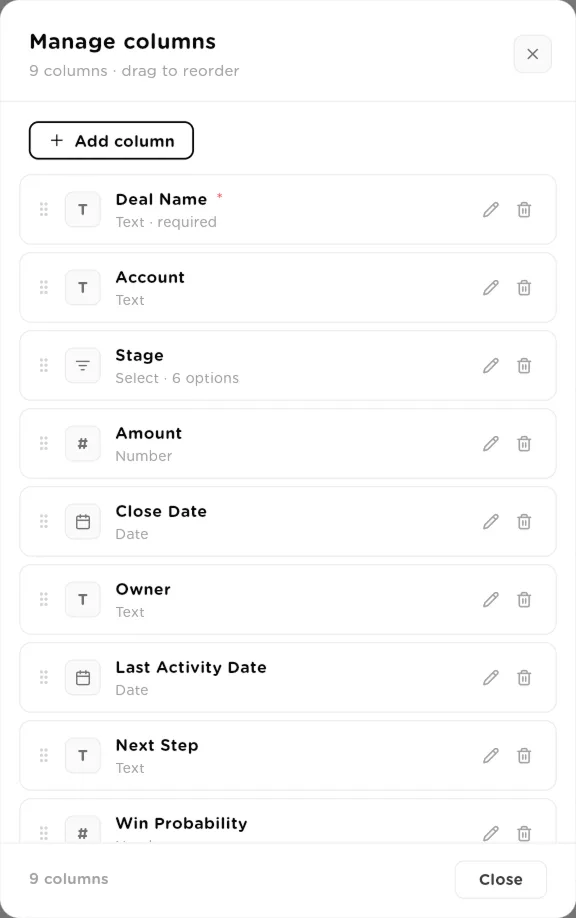
Manage columns: reorder, edit, delete, or add a column.click to enlarge In Add Column, enter a Column name (up to 50 characters), choose theColumn type, and set Unique values, Required fieldand Visible in table. Some types ask for more, as listed in the column type reference below.
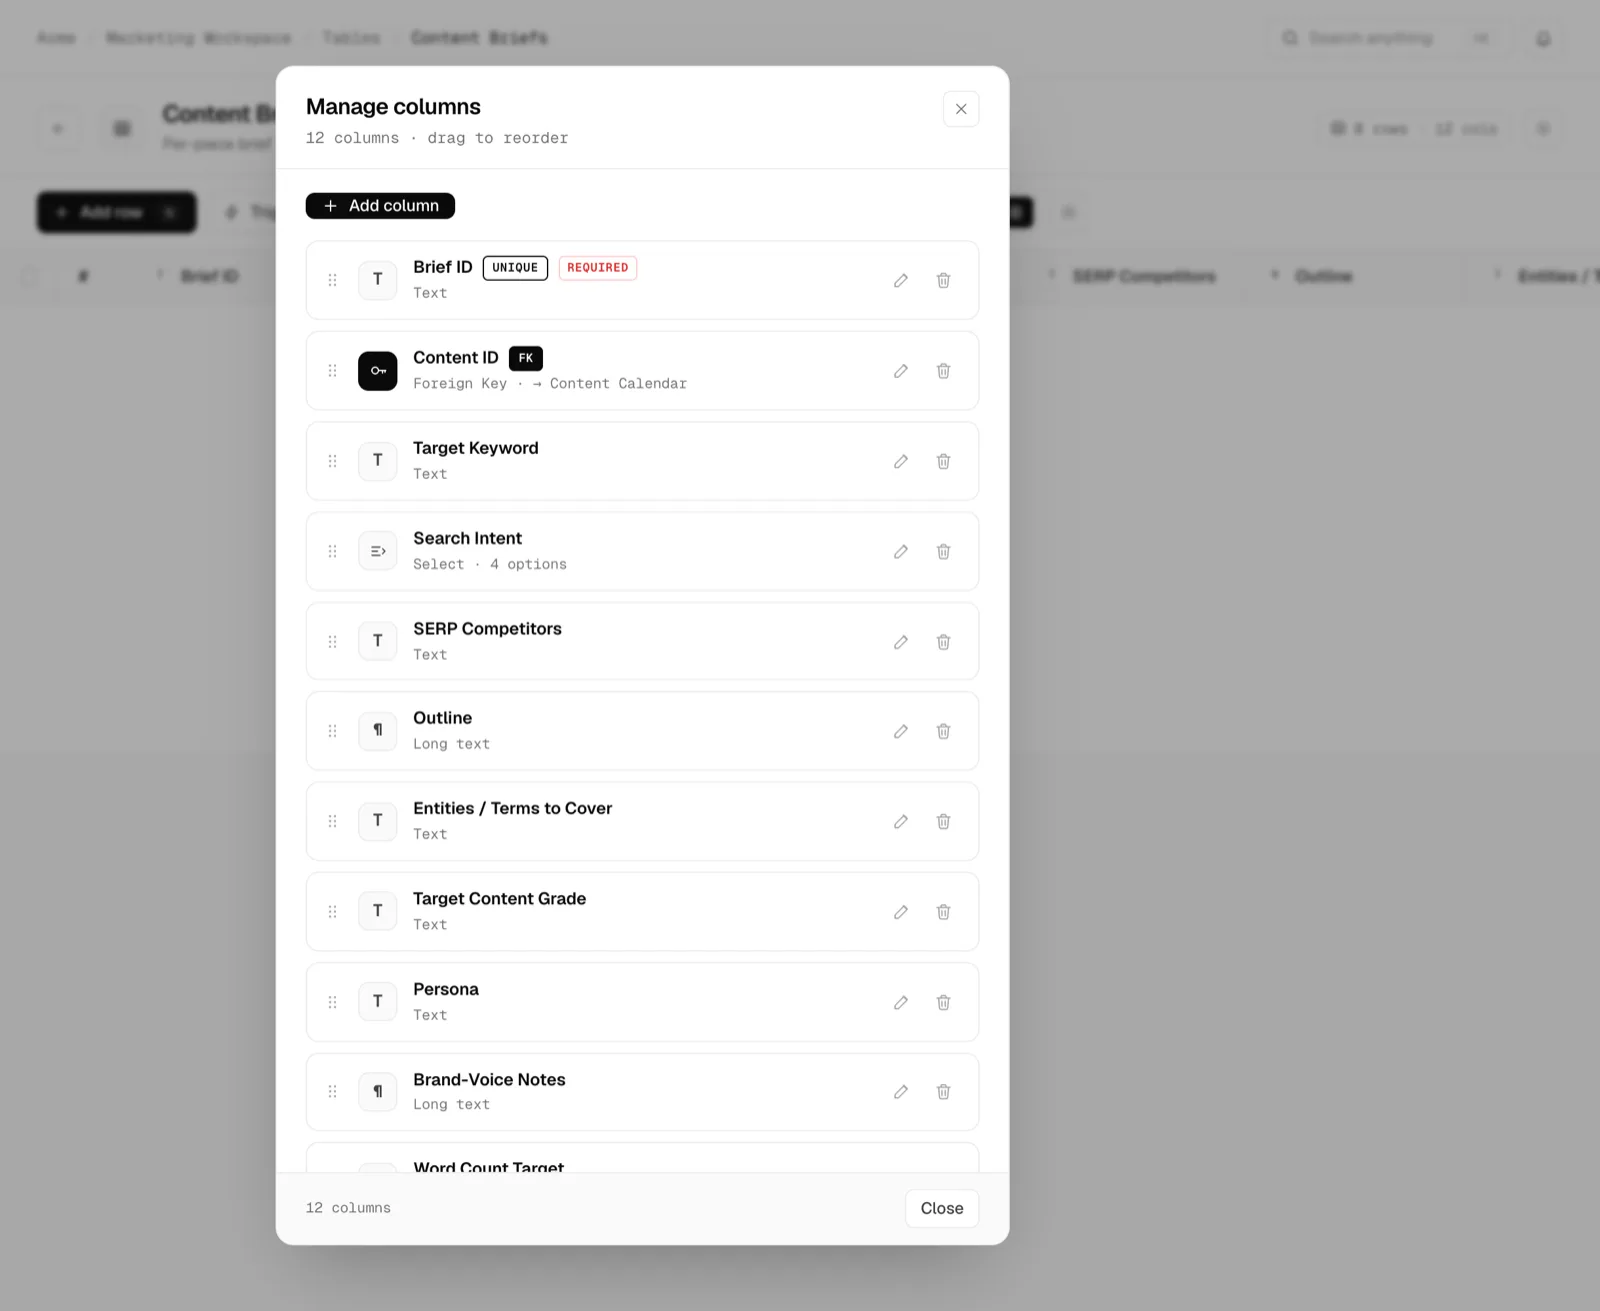
Add Column: name, type, and the per-column settings.click to enlarge Add an AI Enrich column
Add a column and set its type to AI Enrich. Write the Prompt Instructions (what the AI should do with the chosen columns), tap the Source Columns it should read, pick an LLM Provider & Model, and optionally attach Knowledge Bases it may search. The cell then fills itself when a row is created, and fills again when one of its source columns changes.
To fill existing rows, click the AI column's header to open Run Enrichment. Choose the rows you have ticked, the rows matching your filter, or all rows, and optionally Only empty cells, then click Run Now. The run happens in the background while you keep working.
Filter, sort and save views
Filter opens Filter rows. Each filter is a column, an operator and a value. Filters combine with AND by default; click switch to OR to change that, thenApply filters. Sort sorts by one column ascending or descending, andAdd sort level adds tie-breakers.
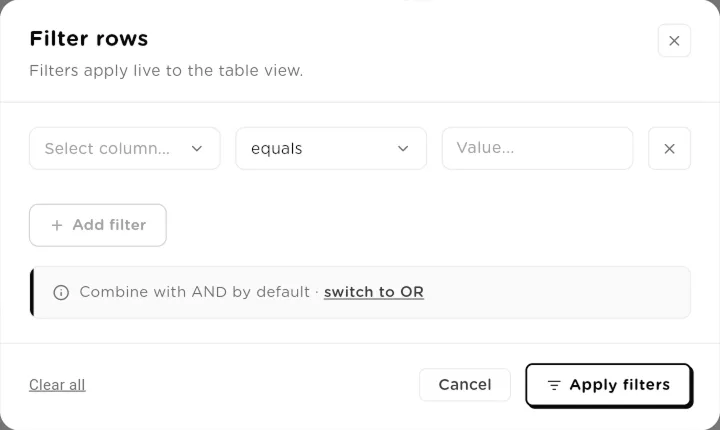
Filter rows: build conditions that apply live to the grid.click to enlarge To keep a way of looking at the table, click New view. Name it, pick a type, and choose Personal view (only you) or Shared view (everyone with table access). A view saves its own filters, sorts, visible columns and color rules. The five types are:
- Grid: the classic spreadsheet layout.
- Kanban: cards in lanes, grouped by a Select or Boolean column. Drag a card to another lane to change its value.
- Calendar: rows on a month grid by a Date column, with an optional end date.
- Gallery: a card grid, with an optional cover image from a File column.
- Grouped list: collapsible sections, one per value of a Select or Boolean column.
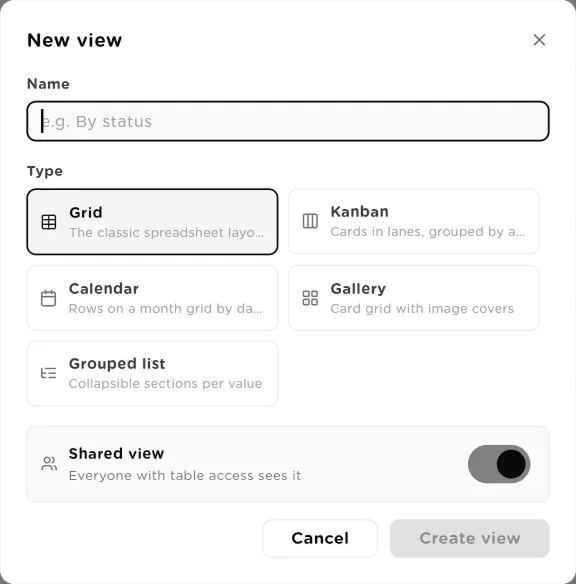
New view: pick a layout and decide who sees it.click to enlarge Views appear as tabs above the toolbar. Each tab's menu has Edit view,Duplicate, Set as default, Lock view andDelete view. A locked shared view can only be changed by the table owner or an organization owner or admin.
Import and export data
Import opens Import data. Pick a source and clickContinue; you map source columns to table columns in the next step, and a summary shows rows imported and rows failed.
- CSV file: upload a .csv from your computer.
- Excel file: upload a .xlsx workbook.
- Google Sheets: connect your Google account, choose a spreadsheet and a tab.
- REST API: generate an API key so your own code can read and write this table. The key is shown once, then hashed.
- Database: connect a Postgres or MySQL database.
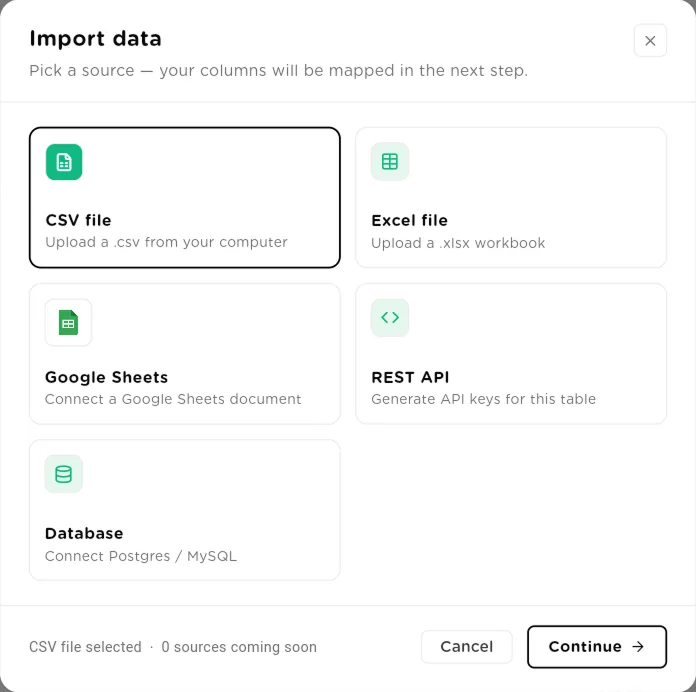
Import data: five sources, then a column mapping step.click to enlarge Export opens Export data. Pick CSV,JSON, Excel or PDF, then choose All rows, Current view (after your filters and sort) or Selected rows, and whether to Include column headers.
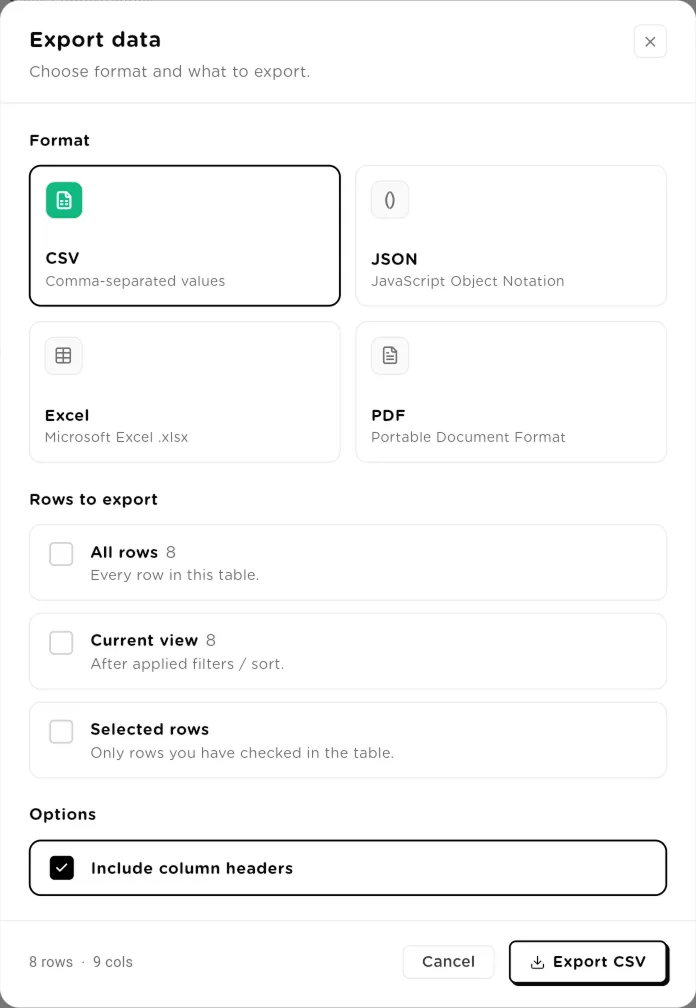
Export data: format, which rows, and headers.click to enlarge Set up table settings and a public form
The gear icon opens Table settings. On General you can rename the table, edit the description and Reference key, turn on Archive this table (it leaves the main list, and existing automations keep running), turn onReference-able from other tables, or Delete table, which cannot be undone.
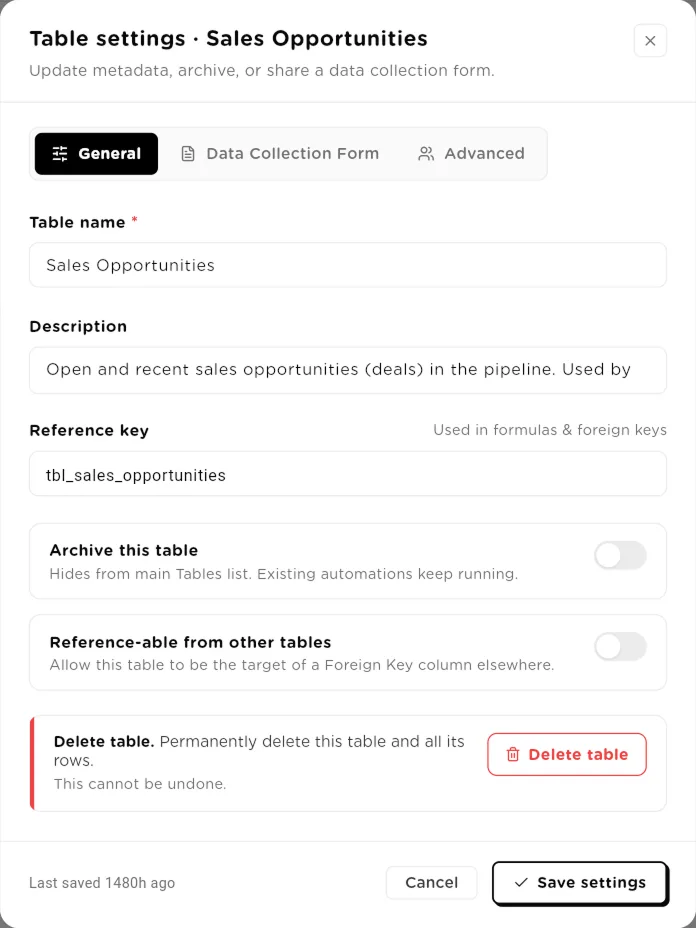
Table settings, General tab.click to enlarge On Data Collection Form, turn on Enable data collection form so people outside your workspace can add rows through a link. Choose Public link (anyone with the link can submit) or Private link (they need a Form password). Set the Form title, Form description and Success message, and tick the Form fields to show. Click Save settings, then copy the shareable form link. Each submission becomes a row, and your row-created triggers run on it.
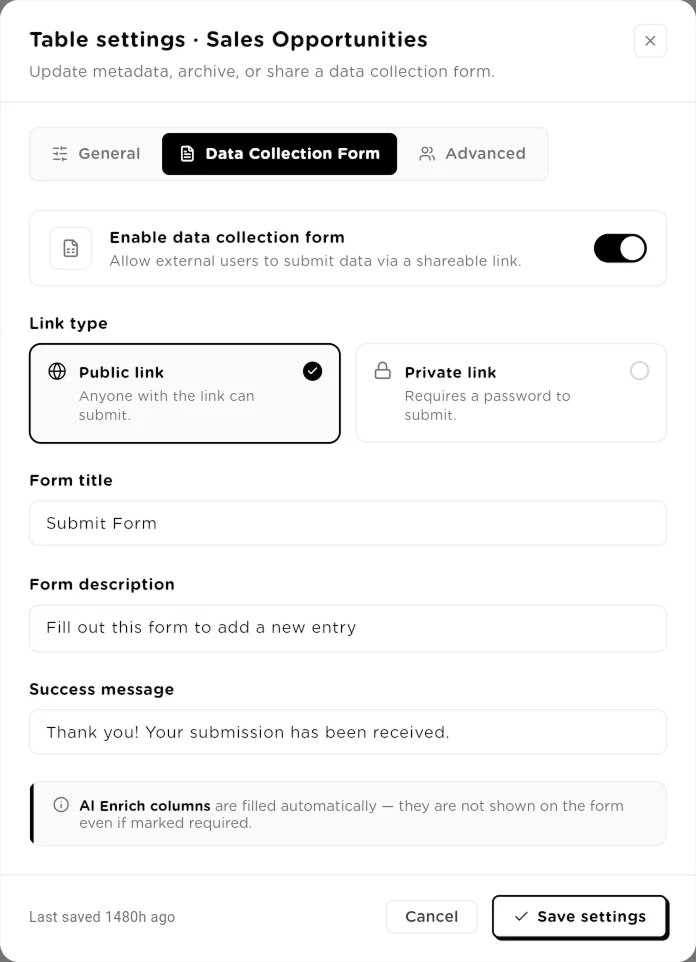
Data Collection Form: a public or password-protected link that adds rows.click to enlarge Share the table with people
On the Advanced tab, turn on Share with Users & Groups. Pick aType (User or Group), an Access Level and the person or group, then click Add. View Only can read rows but not add or edit them.Can Use can view, add and edit rows, but not change the table's structure.
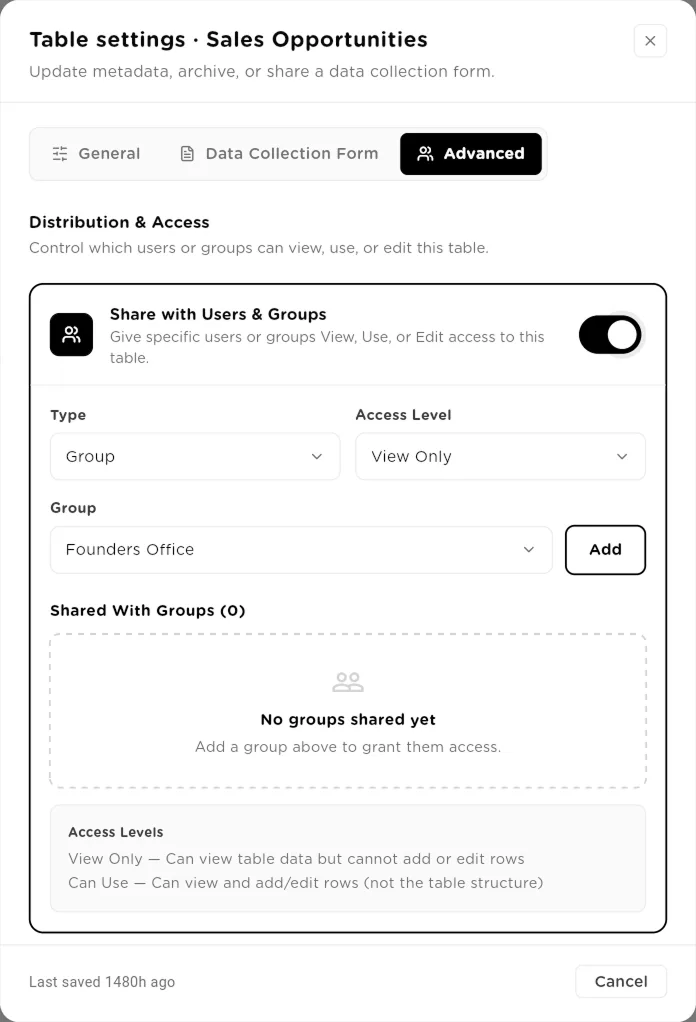
Advanced: give users or groups View Only or Can Use access.click to enlarge Add a trigger
Click Triggers to open Automation triggers, then Add new trigger. When the event happens, the selected agent runs with data from the mapped input columns, and its result is written to the mapped output column.
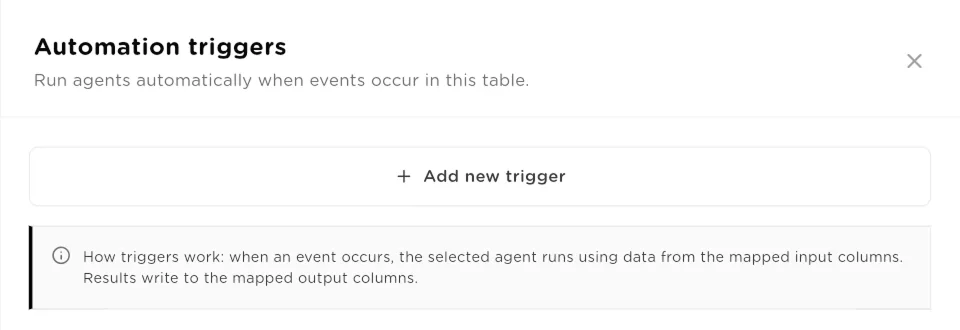
Automation triggers: every trigger on this table, and where you add one.click to enlarge In New trigger, fill in:
- Trigger name: for example "Auto-enrich new leads".
- Event: When a row is created, When field changes (any edit to a row), or On schedule.
- Agent to run: any agent in the workspace.
- Input mapping: for each of the agent's inputs, the column that feeds it. Required inputs are starred and must be mapped.
- Output mapping: the column that receives the agent's final answer.
- Condition Logic: optional for row events, so the trigger only runs when a column equals, does not equal, or contains a value.
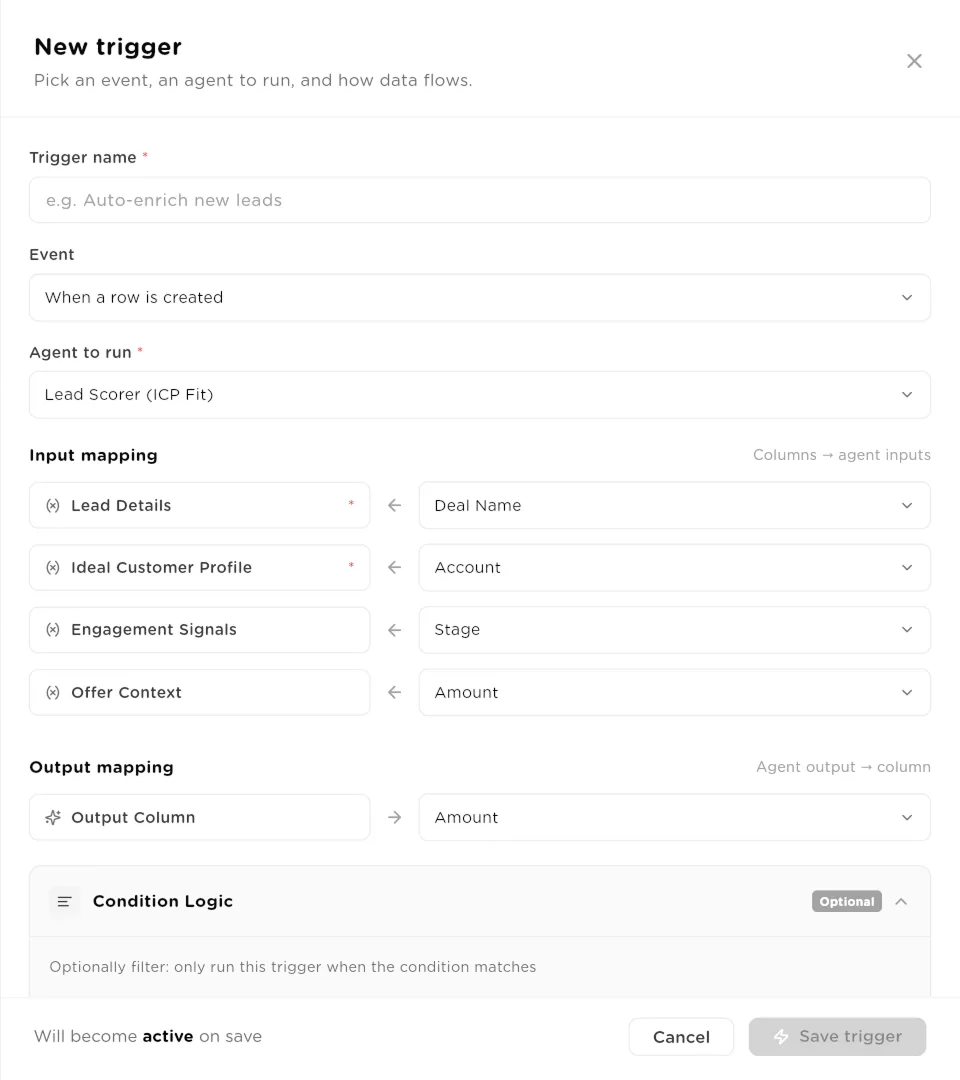
A row-created trigger: columns flow into the agent's inputs and its answer lands in the output column.click to enlarge For On schedule, set a Frequency (Daily, Weekly or Monthly) and aTime. A schedule needs a condition: at each scheduled time the agent runs once for every row that matches it, for example every row whose Status is Pending.
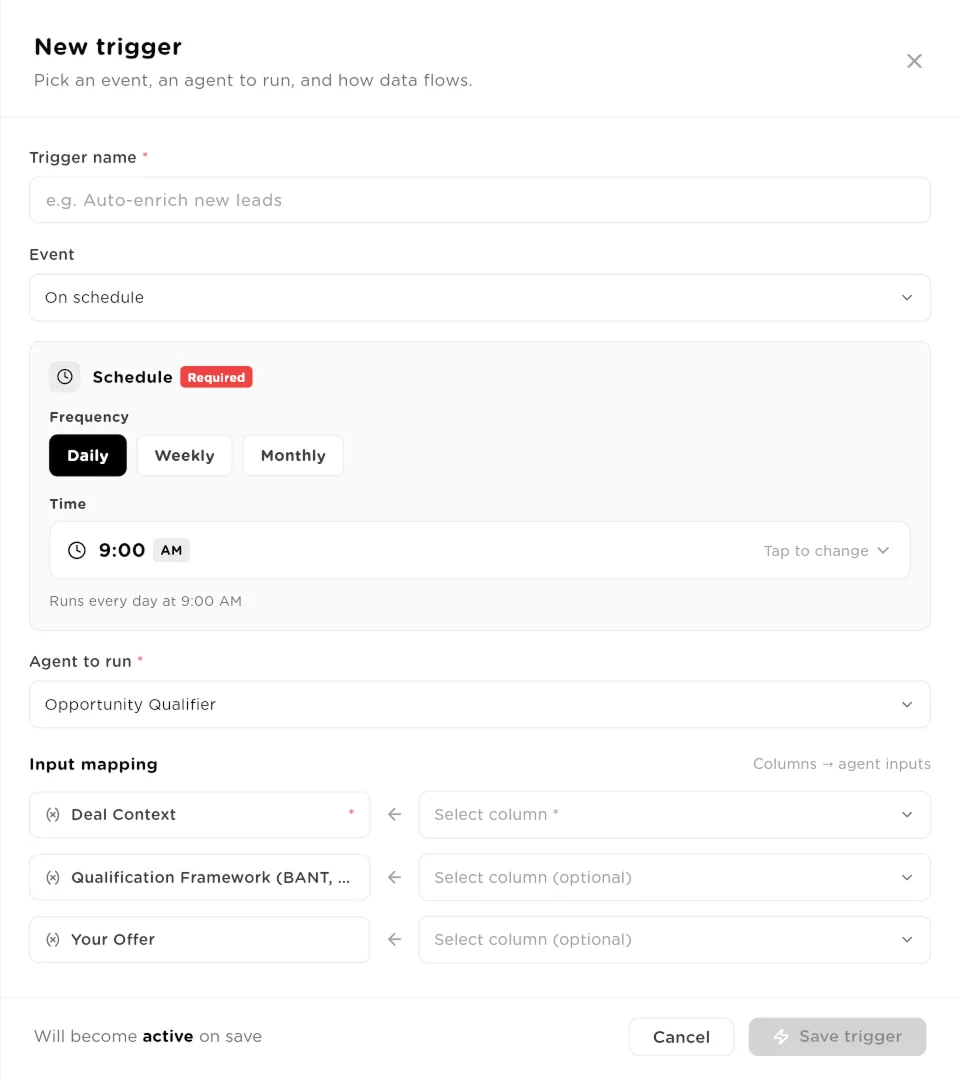
A scheduled trigger: pick a frequency and time, then the rows it should work on.click to enlarge Click Save trigger; it is active straight away. In the triggers list you can switch a trigger off and on, edit it, delete it, open its Run history, or Run now to test it.
Give agents, teams and employees access
An agent cannot touch a table until you grant it. Grant access from the worker, not the table: theTables tab of a Sequential Agent, a team member in anAgentic Team, or the resources of an AI Employee. Each grant has four separate permissions: Read, Create,Update and Delete. Every read and write an agent makes is recorded in its run trace.
For Sequential Agents and team members, a grant can also carry a row filter so the agent only sees rows that match it. Row filters come with solution packs and templates; the Tables tab does not edit them.
Column type reference
Every column has a type. The type decides what a cell accepts and how it is shown.
| Column type | Type | What it does |
|---|---|---|
Text | text | Names, notes and short or long strings. |
Number | number | Counts, amounts and scores. Works with sum, average, min and max in interfaces. |
Date | date | A date picked from a calendar. Powers Calendar views. |
Select | choice | One value from a list of options you define. Powers Kanban lanes, grouped lists and charts. |
Boolean | yes / no | A toggle. Can also group Kanban lanes and grouped lists. |
URL | link | A web link. |
Email | An email address. A people table needs one for interface sign-in matching. | |
File Upload | file | An image (PNG, JPG, GIF, WebP) or a PDF up to 25 MB. An agent with read access can open the file during a run, if its model can read that file type. |
Foreign Key | link to row | Points at a row in another table. Set the Referenced Table and the Lookup Column to display. The other table must be Reference-able. |
User | member | Holds a member of your organization. Solution packs and the API create these columns; the Add Column list does not offer it. |
AI Enrich | AI-filled | Filled by a model from the Source Columns using your Prompt Instructions, chosen model and optional knowledge bases. Not shown on forms. |
Agent Output | AI-filled | Text written by an agent. Use it as the output column of a trigger. |
Column settings
| Setting | Type | What it does |
|---|---|---|
Column name | text | Up to 50 characters. Shown as the header and used by agents. |
Column type | select | One of the types above. |
Unique values | checkbox | No two rows may hold the same value. |
Required field | toggle | A row cannot be saved without this column. |
Visible in table | toggle | Show this column in the grid. On by default. |
Select Options | list | Select columns only. The allowed values. |
Referenced Table / Lookup Column | select | Foreign Key columns only. The table to link to and the column shown for each linked row. |
Prompt Instructions | text | AI Enrich only. What the AI should do with the source columns. |
Source Columns | columns | AI Enrich only. The columns sent to the model as input. |
LLM Provider & Model | select | AI Enrich only. A model your organization has connected. |
Knowledge Bases | optional | AI Enrich only. Knowledge bases the model may search while filling the cell. |
Related
- Knowledge Bases: documents your workers search, next to the facts they keep in tables.
- Interfaces and dashboards: turn tables into dashboards, portals and forms for your team.
- Sequential Agents: the agents that triggers run, and where table access is granted.
- AI Employees: give an employee tables to work in.
- Solution Packs & templates: install tables that come wired to agents and triggers.