Build vs install a pack
When to install a Solution Pack, when to build your own workers, what a pack puts in your workspace, and what to change after it installs.
There are two ways to get working automation into a workspace. You can install a Solution Pack: a pre-wired department with its tables, knowledge, agents, teams, AI employee and triggers already connected to each other. Or you can build each piece yourself in the editors, or with the help of the Assistant.
Neither choice locks you in. A pack installs ordinary agents, tables and employees that you edit like anything you built by hand, and you can add your own workers next to a pack at any time.
Which path fits
Install a pack when:
- A pack in the gallery matches the department or process you want to run, such as sales, support, recruiting, bookkeeping or procurement.
- You want to see a complete working setup quickly and then adjust it, rather than design one from nothing.
- You are new to the product and want an example of how agents, tables, triggers and an AI employee work together.
Build it yourself when:
- The job is one narrow task, such as summarizing notes or scoring a lead. One Sequential Agent is enough.
- Your process does not match any pack, or you already have your own tables and tools that the workers must fit.
- You need a single piece only. Use Import from Library on the Agents, Agentic Teams or AI Employees page to copy one template instead of a whole pack.
If you are unsure, ask the Assistant. It reads what your company does, suggests a pack when one fits, and designs a custom set of workers when none does.
How an install works
When you install a pack, the platform first fits it to your organization:
- Model: every agent, team and employee in the pack is set to a model your organization has connected. If no model is connected, the install stops and asks you to connect one first.
- Tools: if the pack uses a tool you have not connected, and you have connected another tool that does the same job (for example a different email or helpdesk tool), the pack is wired to yours. A tool with no connected alternative is left out, and the install tells you which ones were left out so you can connect them later.
- Names: if a table, agent or knowledge base with the same name as one in the pack already exists, the install stops and lists the clashes. A fresh workspace avoids this.
Step by step: install a pack
Open Solution Packs and find a pack
In the left navigation, click Solution Packs. The Browse tab lists every pack you can install. Filter by category with the chips under the tabs, or type inSearch packs. Each card shows a short description, a setup time estimate, the version, the counts of Tables, Agents, Employee and KBs, and a What you'll get list. Official packs are built by the Turtle AI Coworker team; partner and community packs are listed separately. The Installed tab lists what you have already installed.
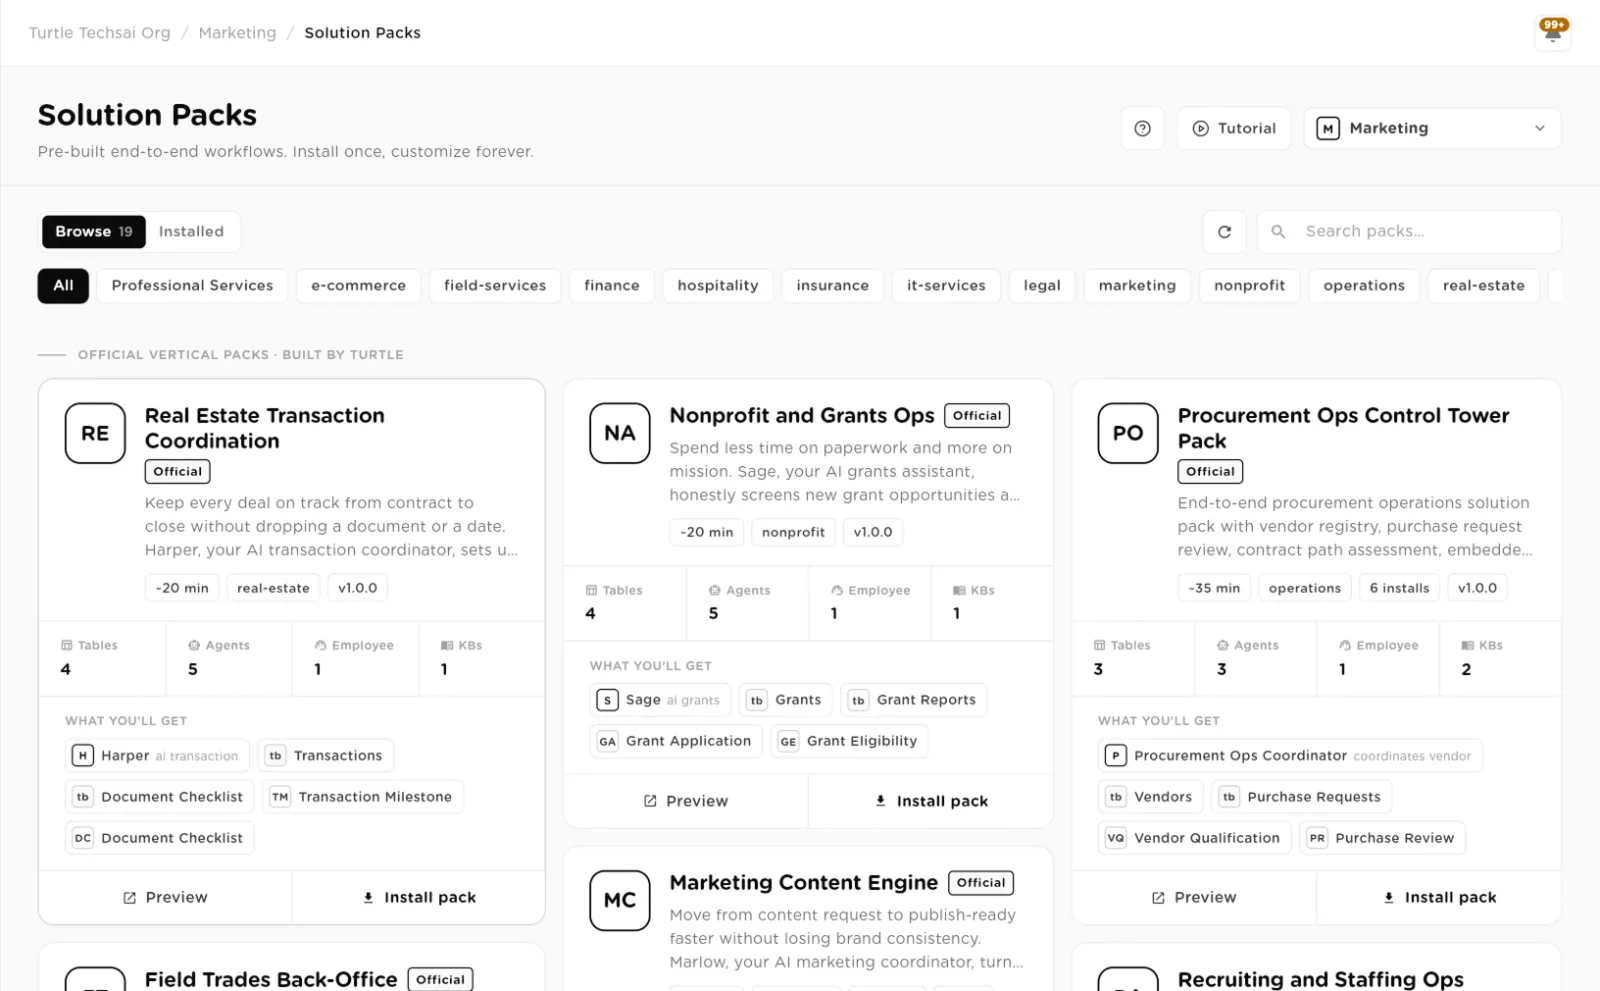
Browse: every card shows what the pack installs, with Preview and Install pack.click to enlarge Preview what it contains
Click Preview. A panel opens with the component count, setup time, installs and version, then What's included: every table, knowledge base, agent, team and AI employee in the order they are installed. Click any component to see its details, such as a table's columns and triggers or an employee's instructions and welcome message, then Back to pack.
Check the model and pick the workspace
At the bottom of the preview, Model tells you which model the pack will run on in this workspace. Under Install into, choose the workspace that should receive the pack. Then click Install pack.
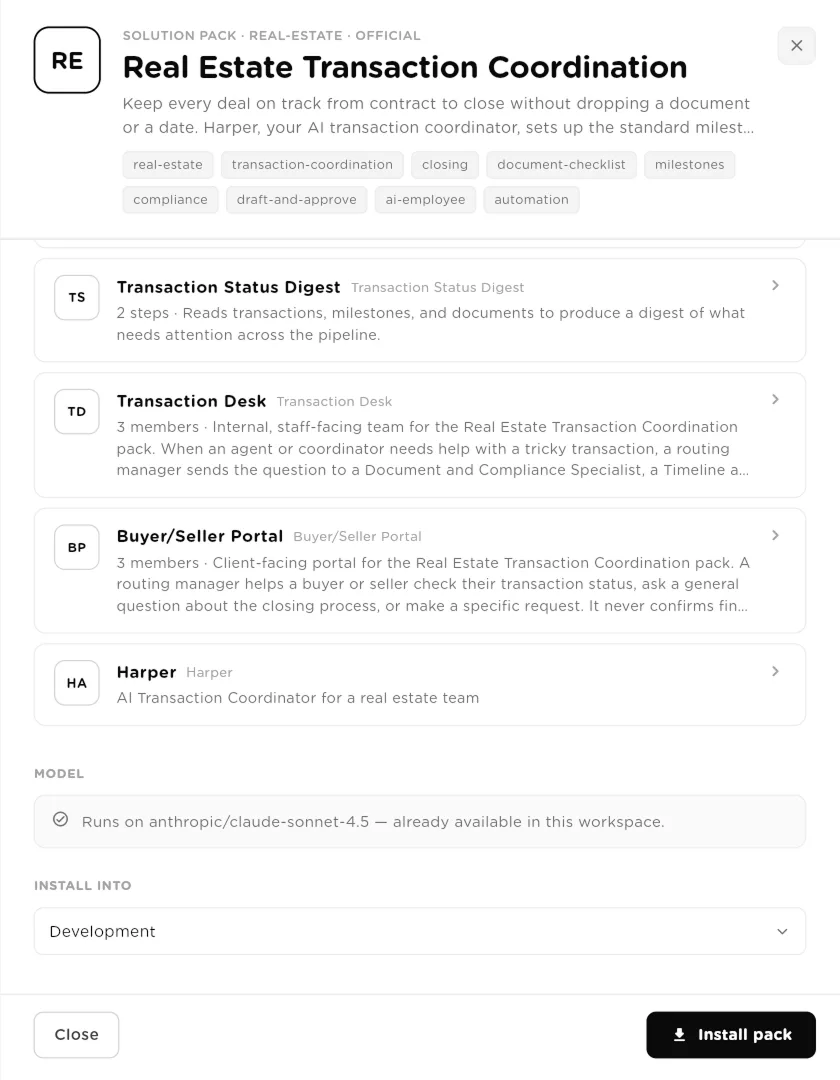
The bottom of the preview: the last components, the model the pack will use, and the workspace it installs into.click to enlarge Read the result
When the install finishes, the new tables, agents, teams and employee appear in their pages in that workspace. If the install could not go ahead, the panel lists each issue, such as a missing model or a name clash, so you can fix it and try again.
What to customize after installing
A pack is a starting point. Go through these before you let it run on its own:
- Replace the knowledge base placeholders. Pack knowledge bases hold starter text such as a sample checklist or policy. Replace it with your own documents so workers follow your rules.
- Connect the missing tools. Connect any tool the install left out on the Tools page, then grant it to the agents and employee that need it.
- Add your data. Pack tables may include a few sample rows. Delete them and import or add your own records.
- Read the instructions. Open each agent and the AI employee and adjust the instructions, tone and rules to how your team works.
- Check the triggers. Open each table's triggers and each agent's Triggers tab. Confirm the schedules and conditions, and switch each one on or off as you want.
- Review governance. Some packs add policy rules, for example that outgoing messages need a person to approve them. Review them on the Compliance page.
- Share the dashboards. If the pack added interfaces, decide who should see them.
What a pack can contain
| Component | Type | What it does |
|---|---|---|
Tables | data | Tables with their columns, views, a few sample rows and the triggers that run agents when rows change or on a schedule. |
Knowledge Bases | data | Reference material the workers search, usually starter text to replace with your own. |
Agents | worker | Sequential agents with their inputs, tasks, tools and table permissions already set. |
Agentic Teams | worker | Chat teams for staff or customers, with a routing manager and member agents. |
AI Employee | worker | A coordinator with a role, instructions, a welcome message and access to the pack's agents, tables and knowledge. |
Interfaces | dashboard | Dashboards and portals built on the pack's tables, in packs that include them. |
Policy rules | governance | Workspace rules, such as holding outgoing messages for approval, in packs that include them. |
Required tools | connection | The integrations the pack expects. Missing ones are left out and reported. |